tipperaryred
-
Posts
596 -
Joined
-
Last visited
-
Days Won
24
Content Type
Profiles
Forums
Events
Everything posted by tipperaryred
-

Imperial Super Commando Gar Saxon animated
tipperaryred replied to beren88's topic in Gar Saxon (Rebels - Animated)
Great to see folks. If we can get more Arena shots, we can compare them side by side. If in reality the Arena and Rebels costumes are virtually identical, it might not make sense to create separate CRLs for them. Either way, we'll definitely focus on getting the Saxon and Super Commando CRLs put together ASAP. EDIT: scrap that, I can already see some slight differences in the Arena Saxon Vs the Rebels one, so we'll need a CRL for each. The vast majority of the costume is the same though, so the work can still benefit both at the same time. -
Imperial Super Commando Gar Saxon animated
tipperaryred replied to beren88's topic in Gar Saxon (Rebels - Animated)
We can look at all the references side by side. If there's no real difference other than colour schemes, it will certainly speed up getting all three CRLs done at once. Isn't there also a regular Super Commando in Arena too? -
Imperial Super Commando Gar Saxon animated
tipperaryred replied to beren88's topic in Gar Saxon (Rebels - Animated)
Sorry, I meant whoever gets a chance to do it first 🙂 We like to keep our new CRL development 100% open with input from all. Especially the folks actually doing the building! You can fire away with whatever you want in your WIP thread, even if you go beyond what we have in the CRL thread. It will just be the final CRL text that we need a wider agreement on before it eventually goes live. -
Purge Trooper (Phase II) - Kenobi - Discussion
tipperaryred replied to nanotek's topic in Purge Trooper Phase II (Kenobi)
Interesting, it looks like Hot Toys added in that silver greeble on the nose that was missing in their early promotional images? -
100% agreed. Too many CRLs get overly specific about things that will never be seen. If you add that into your original text, I think we have what we need for the under suit 👌
-
Imperial Super Commando Gar Saxon animated
tipperaryred replied to beren88's topic in Gar Saxon (Rebels - Animated)
Brilliant work, that should give us everything we need. We'll start by picking out a good shot of the helmet from all angles, and then make sure that the helmet text perfectly matches what we can see. -
Sorry yes, the yellow just meant we'd start with the helmet. I had time to create the thread, but not to put some draft text for the helmet up yet! I'll hopefully get a chance to do that tomorrow, but in the meantime feel free to continue in your WIP thread!
-
Imperial Super Commando Gar Saxon animated
tipperaryred replied to beren88's topic in Gar Saxon (Rebels - Animated)
I've now created a pinned CRL discussion for each costume, where we can discuss and finalise the text for each item, starting with the helmets. As a starting point, can we establish what (if any) differences there are between the two costumes over than the paint jobs? I haven't got many good shots of the grunt commandos right now, but with the ones I have I am struggling to see any differences other than the paint schemes? It would obviously make life a lot easier if most/all of the armour is identical bar the colour scheme. -
This will be the main listing and we'll tackle each part piece by piece (green is done, yellow is WIP, and red is not finalized). We'll get Gar Saxon (Rebels) finished first, then address this list by copying and pasting over the finished CRL and then seeing where it differs. EDIT - 10 May 2025 - Gar Saxon CRL is substantially complete and we are now only waiting on the first trooper to complete their build and submit photos. In the meantime, I shall copy and paste the finalised Saxon text below. We can then tackle each line at a time to see where the grunt ISC differs. As always, green text is new, orange text is changed, red text is removed. Helmet Flight Suit Chest Armor and Shoulder Pauldrons Shoulder Straps Abdominal Armor Jet Pack Forearm Armor Gloves Hand Plates Belt Codpiece Thigh Armor Knee and Shin Armor Boots Imperial Super Commando Blaster Carbine --------------------------------------------------------------- Description: Imperial Super Commando Prefix: TX Detachment: Spec Ops Detachment Context: Star Wars Rebels Mandalorian warriors loyal to the Empire, Imperial Super Commandos were deadly and efficient enforcers. Led by Gar Saxon, the Imperial Super Commandos’ armor was a distinctive and streamlined white, and their masterful combat abilities were eclipsed only by their ruthlessness. Under orders of the Empire, they destroyed the Protectors of Concord Dawn with no mercy, and sought to do the same to their missing leader Fenn Rau and any rebel opposition. Special Notes: The armor parts are a white or off-white, or as specified in each part description, and made from one of these (or similar) types of materials: Fiberglass ABS (Acrylonitrile Butadiene Styrene) HIPS (High Impact Polystyrene) PLA, ABS, PETG (3D Printing) Polyurethane Rubber 3D Printed parts are permitted but all print lines and other artifacts must be removed. Blasters are not required for legion membership per our weapons policy. Where this CRL refers to a "detail indent", these details may present as either a recessed detail sculpted into the parts and then painted black, or can simply be painted onto a flat surface in black to create the same visual effect. Helmet Imperial Mandalorian Super Commando style helmet, matching visual references from Star Wars Rebel animated series. Helmet should be painted and weathered to match references. Weathering/chipping of the red paint should match the light grey paint used elsewhere on the helmet. Helmet dome and face plate to be painted red as per references. Rear plate, raised rear panel detailing, the upper cheek plates, left ear plate and teeth must be painted light grey as per references. Lower cheek plates, raised rear panel, must be painted white (or a lighter shade of grey), as per references. Additional detailing on rear plate must be painted white. Ear caps and antennae may be painted light grey or a weathered white. All recessed panel lines are black or dark grey. There is an inverted white outlined triangle in the center of the forehead. This should be painted. A weathered decal may be acceptable if achieving the look of having been painted. Both visor pieces are black, and obscure the wearer's face. The lower visor tapers in slightly to its narrowest point at the bottom. Left ear cap is oval, with a raised circular detail at the top, and a slightly tapered antenna with a circular profile. Right ear cap is angled at the top, with a narrower half oval at the base. There is an angled recessed panel line in the bottom right corner of the cap. The cap has a raised circular detail at the top, and two antennae. The rear antenna matches that on the left side, while the front antenna is significantly taller. Twin recessed panel lines (1 & 2) run around the upper visor, angle up over the ear pieces, and join together in horizontal lines across the back of the helmet. A third panel line (3) runs parallel and just above the upper of these two lines (2), joined to this same upper panel line at both ends, and running horizontally across the central portion of the rear of the helmet. The distance between 2 and 3 is approximately half the distance between lines 1 and 2 at the rear of the helmet. Additional panel lines vertically bisect each ear plate, and run around their edges. Rear bottom lip of the helmet has a raised, curved rim, running between the rear edges of each ear plate. Back plate has a raised rectangular panel with details to match references. These are long vertical oblongs on both sides, a circle in the lower center, and a double striped rectangle within another rectangle in the upper center. Details are outlined by recessed panel lines. The back plate is light grey, but has white detailing painted on either side of the raised rectangular panel. There are six teeth, three on each side of the lower visor, with the recesses painted black or dark grey. Flight Suit Must be a two-piece garment, and must be properly fitted and shaped to the wearer. If going with British military style pullover, material would commonly be acrylic. Must not have any visible pockets, pouches or zippers. The upper body part of the flight suit is maroon-colored, in a heavily ribbed style similar to British military pullovers. The neck area of the flight suit goes halfway up the neck of the wearer to conceal skin when the helmet is worn. On each shoulder of the flight suit there is a white Imperial Cog emblem on a black background. The cog is 3” (76.2mm) or 3.5” (88.9mm) diameter and 1” (25.4mm) from the shoulder seam. The cog may be embroidered or vinyl. The lower body part of the flight suit is white or light grey. It should appear slightly darker than the white armor. The lower part may be a separate trouser garment, or part of a one piece flight suit. If a one piece jump suit, the upper body jumper should be worn over the garment so as to obscure any view of the flight suit underneath. The lower body part of the flight suit has the following seams: On the outside of each leg there is a seam which runs the entire length of the suit showing from the top of the shins up under the belt. On the front just above the top of the knee armor which wraps around to the back of the flight suit and appears on the back. On the back from the knee seam there is a seam that runs up the back of each thigh and then curves to the outside of the back under the belt. There is a horizontal seam that runs across the butt connecting both of these seams running up the back of each thigh. On the back there is central seam which runs from under the belt to the crotch of the wearer. Chest Armor and Shoulder Pauldrons Armor is segmented with an Upper Chest Armor overlapping the Lower Chest Armor. These may be permanently fixed together, or fitted separately so long as they as attached firmly together when worn. The Upper Chest Armor also overlaps the Shoulder Pauldrons, which likewise can be permanently fixed, or able to be attached securely when worn. Armor is painted white and red to match reference images, and to match the white and red paint used on the helmet and other hard armor pieces. The front of the Upper Chest Armor has a semi-circular notch cut into the center of the lower front edge. The red painted inverted triangle at the front covers the entirety of the shoulders and the Shoulder Pauldrons. The lower sides run from the front edge of each Shoulder Pauldron to meet at the semi-circular notch at the bottom of the Upper Chest Armor. A circular white detail indent with black outline is present halfway along the lower left (as worn) side of the front triangle. A linear detail indent borders the lower edge of the upper chest plate. The red painted inverted triangle at the rear likewise covers the entirety of the shoulders and the Shoulder Pauldrons. However the lower sides differ from the front as they run from the lower edge of the Pauldrons down to the bottom center of the Lower Chest Plate, not the Upper Chest Plate. Note that much of this will be hidden by the Jetpack. The Lower Chest Armor has symmetrical, twin semi-circular notches cut into the lower front edge. The notches line up with the details featured in the Abdominal Armor. The lower edge of the Lower Chest Armor curves down to the sides from a arched center point at the front center. The rear edge therefore sits much lower than the front, and covers almost the entirety of the Abdominal Armor underneath. A linear detail indent borders the lower edge of the lower chest plate. The two layers of the Chest Armor may be joined in a clamshell front and back design, so long as the connection point is relatively seamless. Shoulder Straps White painted hard armor "straps" sit on both shoulders connecting the front and back halves of the Upper Chest Armor. The material and white paint of the straps should match those of the Chest Armor. Abdominal Armor Made from the same hard material as the rest of the armor, and painted white to match all other relevant armor. May be constructed in a clamshell front and back design, so long as the connection point is relatively seamless. Is worn so that it is overlapped by the Lower Chest Armor above it. The Lower Chest Armor curves down at the sides so that almost completely overlaps the Abdominal Armor at the rear. Two symmetrical detail indents are present at the front, to match reference pictures. The outer edges of each design must be aligned with the cut outs at the bottom edge of the Lower Chest Armor. The inner details are rectangular, with a semi-circular top edge that sits just below the semi-circular cut outs on the Lower Chest Plate. The inner details are split into four segments, divided to match reference images. Jetpack The same basic design as the Sabine Wren / Imperial Super Commando animated jetpack, but matching visual references for paint and markings. Central thruster is painted a dark gunmetal. Side thrusters are painted red and white to match other armor parts, with designs to match visual references. Red areas show medium to heavy weathering to match visual references, white in color to match other armor parts. There is a curved bridge over the central thruster that is yellow/gold in color with 3 white designs to match visual references. The height of the bridge piece is approximately 1/5 the length of the central thruster, and the top of the bridge piece is located approximately this same distance from the top of the thruster. Forearm Armor Armor is painted red to match the other armor parts. Moderate to heavy weathering in white is present on both forearms, with a horizontal scratch particularly visible on the left forearm. Each forearm has two raised rectangular compad buttons located just above the wrist. The button closest to the wrist is red. The upper button is orange. Armor is seamless on the outer edge. Due to the shape of the armor, a butted seam is acceptable on the inside if required. Elbow plate is integrated into the forearm. Left forearm has a spiraling white band painted above the wrist. This starts behind the red button, follows the contours of the armor around the back, and terminates just above and to the side of the orange button. Right forearm has an angled white band painted between the forearm plate and the integrated elbow plate, matching reference images. This band continues to the rear of the forearm plate, flush with the top edge. OPTIONAL Level two certification (if applicable) The rear lower portion of each forearm tapers slightly inwards towards the wrist, starting approximately at the same level as the gap between the two compad buttons. Gloves Gloves are made from a textured fabric, closely matching the maroon of the upper flight suit. OPTIONAL Level two certification (if applicable): Gloves should be made from the same material as the upper flight suit. Hand Plates Hand plates should be red in color, matching other armor parts. Hand plates should extend up the wrist and the gauntlets. Hand plates may be constructed from a flexible material to facilitate movement. A white triangular design should be painted on both hand plates, matching visual references. OPTIONAL Level two certification (if applicable): Hand plates shall run underneath the gauntlets. Belt Belt is of the same material and color as other white armor parts. Comprised of approximately 16 vertically chained rectangles. Two of these rectangles meet with an interlocking design at the front center. A white pouch sits on the belt at each hips, matching visual references. The belt may of the same material as the belt, or a white leather-like material. Codpiece Codpiece is of the same material and color as other white armor parts. Codpiece attaches under the belt. There is a 3 sided detail imprint on the front of the codpiece. Thigh Armor The thigh armor is of the same material and color as other white armor parts. The center of each piece is rectangular in shape, with an inset rectangular detail indent. There are angled "wings" curving from both sides of the armor, each reaching the center front and center back of each thigh. These "wings" are offset from center, sitting closer to the top than the bottom. The thigh armor must be attached with an "invisible" method. There should be no visible strapping. Knee and Shin Armor The knee and shin armor is painted to match red armor pieces, with white weathering consistent with visual references. The armor may be constructed from flexible material to allow a greater range of movement. The knee plate may be permanently fixed to the shin armor, or hinged to allow greater movement. The upper curve of the knee plate should sit just below the seam of the undersuit's thigh panels. The knee armor may be constructed of a flexible material to allow a greater range of movement. The armor runs from the top of each calf, and overlaps the sides of each boot. The toes, bridge and heel of each boot remains uncovered, consistent with visual references. There is a semi-circular notch in the top center of each boots. The knee armor is aligned with this notch. Boots Boots are red, as close as possible a match to the red armor. There should be no decorative stitching. There should be little to no heel on the boots. OPTIONAL Level two certification (if applicable): Boots shall have a tan colored sole. Optional Accessories Items below are optional costume accessories. These items are not required for approval, but if present appear as described below. If adding in an accessory after initial approval, the item still needs to be submitted to local GML for approval before use. Imperial Super Commando Blaster Carbine Unique blaster carbine accurate to screen references. The receiver and scope are painted in three tones of grey, matching visual references. Dark grey / black telescoping stock with an end plate and circular recessed detailing (may also be painted) on either side. May be functional. Dark grey barrel protrudes from the end of the receiver, with a light grey cuboid shape protruding underneath. Symmetrical detail indents (may be painted) on each side of the receiver: 3 rectangular shapes 2 circular shapes Symmetrical detail indents (may be painted) on the dark grey / black grip. Rifle scope scaled correctly to the blaster. Dark grey dual front and rear sights on either side of the scope, with a dark grey circular greeblie sitting just behind the front sights. OPTIONAL Level two certification (if applicable): Telescoping stock shall be functional.
-
This will be the main listing and we'll tackle each part piece by piece (green is done, yellow is WIP, and red is not finalized): Helmet Flight Suit Chest Armor and Shoulder Pauldrons Shoulder Straps Abdominal Armor Jet Pack Gauntlets Gloves Hand Plates Belt Codpiece Thigh Armor Knee Armor and Shin Armor Boots Imperial Super Commando Blaster Carbine --------------------------------------------------------------- Description: Imperial Super Commando - Gar Saxon Prefix: TX Detachment: Spec Ops Detachment Context: Star Wars Rebels CHARACTER DESCRIPTION HERE Special Notes: The armor parts are a [color description here], or as specified in each part description, and made from one of these (or similar) types of materials: Fiberglass ABS (Acrylonitrile Butadiene Styrene) HIPS (High Impact Polystyrene) PLA, ABS, PETG (3D Printing) Polyurethane Rubber 3D Printed parts are permitted but all print lines and other artifacts must be removed. Blasters are not required for legion membership per our weapons policy. Where this CRL refers to a "detail indent", these details may present as either a recessed detail sculpted into the parts and then painted black, or can simply be painted onto a flat surface in black to create the same visual effect. Helmet Imperial Mandalorian Super Commando style helmet, matching visual references from Star Wars Rebel animated series. Helmet should be painted and weathered to match references. Weathering/chipping of the red paint should match the light grey paint used elsewhere on the helmet. Helmet dome and face plate to be painted red as per references. Rear plate, raised rear panel detailing, the upper cheek plates, left ear plate and teeth must be painted light grey as per references. Lower cheek plates, raised rear panel, must be painted white (or a lighter shade of grey), as per references. Additional detailing on rear plate must be painted white. Ear caps and antennae may be painted light grey or a weathered white. All recessed panel lines are black or dark grey. There is an inverted white outlined triangle in the center of the forehead. This should be painted. A weathered decal may be acceptable if achieving the look of having been painted. Both visor pieces are black, and obscure the wearer's face. The lower visor tapers in slightly to its narrowest point at the bottom. Left ear cap is oval, with a raised circular detail at the top, and a slightly tapered antenna with a circular profile. Right ear cap is angled at the top, with a narrower half oval at the base. There is an angled recessed panel line in the bottom right corner of the cap. The cap has a raised circular detail at the top, and two antennae. The rear antenna matches that on the left side, while the front antenna is significantly taller. Twin recessed panel lines (1 & 2) run around the upper visor, angle up over the ear pieces, and join together in horizontal lines across the back of the helmet. A third panel line (3) runs parallel and just above the upper of these two lines (2), joined to this same upper panel line at both ends, and running horizontally across the central portion of the rear of the helmet. The distance between 2 and 3 is approximately half the distance between lines 1 and 2 at the rear of the helmet. Additional panel lines vertically bisect each ear plate, and run around their edges. Rear bottom lip of the helmet has a raised, curved rim, running between the rear edges of each ear plate. Back plate has a raised rectangular panel with details to match references. These are long vertical oblongs on both sides, a circle in the lower center, and a double striped rectangle within another rectangle in the upper center. Details are outlined by recessed panel lines. The back plate is light grey, but has white detailing painted on either side of the raised rectangular panel. There are six teeth, three on each side of the lower visor, with the recesses painted black or dark grey. Flight Suit Must be a two-piece garment, and must be properly fitted and shaped to the wearer. If going with British military style pullover, material would commonly be acrylic. Must not have any visible pockets, pouches or zippers. The upper body part of the flight suit is maroon-colored, in a heavily ribbed style similar to British military pullovers. The neck area of the flight suit goes halfway up the neck of the wearer to conceal skin when the helmet is worn. On each shoulder of the flight suit there is a white Imperial Cog emblem on a black background. The cog is 3” (76.2mm) or 3.5” (88.9mm) diameter and 1” (25.4mm) from the shoulder seam. The cog may be embroidered or vinyl. The lower body part of the flight suit is white or light grey. It should appear slightly darker than the white armor. The lower part may be a separate trouser garment, or part of a one piece flight suit. If a one piece jump suit, the upper body jumper should be worn over the garment so as to obscure any view of the flight suit underneath. The lower body part of the flight suit has the following seams: On the outside of each leg there is a double-lapped seam which runs the entire length of the suit showing from the top of the shins up under the belt. On the front just above the top of the knee armor which wraps around to the back of the flight suit and appears on the back. On the back from the knee seam there is a seam that runs up the back of each thigh and then curves to the outside of the back under the belt. There is a horizontal seam that runs across the butt connecting both of these seams running up the back of each thigh. On the back there is central double-lapped seam which runs from under the belt to the crotch of the wearer. Chest Armor and Shoulder Pauldrons Armor is segmented with an Upper Chest Armor overlapping the Lower Chest Armor. These may be permanently fixed together, or fitted separately so long as they as attached firmly together when worn. The Upper Chest Armor also overlaps the Shoulder Pauldrons, which likewise can be permanently fixed, or able to be attached securely when worn. Armor is painted white and red to match reference images, and to match the white and red paint used on the helmet and other hard armor pieces. The front of the Upper Chest Armor has a semi-circular notch cut into the center of the lower front edge. The red painted inverted triangle at the front covers the entirety of the shoulders and the Shoulder Pauldrons. The lower sides run from the front edge of each Shoulder Pauldron to meet at the semi-circular notch at the bottom of the Upper Chest Armor. A circular white detail indent with black outline is present halfway along the lower left (as worn) side of the front triangle. A linear detail indent borders the lower edge of the upper chest plate. The red painted inverted triangle at the rear likewise covers the entirety of the shoulders and the Shoulder Pauldrons. However the lower sides differ from the front as they run from the lower edge of the Pauldrons down to the bottom center of the Lower Chest Plate, not the Upper Chest Plate. Note that much of this will be hidden by the Jetpack. The Lower Chest Armor has symmetrical, twin semi-circular notches cut into the lower front edge. The notches line up with the details featured in the Abdominal Armor. The lower edge of the Lower Chest Armor curves down to the sides from a arched center point at the front center. The rear edge therefore sits much lower than the front, and covers almost the entirety of the Abdominal Armor underneath. A linear detail indent borders the lower edge of the lower chest plate. The two layers of the Chest Armor may be joined in a clamshell front and back design, so long as the connection point is relatively seamless. Shoulder Straps White painted hard armor "straps" sit on both shoulders connecting the front and back halves of the Upper Chest Armor. The material and white paint of the straps should match those of the Chest Armor. Abdominal Armor Made from the same hard material as the rest of the armor, and painted white to match all other relevant armor. May be constructed in a clamshell front and back design, so long as the connection point is relatively seamless. Is worn so that it is overlapped by the Lower Chest Armor above it. The Lower Chest Armor curves down at the sides so that almost completely overlaps the Abdominal Armor at the rear. Two symmetrical detail indents are present at the front, to match reference pictures. The outer edges of each design must be aligned with the cut outs at the bottom edge of the Lower Chest Armor. The inner details are rectangular, with a semi-circular top edge that sits just below the semi-circular cut outs on the Lower Chest Plate. The inner details are split into four segments, divided to match reference images. Jetpack The same basic design as the Sabine Wren / Imperial Super Commando animated jetpack, but matching visual references for paint and markings. Central thruster is painted a dark gunmetal. Side thrusters are painted red and white to match other armor parts, with designs to match visual references. Red areas show medium to heavy weathering to match visual references, white in color to match other armor parts. There is a curved bridge over the central thruster that is yellow/gold in color with 3 white designs to match visual references. The height of the bridge piece is approximately 1/5 the length of the central thruster, and the top of the bridge piece is located approximately this same distance from the top of the thruster. Forearm Armor Armor is painted red to match the other armor parts. Moderate to heavy weathering in white is present on both forearms, with a horizontal scratch particularly visible on the left forearm. Each forearm has two raised rectangular compad buttons located just above the wrist. The button closest to the wrist is red. The upper button is orange. Armor is seamless on the outer edge. Due to the shape of the armor, a butted seam is acceptable on the inside if required. Elbow plate is integrated into the forearm. Left forearm has a spiraling white band painted above the wrist. This starts behind the red button, follows the contours of the armor around the back, and terminates just above and to the side of the orange button. Right forearm has an angled white band painted between the forearm plate and the integrated elbow plate, matching reference images. This band continues to the rear of the forearm plate, flush with the top edge. OPTIONAL Level two certification (if applicable) The rear lower portion of each forearm tapers slightly inwards towards the wrist, starting approximately at the same level as the gap between the two compad buttons. Gloves Gloves are made from a textured fabric, closely matching the maroon of the upper flight suit. OPTIONAL Level two certification (if applicable): Gloves should be made from the same material as the upper flight suit. Hand Plates Hand plates should be red in color, matching other armor parts. Hand plates should extend up the wrist and the gauntlets. Hand plates may be constructed from a flexible material to facilitate movement. A white triangular design should be painted on both hand plates, matching visual references. OPTIONAL Level two certification (if applicable): Hand plates shall run underneath the gauntlets. Belt Belt is of the same material and color as other white armor parts. Comprised of approximately 16 vertically chained rectangles. Two of these rectangles meet with an interlocking design at the front center. A white pouch sits on the belt at each hips, matching visual references. The belt may of the same material as the belt, or a white leather-like material. Codpiece Codpiece is of the same material and color as other white armor parts. Codpiece attaches under the belt. There is a 3 sided detail imprint on the front of the codpiece. Thigh Armor The thigh armor is of the same material and color as other white armor parts. The center of each piece is rectangular in shape, with an inset rectangular detail indent. There are angled "wings" curving from both sides of the armor, each reaching the center front and center back of each thigh. These "wings" are offset from center, sitting closer to the top than the bottom. The thigh armor must be attached with an "invisible" method. There should be no visible strapping. Knee and Shin Armor The knee and shin armor is painted to match red armor pieces, with white weathering consistent with visual references. The armor may be constructed from flexible material to allow a greater range of movement. The knee plate may be permanently fixed to the shin armor, or hinged to allow greater movement. The upper curve of the knee plate should sit just below the seam of the undersuit's thigh panels. The knee armor may be constructed of a flexible material to allow a greater range of movement. The armor runs from the top of each calf, and overlaps the sides of each boot. The toes, bridge and heel of each boot remains uncovered, consistent with visual references. There is a semi-circular notch in the top center of each boots. The knee armor is aligned with this notch. Boots Boots are red, as close as possible a match to the red armor. There should be no decorative stitching. There should be little to no heel on the boots. OPTIONAL Level two certification (if applicable): Boots shall have a tan colored sole. Optional Accessories Items below are optional costume accessories. These items are not required for approval, but if present appear as described below. If adding in an accessory after initial approval, the item still needs to be submitted to local GML for approval before use. Imperial Super Commando Blaster Carbine Unique blaster carbine accurate to screen references. The receiver and scope are painted in three tones of grey, matching visual references. Dark grey / black telescoping stock with an end plate and circular recessed detailing (may also be painted) on either side. May be functional. Dark grey barrel protrudes from the end of the receiver, with a light grey cuboid shape protruding underneath. Symmetrical detail indents (may be painted) on each side of the receiver: 3 rectangular shapes 2 circular shapes Symmetrical detail indents (may be painted) on the dark grey / black grip. Rifle scope scaled correctly to the blaster. Dark grey dual front and rear sights on either side of the scope, with a dark grey circular greeblie sitting just behind the front sights. OPTIONAL Level two certification (if applicable): Telescoping stock shall be functional.
-
I just want to make sure I'm understanding where we're at so far. At this point in the discussion, is it safe to say we can give builder the option to build the Under Suit in one of 4 ways? Shirt with integrated neck seal, trousers, bib. Shirt, separate neck seal, trousers, bib. One piece under suit with integrated neck seal, bib. One piece under suit, separate neck seal, bib. If so, something like this to simplify all of the above? "Under suit - One-piece or two-piece construction with no visible zippers or logos. Neck seal may be integrated into the under suit, or worn over it." Followed by the bib description?
-
Imperial Super Commando Gar Saxon animated
tipperaryred replied to beren88's topic in Gar Saxon (Rebels - Animated)
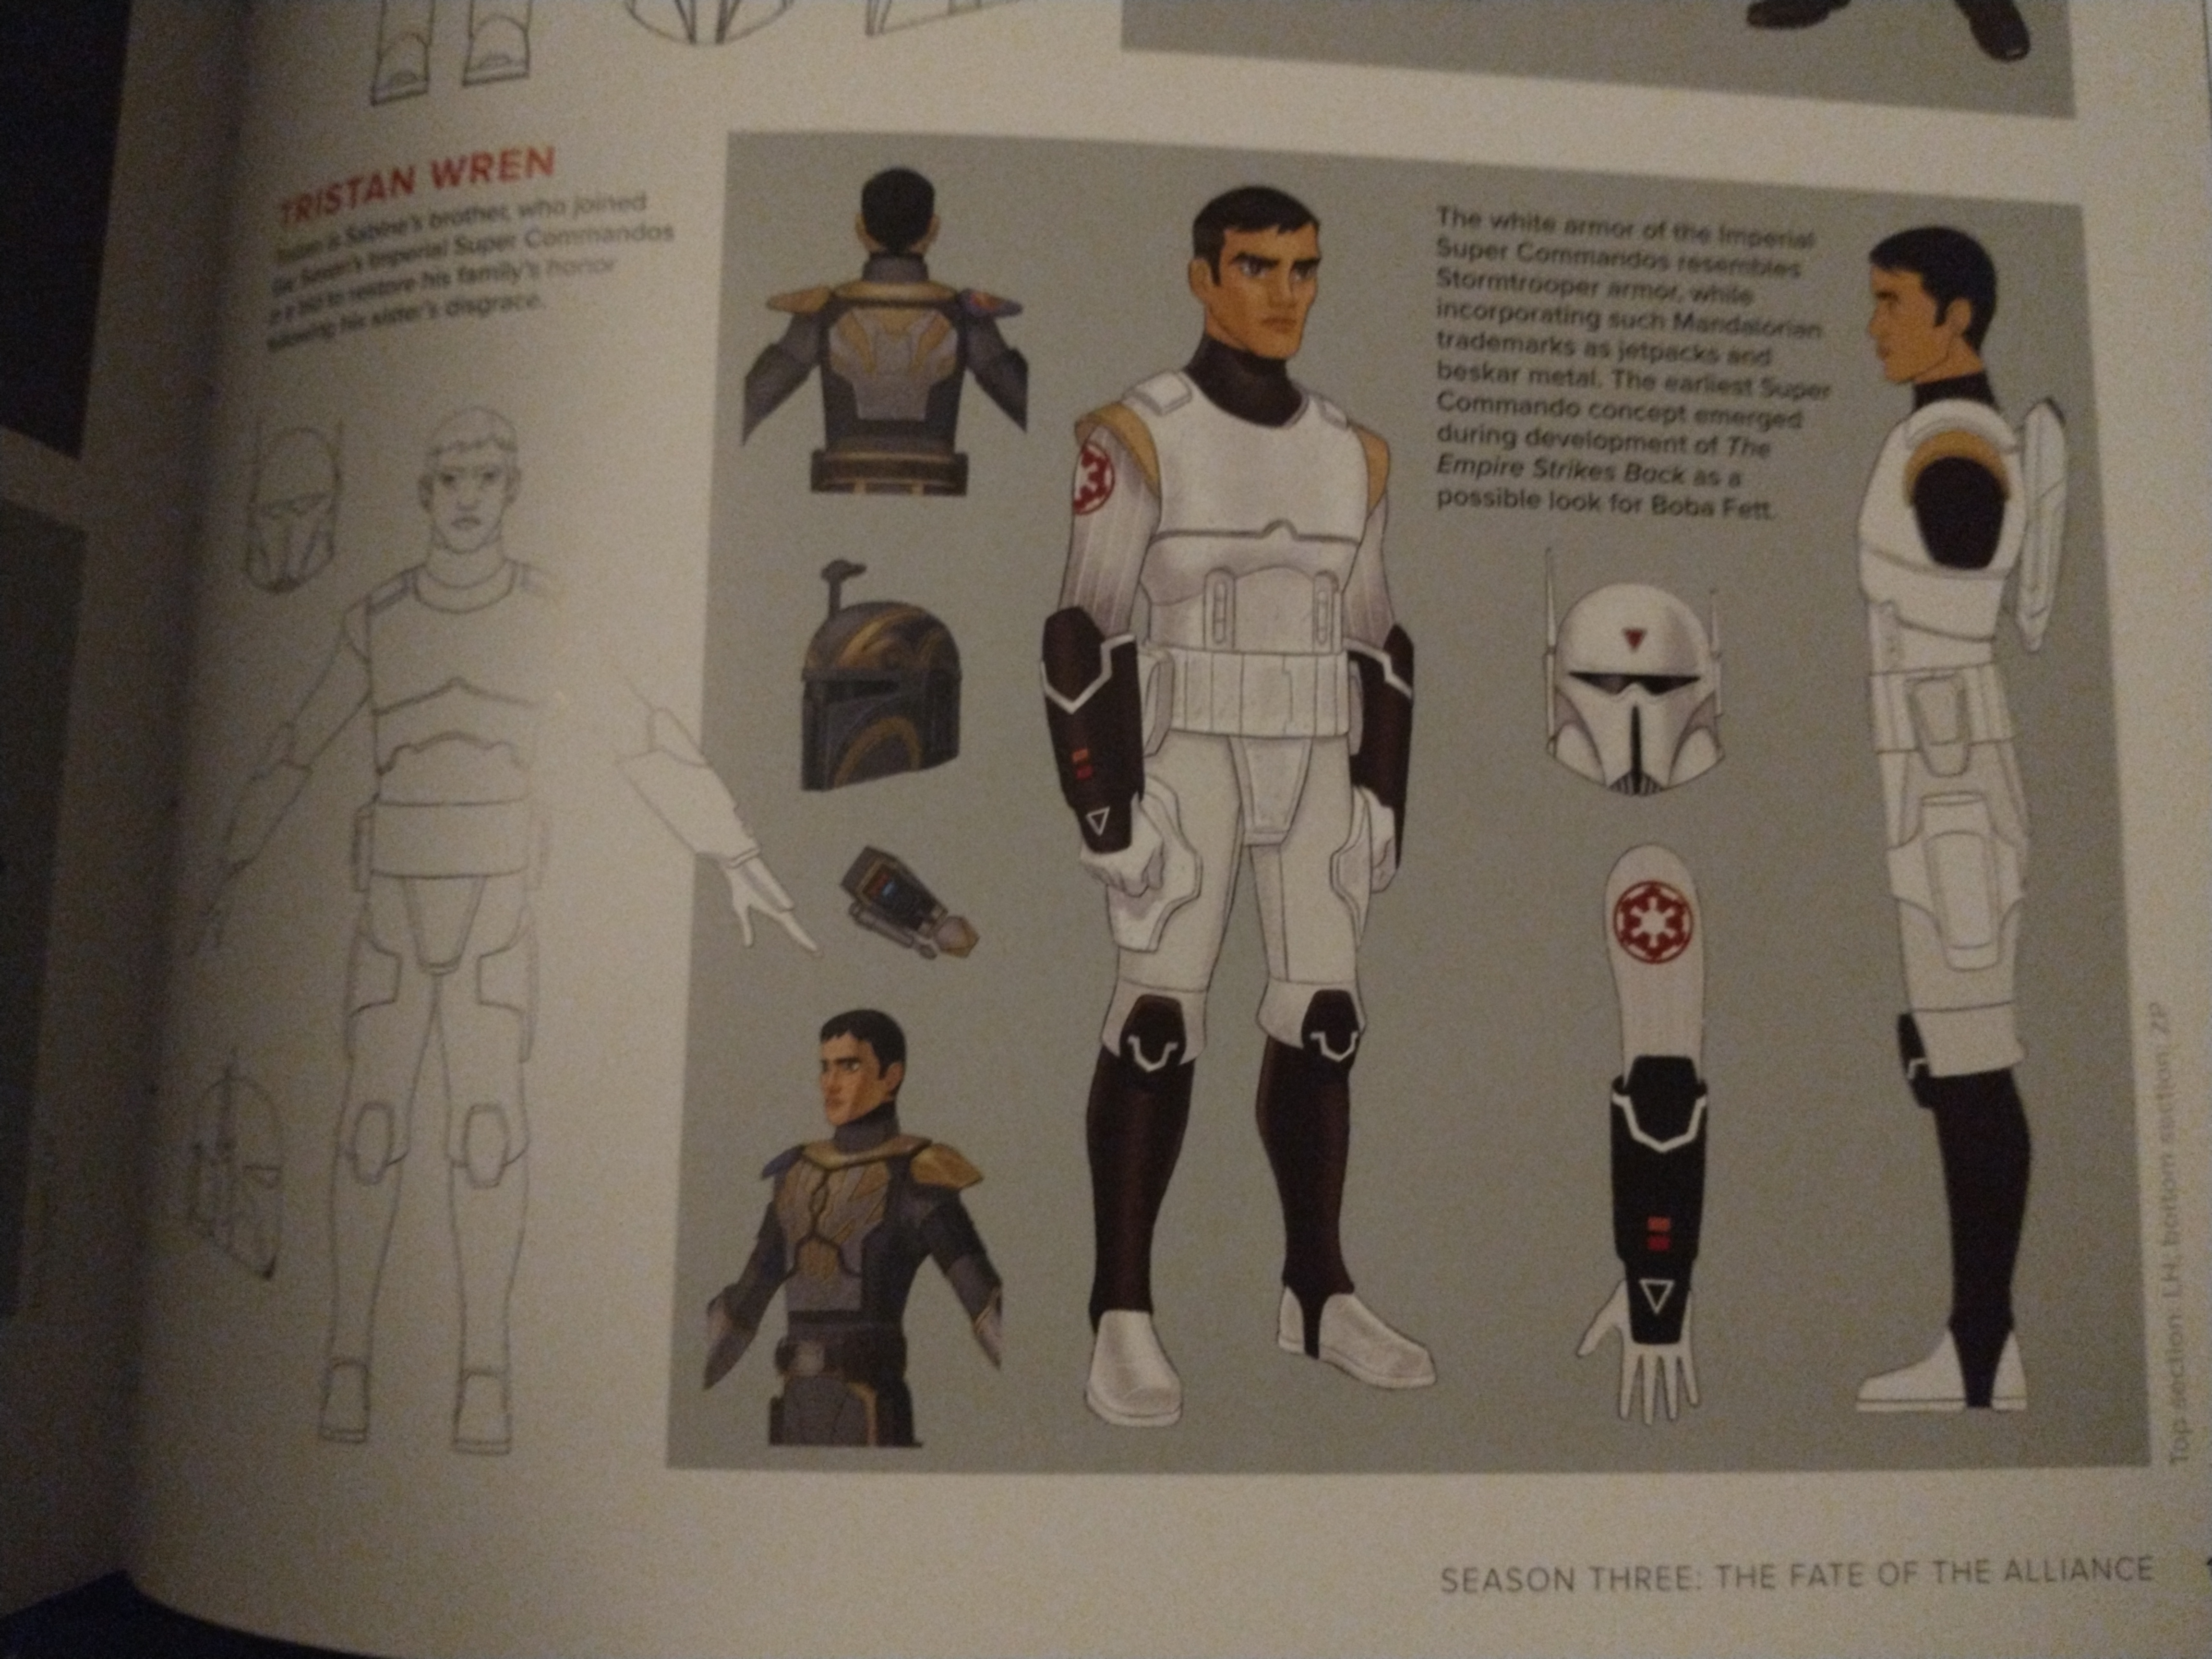
Absolutely, you can use this thread as your build thread for Saxon and post any photos you find here as you go. We work from the top down (usually helmet, then jumpsuit) so that works perfectly for us too. We typically don't move on to the next piece until the previous one is finalised to stop the discussion jumping around all over the place! And yes, if you can create a separate WIP thread for your friend's costume that would be great. We can use info from both WIP threads to feed the two CRL threads, which we will create and pin to the top of the page. I took a quick look at my book this morning and while there's no detailed sketches for unnamed Imperial Super Commandos, there are some for characters who wear variations of their armour. There was also some Gar Saxon artwork that I uploaded into his own reference thread last year, so you can find that there.
-
Imperial Super Commando Gar Saxon animated
tipperaryred replied to beren88's topic in Gar Saxon (Rebels - Animated)
Great to see someone willing to push such a brilliant costume forwards, thanks for posting 🙂 You are correct! We don't currently have any CRL drafts for the grunts, and the only one with significant progress was the Arena version. So if you'd like to lead the way on an animated version, we'll give you all the support we can. First step I'd recommend is gathering together as many visual references as you can to post here. I have the Rebels art book myself, so I'll see if I can find some too. The MMCC CRL seems to have had a huge amount of work done on it, so we can certainly then use that as a starting point rather than trying to reinvent the wheel from scratch. -
Purge Trooper (Phase II) - Kenobi - Discussion
tipperaryred replied to nanotek's topic in Purge Trooper Phase II (Kenobi)
And some draft text to go with that. My first attempt writing one of these from scratch, so please call out anything that doesn't look right or needs adding. I'm also calling a few elements by names that seem natural to me, but might be meaningless to other people, so give a shout if anything I'm trying to describe is unclear. HELMET Gloss black in colour, consistent with the rest of the costume. Is in proportion to the rest of the costume. The eye lens is one continuous piece with a red tint and should obscure the wearer’s eyes. There is a matte black hexagonal front plate, with matte black greebles. Square profile side tusks run back from the lower edges of this front plate. Rectangular metallic silver greebles in the front of each side tusk. Six symmetrical recessed stripes on each tusk, with the recesses painted red. Raised teeth painted silver, with matte black in the recesses (OR cut out, backed with mesh?). Silver greeble on the nose, between the teeth and the front plate. Symmetrical recesses with greeble on each side between the side tubes and the cheeks. Sharp angular cheekbones sculpted into helmet face plate. Three raised ridges run from the centre of the brow, over the top of the helmet and down to the rear centre rim. The central ridge is considerable wider than the ridges either side of it. Top of the helmet separated from the face plate by horizontal ridge along the brow, and from the rear skirt of the helmet by a groove. Rear skirt of the helmet may be a separate part? Symmetrical rectangular greebles (communicators, range finders?) with semi-circular ridges underneath, present at the back of each side of the brow ridge, in between the join between the top of the helmet and the rear skirt. OPTIONAL – top LED may be lit (must be white), bottom LED may be lit (must be red). Small double indentation in the bottom corners of the faceplate, under each ear. -
Purge Trooper (Phase II) - Kenobi - Discussion
tipperaryred replied to nanotek's topic in Purge Trooper Phase II (Kenobi)
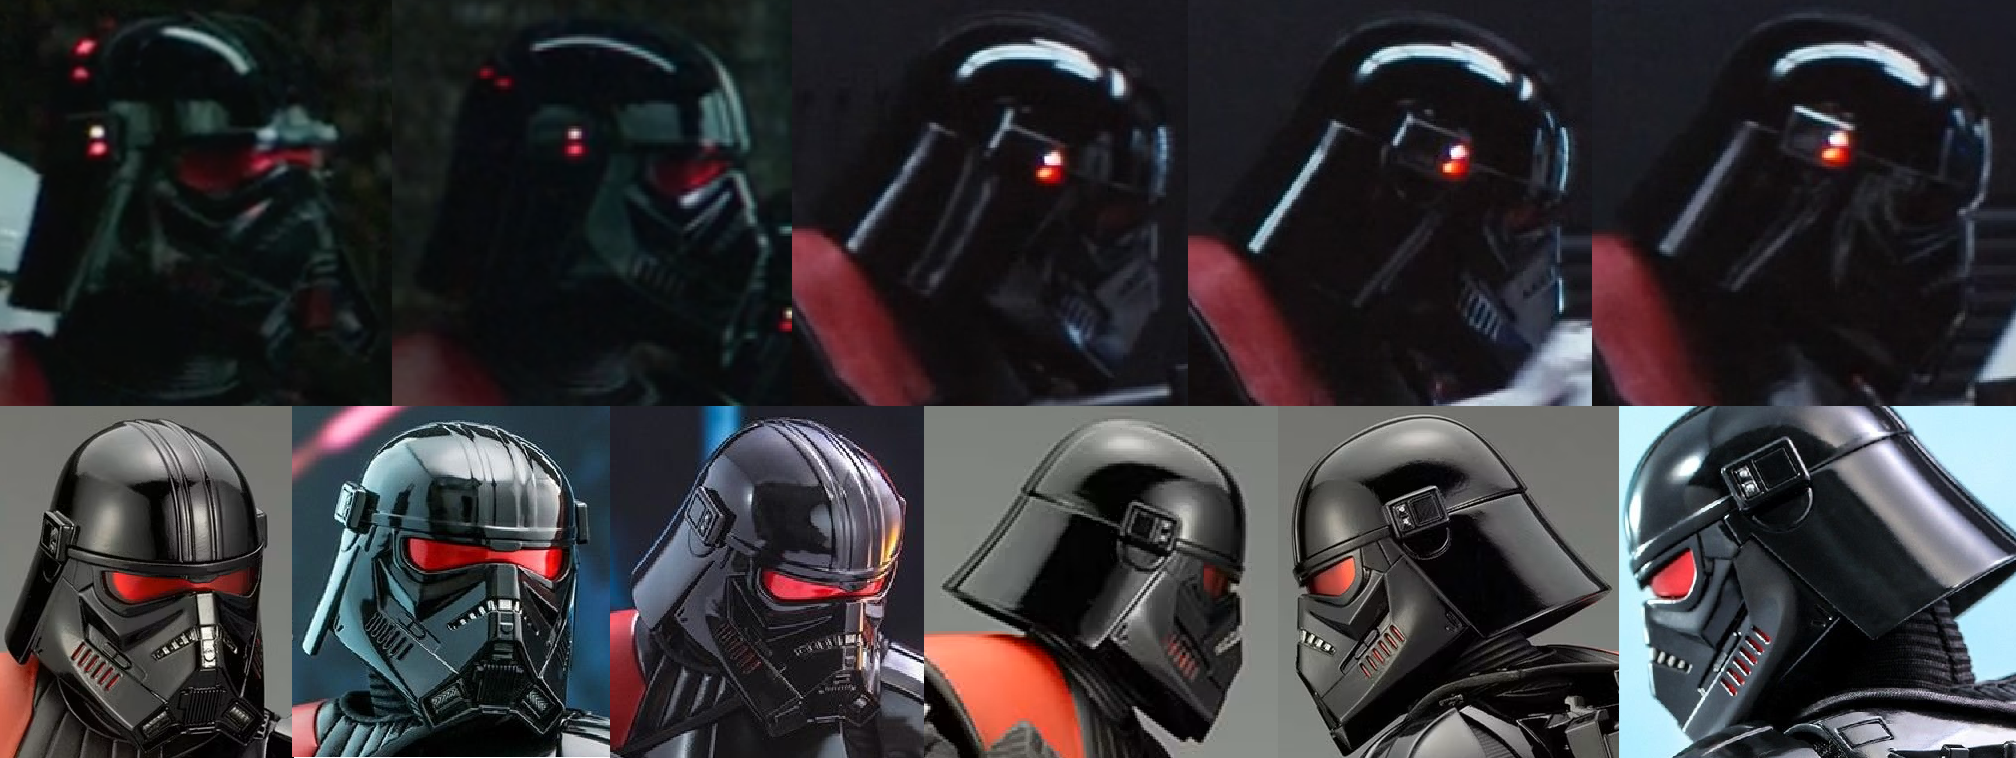
Starting off with the front view of the helmet, a recap of our references so far. I've put together the best of the screenshots and production photos on top, with some views of the Hot Toys and Kotobukiya ArtFX statues underneath for reference. Straight away I can see the Hot Toys seems to be missing the vertical metallic greeblie below the teeth, although this is present on the ArtFX. This aside, I can't see any other serious inconsistencies between the three sources? Similarly, I've put together the best of the side on screens and photos on top, with their statue counterparts underneath. As far as I can tell, we never really get a good view of the left side of any of the Purge helmets in the show, so we may have to take it from the statues that they are indeed symmetrical. The only clear difference that jumps out between the three sources is the ArtFX statue shows a much more obvious red colours recessed in the tusk stripes. However, the red can definitely still be seen from certain angles both from the screen footage and the Hot Toys. Finally, the back seems fairly straightforward. Besides the divide between the top and bottom halves, and the continuation of the vertical grooves that can be seen on the front, there does not seem to be any other detail that needs mentioning.
-
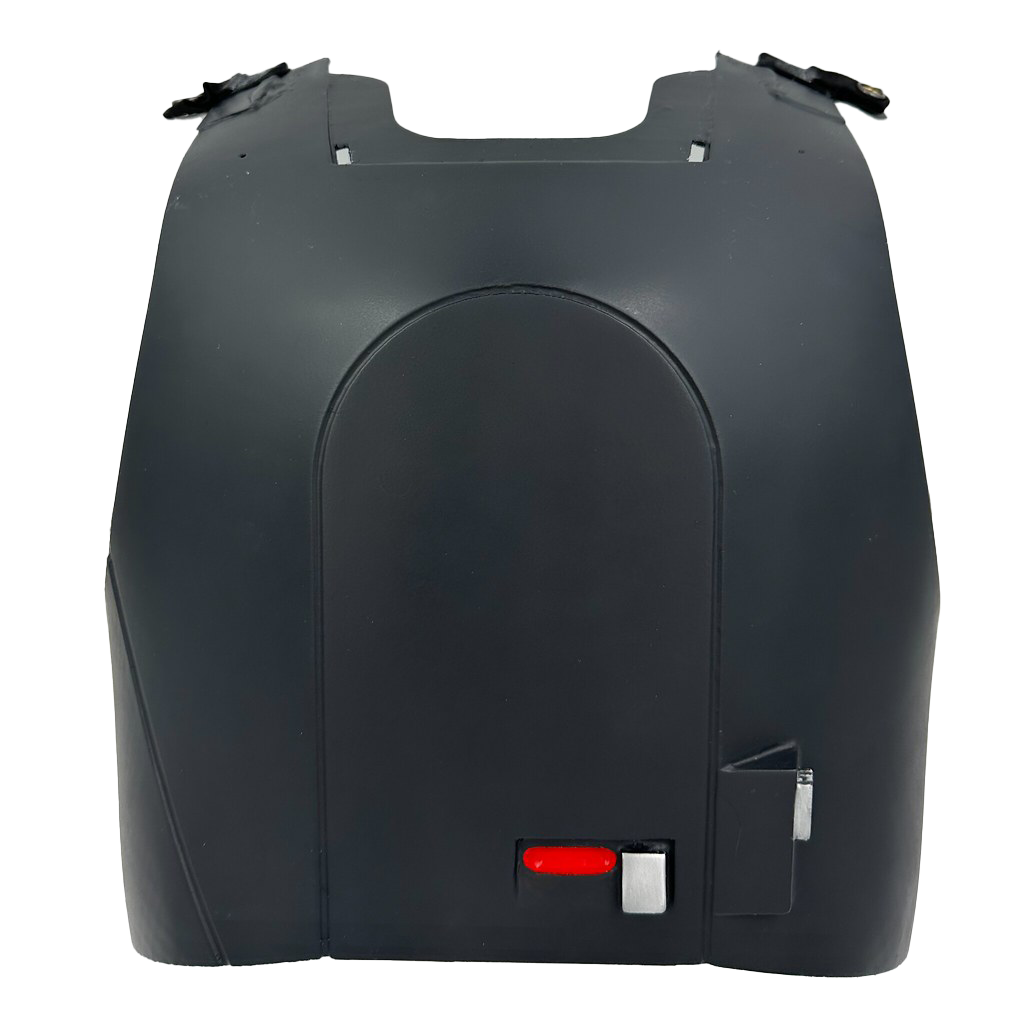
Again, you need to compare colours in the same photos. Yes, the lighting might be awful, but they are all under the same lighting. Look at the gloves and the E-11 barrel in your last post - both are indisputably black. Both have the same lighting conditions as the armour. They are also both a much, much darker colour than any part of the armour that you can see in the same screenshot. It's not even close, and it can't be explained just by materials, angles, matte/gloss contrast or lighting. The shoulder straps are also black, and are also much darker than the armour. So you have a matte black synthetic fabric, a glossy black leather fabric, and a satin black effect prop made from metal, rubber or plastic. All are clearly a far darker colour than the armour in every screenshot, under all lighting conditions. I do not doubt for a minute that when on set, the armour looked black, especially as it was constantly in contrast with the green fatigues. But I do not see how we can disregard all the visual references from the show and change the CRL to indicate that the armour should be the same colour as the straps, gloves and boots.
-
I know where you're coming from, but the dark green/grey hues look even more obvious to me inside the bunker and on the wall than it does outside. I mean, compare the colour of the armour above to the black boots or gloves. There is a huge difference. True "black" is usually a lot more obvious to identify than this, and unless it is gloss it is very unlikely to reflect the colours from surrounding environments. The CRL armour in the post above is a very close visual match to what we see on the screen, both in and out of the bunker.
-
I mean, if you handed the item below (the very dark green, as used in the new CRL) to someone, and then 12 months later asked them what colour it was, 99.9% of the time they'd simply answer "black". No one wants to be the person who rambles on, "well, it's a funny story that it looked black, but if you looked very closely you could clearly see a dark greenish hue!". Well, except us folks 😉 Having some insight into the production is great, but ultimately we are trying to recreate what was seen on the screen. Reference images and screenshots have to take priority over memories I believe. If anything, the grass and the green fatigues should have made the armour look *less* green, not more. It would be a shame to undue months of completely transparent work almost as soon as the CRL is published.
-
Purge Trooper (Phase II) - Kenobi - Discussion
tipperaryred replied to nanotek's topic in Purge Trooper Phase II (Kenobi)
Looks ok, though I definitely don't know this kit well enough yet to be sure. Shall we start at the top and prepare some text for the helmet to kick off? -
Yeah, sadly unofficial so no use for a potential CRL, but those are some fine models and I need them very soon for my Legion army!
-
Del Meeko - first build for new trooper
tipperaryred replied to AradoX's topic in Inferno Squad Del Meeko
One thing that might be useful to bear in mind - when I first made my outer belt I used a very soft leather for the strap. Turned out to be too soft to reliably clip the thermal detonator to, so I was always paranoid about it falling off. That's why I switched to an actual leather belt, and just hid the buckle behind the front section of the scout belt. However that didn't work very well... So I am going back to velcro, but I'll be using a sturdier leather strap this time. -
Del Meeko - first build for new trooper
tipperaryred replied to AradoX's topic in Inferno Squad Del Meeko
Yes, velcro is a simple and effective way to do it. I've experimented with some other options which has been less successful, so I'm going to convert my own back to velcro again! -
An incredible looking kit, great work!
-
Would agree with lighting for L2. Not much jumps as L2 only. Also, while I agree with taking "matte" out, is there a reason why it's as specific as "satin" instead? As opposed to "gloss" or "satin/gloss"? I'd struggle to tell the difference between them often, especially in black.
-
Purge Trooper (Phase II) - Kenobi - Discussion
tipperaryred replied to nanotek's topic in Purge Trooper Phase II (Kenobi)
No, I think it's a different image but showing much the same. I think it was just a sketch in the art book, with very little detail. That's why I didn't take a photo at the time - it was very clearly the helmet that ended up being the P2 Purge, but it didn't offer any details. I'll take a photo next time I'm back with my books anyway to check. Thanks for the reminder Anton, I lost track of this with everything going on late last year. Let's get back on track 👊