tipperaryred
-
Posts
596 -
Joined
-
Last visited
-
Days Won
24
Content Type
Profiles
Forums
Events
Everything posted by tipperaryred
-

Del Meeko CRL Change proposals FEBRUARY 2025
tipperaryred replied to Blackwatch's topic in Inferno Squad Del Meeko
Apologies David, a busy few days! In line with some of the discussions we had earlier in the text, a few further tweaks below. I've also just put a little bit of proposed tidying in to clean up some of the wordiness. Flightsuit One-piece flight suit is made out of a suitably heavy fabric. A canvas style fabric is most suitable, but other fabrics consistent with the visual references are entirely acceptable. The front zipper is covered by a 2" (50mm) wide piece of leather or leather-like material with vertical lines that attaches with Velcro over the zipper. Approximately 1.5" (38mm) tall mandarin collar with a chevron shaped, left-over-right Velcro closure. A 2.5" (63.5mm) red embroidered or PVC Inferno Squad emblem, on a black background, is present on both shoulders. The shoulders of the suit are slightly padded. A compad pocket that properly fits the compad is placed above the left glove so that the pocket is not hidden and faces outward on the arm. On the left bicep below the cog emblem, there is a code cylinder pocket with no flap, and vertical stitching dividing it into pen sleeves. No code cylinders are present. The bottom front corner is cut off at an angle. A piece of leather or leather-like material is sewn below the pen sleeve openings and is the same length as the top of the pocket. There is a piece of nylon strapping sewn below the pen sleeve openings and is the same length as the top of the pocket. The bottom front corner of the pocket is cut off at a bevel on the side pointing in view direction, with the broader upside forming the border of the pen sleeves. The right sleeve has a cargo pocket with a chevron flap below the cog emblem. The right arm pocket has a chevron flap. Two large chest pockets and two large front pockets with no zippers or flaps are present below the belt. There are no leg pockets below the knees. There are two red stripes that run up the right side of the flight suit. The first begins at the bottom of the right leg and continues up to the right armpit. The second begins at the right wrist and stops at the bottom of the arm pocket. The stripe then continues above the arm pocket, behind the patch emblem to the shoulder seam. The red arm stripe stops at the top of the shoulder seam, but continues up and over the shoulder as a black stripe. There are two black stripes that run up the left side of the flight suit. The first begins at the bottom of the left leg and continues up to the left armpit. The second begins at the left wrist and stops at the bottom of the arm pocket. The stripe then continues above the arm pocket, behind the patch emblem to the shoulder seam. The black arm stripe stops at the top of the shoulder seam, but continues up and over the shoulder to the collar. For basic approval this can be accomplished with topstitching. The black portion of this stripe stops at the collar. A piece of leather or leather-like material is sewn below the pen sleeve openings and is the same length as the top of the pocket. MOVED ABOVE TO THE SLEEVE SECTION FOR CLARITY OPTIONAL Level two certification (if applicable): Patches are vinyl on textile with no edge border. If twill is used for the patch material the fabric texture will be vertically oriented. The black stripes on top of the shoulders shall be a material matching texture and weave of the red stripe. Textured canvas is most accurate for the flightsuit's construction as it is a thick materials with a "solid" structure. A "loose", soft or lightweight material is not accurate. -
ISB Tactical Agent - CRL Discussion
tipperaryred replied to IcyTrooper's topic in Imperial Security Bureau
Yes, the text above mirrors the text for the earlier hats already described in other CRLs, so they will largely be able to be used interchangeably. And yes, the hat will certainly not be essential for all versions of this costume. There are a lot of part being swapped in and out, including the hat(s), goggles and tactical vests. For now we'll just work on getting each of those parts well described, and then we can finalise how exactly the CRL will be presented. We could go with a single CRL with a lot of "Optional" pieces, or a multi-part CRL using different "versions" as per the IAT and IST CRLs. -
ISB Tactical Agent - CRL Discussion
tipperaryred replied to IcyTrooper's topic in Imperial Security Bureau
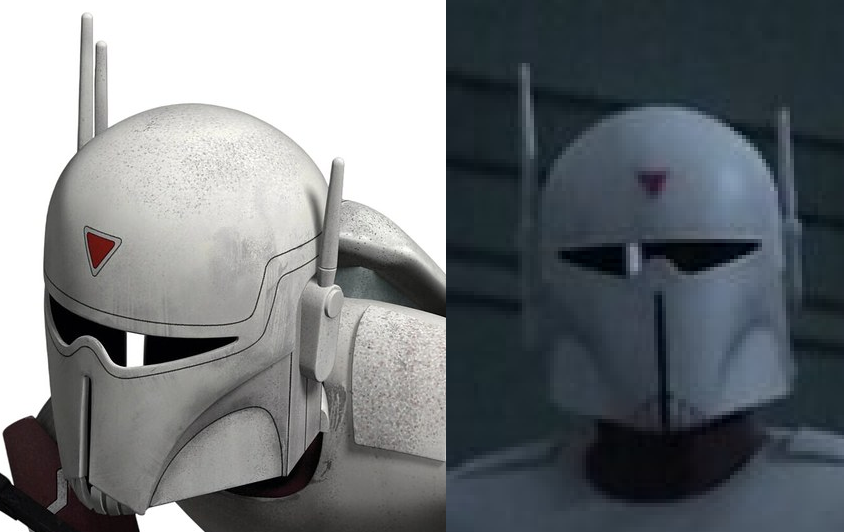
Dedra's hat uses the exact same text as the OT Staff Officer hat, and I'd agree that what we see in the tactical team does on the surface seem more conical at the top. However, it's worth noting that Heert is wearing the exact same style hat as the tacticals, despite being a supervisor like Dedra. Combined with what we know about the production team reusing costumes and props wherever possible, it seems to me quite likely that we're looking at the same hat in all cases. Perhaps it was a conscious decision to have the tactical hats looking a little more roughed up? If you manhandled them and threw them around a bit, it could almost certainly compress them and create that slightly puffed up look at the top? In either case, I think going with the text above referring Dedra's CRL would be appropriate. We could also add in the more detailed description of the material from the IOC text if it looks appropriate to folks? "Fabric is a medium weight suiting material matching the pants and tunic if applicable. Cavalry Twill or a Gabardine style weave is most accurate." I'd 100% agree that if we add in the "more conical" text it would only belong in Level 2, as would any tweaks to the code cylinders. Do we have any close ups of the code cylinders to compare? But yes, in essence the same hat should easily be able to clear basic clearance for the ISB Tactical Agent, Dedra Meero and the OT Staff Officer.
-
Del Meeko CRL Change proposals FEBRUARY 2025
tipperaryred replied to Blackwatch's topic in Inferno Squad Del Meeko
That's great to hear Dennis. A key goal for us with this update has been to give builders a little more flexibility, so hopefully that will also be a benefit for those who want to clear multiple Inferno costumes across the two detachments. Please feel free to jump in with any feedback, or give any of us a message if you'd like any feedback over on the JRS boards. -
Del Meeko CRL Change proposals FEBRUARY 2025
tipperaryred replied to Blackwatch's topic in Inferno Squad Del Meeko
Just a couple of additional tweaks there David - the line about "suitably heavy fabric" for the flightsuit and crossing out the level 2 line about placement of the oiler pouch for the shoulder pouch (because it's only repeating the exact same placement already specified for basic clearance above it). Flightsuit One-piece flight suit is made out of a canvas or similar suitably heavy material fabric. A canvas style fabric is most suitable, but other fabrics consistent with the visual references are entirely acceptable." The front zipper is covered by a 2" (50mm) wide piece of leather or leather-like material with vertical lines that attaches with Velcro over the zipper. Approximately 1.5" (38mm) tall mandarin collar with a chevron shaped, left-over-right Velcro closure. A 2.5" (63.5mm) red embroidered or PVC Inferno Squad emblem, on a black background, is present on both shoulders. The shoulders of the suit are slightly padded. A compad pocket that properly fits the compad is placed above the left glove so that the pocket is not hidden and faces outward on the arm. On the left bicep below the cog emblem, there is a code cylinder pocket with no flap, and vertical stitching dividing it into pen sleeves. No code cylinders are present. There is a piece of nylon strapping sewn below the pen sleeve openings and is the same length as the top of the pocket. The bottom front corner of the pocket is cut off at a bevel on the side pointing in view direction, with the broader upside forming the border of the pen sleeves. The right sleeve has a cargo pocket below the cog emblem. The right arm pocket has a chevron flap. Two large chest pockets and two large front pockets with no zippers or flaps are present below the belt There are no leg pockets below the knees. There are two red stripes that run up the right side of the flight suit. The first begins at the bottom of the right leg and continues up to the right armpit. The second begins at the right wrist and stops at the bottom of the arm pocket. The stripe then continues above the arm pocket, behind the patch emblem to the shoulder seam. The red arm stripe stops at the top of the shoulder seam, but continues up and over the shoulder as a black stripe. There are two black stripes that run up the left side of the flight suit. The first begins at the bottom of the left leg and continues up to the left armpit. The second begins at the left wrist and stops at the bottom of the arm pocket. The stripe then continues above the arm pocket, behind the patch emblem to the shoulder seam. The black arm stripe stops at the top of the shoulder seam, but continues up and over the shoulder to the collar. For basic approval this can be accomplished with topstitching. The black portion of this stripe stops at the collar. A piece of leather or leather-like material is sewn below the pen sleeve openings and is the same length as the top of the pocket. OPTIONAL Level two certification (if applicable): Patches are vinyl on textile with no edge border. If twill is used for the patch material the fabric texture will be vertically oriented. The black stripes on top of the shoulders shall be a material matching texture and weave of the red stripe. Textured canvas is most accurate for the flightsuits construction as it is a thick materials with a "solid" structure. A "loose", soft or lightweight material is not accurate. Armor Armor consists of front and back pieces connected by shoulder bridges anchored by wedge connectors. Armor is glossy black. Chest and back plate meet flush at the sides under the arms. This is done with a third plate that bridges the gap between the front and back armor parts. This is best achieved with material matching the rest of the hard armor parts, but more flexible options are also accepted so long as the visual appearance matches the rest of the Armor (eg. non-textured black leather. Molded black, ribbed, rubber shoulder bridges are acceptable. Back plate contains detailed "O II" design. The top of the back plate box may feature a trapezoid shaped depression 4" x 5" (101mm x 127mm) at the top of the box. There is a 5/16" (8mm) circular depression below the right shoulder strap connector on the back plate. Armor may be lightly stained or weathered. Silver is not permitted. OPTIONAL Level two certification (if applicable): Made with reference to the game's 3D model and scaled to the wearer. Armor scaling and strapping must fit the wearer accurately. "O II" design shall have 16 points on the "O" design and "II" bars shall have 5 indented slot depressions at the bottom of each bar matching references. Trapezoid shaped depression at the top of the box shall match game refences for size, shape and location. Any visible staining or weathering must be light. Silver is not permitted. Shoulder Ammo Pouch There is an MP-40 style ammo pouch attached to the left shoulder and it must be filled. The pouch is made of black canvas, or canvas-like material with black stitching. Closure straps are made of black leather or leather-like material. There is a small oiler-style pouch on the bottom of the pouch at the right side. OPTIONAL Level two certification (if applicable): Attachment is not seen. No straps are visible. Magnets or another source of firm mounting are advised. Oiler pouch is attached to the bottom right side of the right pouch. -
Thanks a million for jumping in again Teresa @SoulArt. Looking back on all our "seams" text again I'm not remotely happy with it and I think we could definitely use your expertise. I agree entirely that there's no seam on the "outside" of the leg as originally drafted. We should have caught that earlier. As I see it now the legs only have three seams: One around the circumference of each leg just above the knee. One at the inside rear of each thigh, running from the knee seam up to the horizontal seam running across the butt. One at the inside front of each thigh, running from the knee seam up to join at the crotch. Does that read correctly for you based on what you're seeing? As for the shins, I fully agree with needing to put one in. As it does not exist in the references, I am happy to leave this entirely at the discretion of the wearer/maker. It would seem a bit daft for us to insist that it *has* to go in one specific place, if in the references it never exists to begin with. Even if it is front centre, it would be almost entirely hidden by the knee armour so would not stand out. So front centre, back centre, inside centre or outside centre... I don't think any of them are going to look out too of place. I'd agree with your instinct to go back or inside though. Let me know what you think, and then we can see about redrafting that text 🙂
-
It is certainly very sad to see that we will not be permitted to proceed with exploring this CRL. The reason given was that the references were deemed "insufficient to justify a new CRL" beyond the already existing ones for the named Inferno characters. The basic trooper proposed here was completely distinct from any of the named characters in either SpecOps or JRS, so it is a puzzling decision. We have also built high quality CRLs in the past with worse reference images (as have other detachments), so I'm at a loss here unfortunately. Gutting to have so much work thrown out.
-
Del Meeko CRL Change proposals FEBRUARY 2025
tipperaryred replied to Blackwatch's topic in Inferno Squad Del Meeko
It is the job of our good friends at JRS to look after Iden and Gideon, and I'm not sure if they are currently updating those CRLs. I know @Wingmanis very active over here as well though, so I'm sure that he will keep an eye out for any updates that could be useful for their work too 🙂 -
Del Meeko CRL Change proposals FEBRUARY 2025
tipperaryred replied to Blackwatch's topic in Inferno Squad Del Meeko
Looks good, and yup, pretty sure that's you caught up now. Cheers! -
Yes those Etsy sellers are the only ones that I'm aware of too.
-
Del Meeko CRL Change proposals FEBRUARY 2025
tipperaryred replied to Blackwatch's topic in Inferno Squad Del Meeko
Absolutely, the FLYYE vests have been specified as inaccurate for a long time now. My earlier point on measurements was more a wider point about trying to slim the CRL text down a little, which we've been trying to do here where we can. I've lost count of the number of members I've tried to sell on an Inferno only for them to scrap the idea after 5 seconds of scrolling down the CRL text. So if we can take some of the extraneous parts out, especially where they are already readily available here on the forums, I think that can only be a benefit. -
That's brilliant Kevin, we're all looking forward to seeing them!
-
The fight suit would be the trickiest part of this potential CRL, as unlike the "Shatterpoint" troopers, the primary artwork here shows a flightsuit that is inconsistent with the sculpts, and with established Inferno flight suits. I would suggest that for now we won't be returning to this "Legion" version until we know where we're going with the "Shatterpoint" one that is currently under consideration.
-
No need to apologise, nothing missed 🙂 It's with our friends in the LMO team at the moment, so we'll post here once a decision has been made.
-
Thanks Antonio, we will wait and hope for a positive verdict on the references and the work completed to date. With regards to the E-11, I imagine we would go with the same basic clearance text that we have in Del's CRL, which is also the same used by the FISD for basic clearance on all of their OT TKs. The main artwork does suggest a ROTJ style E-11 which would be in line with the other Inferno CRLs, but our current thinking is to omit any Level 2 requirements for this proposed costume. If it is approved, the costume can be a great stepping stone to Del, Iden and Hask for those looking to achieve a higher level of accuracy. E-11 Blaster Based on a real or replica Sterling sub-machine gun, scratch-built, or a modified commercial toy Stormtrooper blaster.
-
Del Meeko CRL Change proposals FEBRUARY 2025
tipperaryred replied to Blackwatch's topic in Inferno Squad Del Meeko
Jumping back in, we have the shoulder pouch next. I made a couple of grammatical and clarifying tweaks already, but the substance doesn't need any changes as far as I can see. The reference to the oiler pouch in Level 2 doesn't seem to add anything to the basic clearance text except to refer to it as an "oiler pouch" instead of a "pouch". Shoulder Ammo Pouch There is an MP-40 style ammo pouch attached to the left shoulder and it must be filled. The pouch is black in color and made of canvas, or canvas-like material. Closure straps are made of black leather or leather-like material. There is a small oiler-style pouch on the bottom of the pouch at the right side. All pouch stitching is black. OPTIONAL Level two certification (if applicable): Attachment is not seen. No straps are visible. Magnets or another source of firm mounting are advised. Oiler pouch is attached to the bottom right side of the right pouch. (Is this adding anything to what is written above?) -
Moving onto the chestbox, again, taking Del's text and modifying it. We can clearly see the left buttons, the top lights and the tops of the 3 rocker switches in the primary visual reference. Referring to some of the artwork for Iden in the same publication confirms the same colouring system is in place. Chest Box Chest boxes meeting the standard for the Inferno Squad - Del Meeko CRL are acceptable. The chest box is required to have the same configurations as seen in the visual references photo. The chest box is held to the armor with an invisible system which is not visible when the box is removed. Strong magnets are advised. The chest box is painted glossy black and matches the sheen of the armor. The left side of the chest box has five detail pieces: 1 Red, 1 White, 1 black, 2 Blue. There is a 1/8" (3mm) thick white pinstripe border around the square containing the 4 leftmost detail pieces. There are two round indicator lights above the rocker switches, one white, one red respectively. There are three rocker switches below the round indicator lights. The rockers are always gray, white, gray. The gray rockers have red dots or indicator lamps in the bottom outfacing portion. There is a 1/8" (3mm) thick white pinstripe that runs horizontally across the bottom portion of the box. There is a male silver snap or radio jack and a silver round disc with cone knob greeblie on the lower portion of the box below the horizontal pinstripe. There are two "gear" type greeblies affixed to either end of the lower tube portion of the box, and are painted silver or metallic grey. There are two silver or metallic grey machined aluminum or molded silver greeblies in the hose ports of the box. See reference images and the CRL Gallery view. The hose port greeblies feature 8 round depressions around a raised disc. The color matches the gear type greeblies. Chestbox may be light to moderately weathered or stained. Silver is not permitted. The red and white indicator lights and rocker lamps may be functional. OPTIONAL Level two certification (if applicable): Box is electrically lit to include the red and white squares, both rocker lamp lights and the red and white indicator lights on top of the box. *Box is based on the games 3D model and is scaled to the wearer and consistent with armor size.
-
I think the white/grey spectrum is one of the trickiest parts of both of these costumes. Between the different shades on the armour and the off-white of the flightsuit, it can look very different depending on the lighting and perspective. In some of the distant shots it looks like the entire upper half of the helmet is light grey from the front, yet in the close ups you can clearly see that it's only the swooping pattern on the upper cheeks. And now that you've said it, I'm tempted to think that the triangle border is grey too...
-
Juice Box's (APPROVED!) Del Meeko Build
tipperaryred replied to TonyJuiceBox's topic in Inferno Squad Del Meeko
Looks pretty good to me! Good luck Antonio! -
Del Meeko CRL Change proposals FEBRUARY 2025
tipperaryred replied to Blackwatch's topic in Inferno Squad Del Meeko
Honestly mate, it makes our life so much easier when people do jump in on CRL builds or revisions with new perspectives. There are few worse feelings as a DCA than spending months or even years on a CRL, with only 2 or 3 people contributing, only for the finished CRL to go live and folks start queuing up to list the mistakes 😅 So genuinely, thanks a million for the input, and if you get a chance to check back in again before we finish this revision, please do let us know if you have any more feedback. -
Del Meeko CRL Change proposals FEBRUARY 2025
tipperaryred replied to Blackwatch's topic in Inferno Squad Del Meeko
Always great to have the feedback Gary, especially from vendors who bring a very different perspective to most of our staff and members. For the helmet I'll suggest another compromise version, and I promise it's not awkwardness, there is method to my madness. 😅 "Original Trilogy TIE Pilot style helmets are not permitted. There are also no screws visible on the helmet." Firstly the Del text has always been a bit sprawling down the page(s), and it is quite off putting for new builders. So wherever possible I don't want to give a new line to every small detail. But even more importantly I'd like to keep those two points together, because they are actually related. The screws are one of the quickest ways to spot an OT TIE helmet, and for many members it can sometimes be a challenge to differentiate between a OT TIE, R1 TIE and an Inferno. I think it's important that members know that if they see screws in a TIE helmet, it is likely an OT helmet and therefore should not be clearable even if they removed the screws. On the subject of "should" however, I can absolutely imagine some of our members arguing that point, so I absolutely agree with your suggestion of "are" instead. For the armour sides and the flight suit fabric, I think the problem is the same one for both. In an ideal world we know the closest material, but want to give GMLs and builders the flexibility to use something that has the same appearance, but is either more accessible or easier to wear. You correctly point out that a small number of GMLs might not look past the one example we give, but I don't believe that this would be a correct interpretation on their part. The visual references should always be the first consideration, and if a costume looks right while also meeting the flexible definition of "a suitably heavy fabric", then a GML would be failing in their duties if they failed a flight suit just because it wasn't made of a material that is explicitly given as only an example. Adding black denim into the list of examples won't necessarily help solve that problem, it will only give awkward people two things to fixate on instead of one. We can't realistically list every possible material that each part could be constructed from just to account for an awkward minority who might misread it. In my experience the vast majority of GMLs want to help their members get their costumes over the line, so we want to give them the flexibility in the new text to allow this. In saying all that (my apologies for this turning into a small essay!), there's no reason at all why we can't tweak the text a little further as you suggest, and try to reduce the chances of the worst case scenario happening! I'd also be happy to put "non-textured leather" in as an example in the context of the new text below. "One-piece flight suit is made out of a canvas or similar suitably heavy material fabric. A canvas style fabric is most suitable, but other fabrics consistent with the visual references are entirely acceptable." "Chest and back plate meet flush at the sides under the arms. This is done with a third plate that bridges the gap between the front and back armor parts. This is best achieved with material matching the rest of the hard armor parts, but more flexible options are also accepted so long as the visual appearance matches the rest of the armor (eg. non-textured black leather)." -
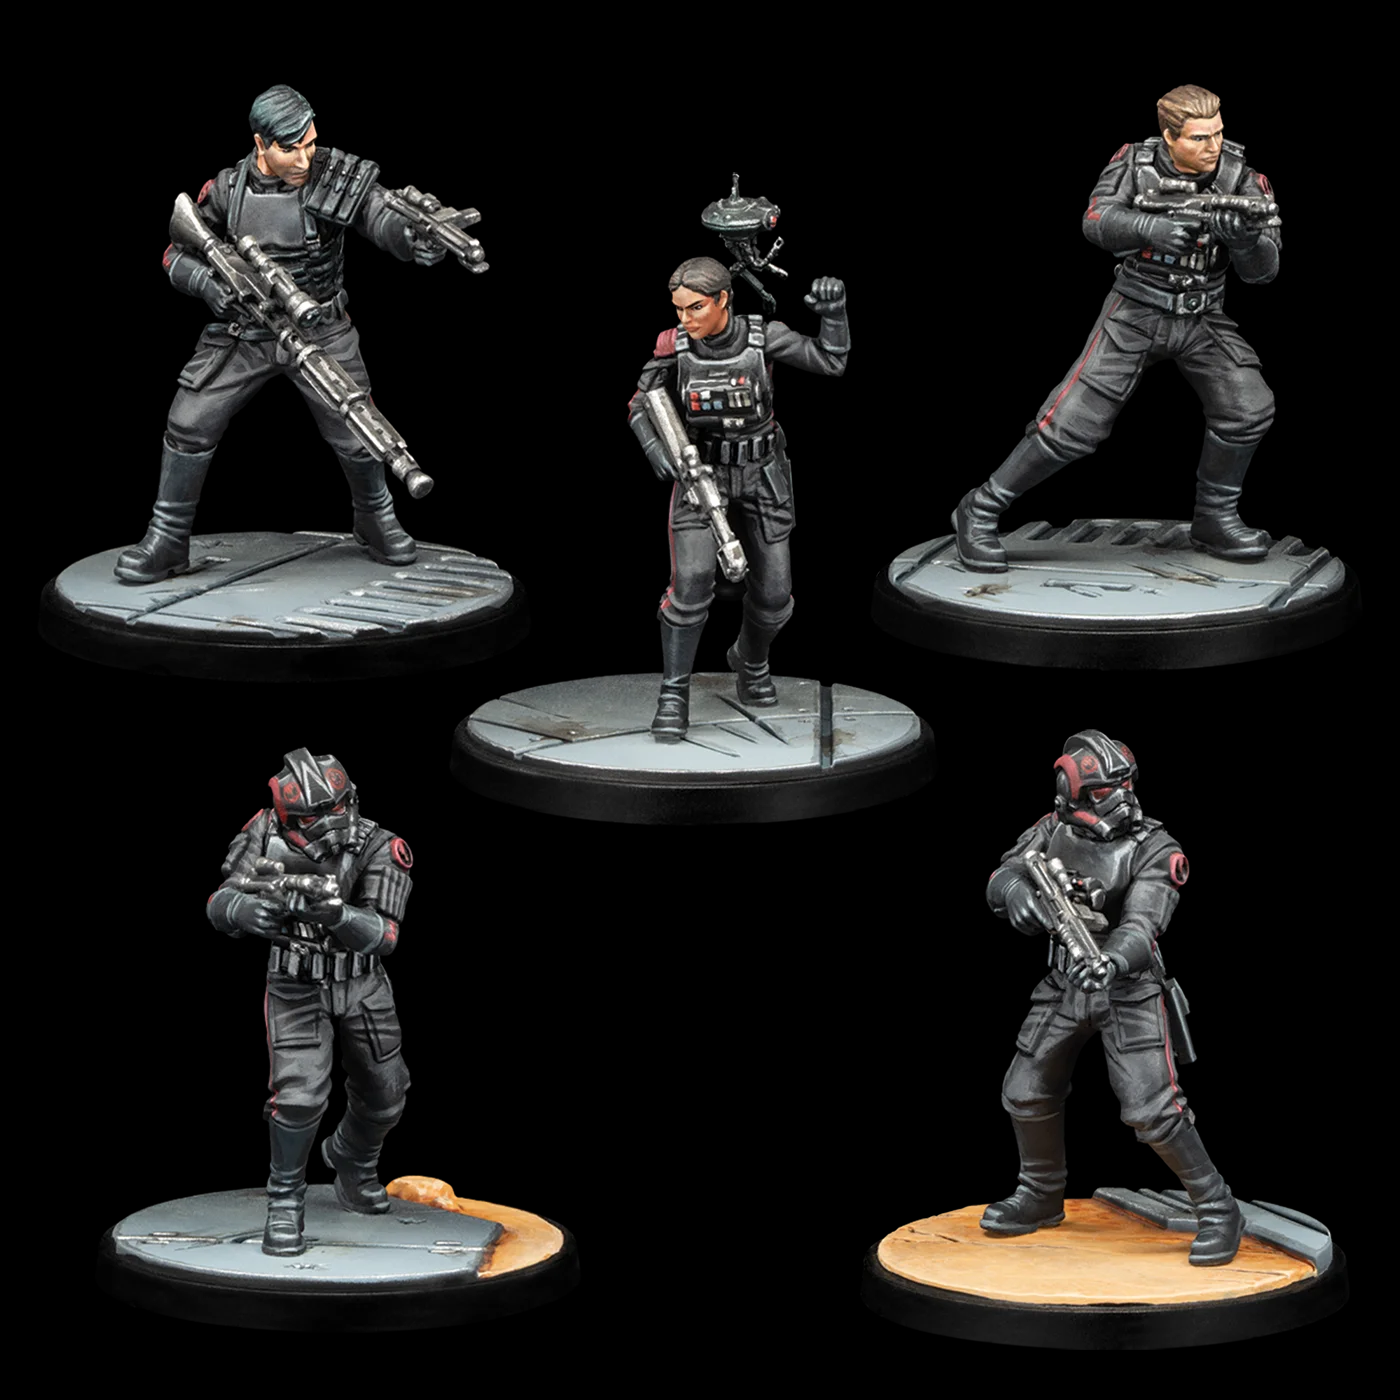
ISB Tactical Agent (Andor S2)
tipperaryred replied to IcyTrooper's topic in Imperial Security Bureau
Excellent, good to have the clarity on the name. We'll need to put together some decent screen grabs to prove it, but it would largely appear to be an unarmoured Imperial Security Trooper wearing the white ISB tactical armour. Similarly we see an ISB officer being given some of the same armour (the torso armour) to wear over their ISB tunic. I would therefore be surprised if the placement didn't follow those of the pre-existing underlying costumes. Specifically the ISB Tactical Agent to SpecOps to join the underlying Imperial Security Trooper costume; and the Armoured ISB Officer to IOC to join the ISB uniforms (eg. Dedra). The same logic was used with the Star Wars Rebels armoured ISB officers such as Kallus, who wore their armour over their officers' tunics and were subsequently placed with IOC. If this is how it plays out, the only minor complication would be that the torso armour needs to be consistent across the two costumes. I'm sure however that we'll have no trouble coordinating that if that is the direction that the LMOs decide on. -
Thanks Ryan, that's a good shout. Realistically the pauldron is going to be pushed all over the place if it's sitting on top of the straps/armour. Iden's CRL doesn't actually specify its position relative to the armour straps, so maybe it's safest just to omit that line altogether to avoid confusion? Shoulder Pauldron Worn on the right shoulder, matching references. Made from leather or leather-like material. The base of the pauldron is black. On top of the black base are three red stripes placed evenly apart. The pauldron may be worn under or over the shoulder straps of the armour. The outer edge of the pauldron should be approximately in line with the shoulder seam of the flight suit. The pauldron may be attached to the shoulder of the flight suit with any discrete method, including velcro, magnets or sewing.
-
Del Meeko CRL Change proposals FEBRUARY 2025
tipperaryred replied to Blackwatch's topic in Inferno Squad Del Meeko
Thanks for getting back again Gary 🙂 I'm doubling up on GML duties too, so I can certainly see that side of it as well. Solid point on the screw wording - if you feel it's still a little ambiguous then definitely no harm adding an "and" or an "also" in there to remove any doubt. Perhaps something like, "Original Trilogy TIE Pilot style helmets are not permitted. There should also be no screws visible on the helmet." For the other two points, we could potentially make some minor tweaks like below: "One-piece flight suit is made out of a canvas or similar suitably heavy material fabric (eg. canvas). Perhaps just reordering the sentence like that to give prominence to the "suitably heavy fabric" will be enough to point GMLs in the correct direction? As for the armour: "Chest and back plate meet flush at the sides under the arms. This is done with a third plate that bridges the gap between the front and back armor parts. This may be achieved with a solid plate or a non textured fabric, so long as the visual appearance matches the armor." If we make this tweak, then perhaps it would make sense to make the solid plate option a Level 2 requirement? What do you think @Blackwatch?