tipperaryred
-
Posts
596 -
Joined
-
Last visited
-
Days Won
24
Content Type
Profiles
Forums
Events
Everything posted by tipperaryred
-
There is indeed an issue with availability at the moment, and this may be something we need to look at if it continues. Speaking personally I'm badly in need of a replacement scout belt for my Del, but the limited availability of accurate ones (and the subsequent price inflation) is making it a tough one. Part of the reason I am keen to get a new CRL for a generic Inferno "Imperial Special Forces Trooper" is that the artwork is much simpler - therefore we can go with a much simpler CRL. This should hopefully allow more vendors to supply parts, and indeed make it easier for people to 3D print some of their own parts as Ryan points out. If we can get that over the line it could be a great entry point to the Inferno costumes, not completely dissimilar to the way that the TIE Reserve is a nice entry point over at JRS. If we get more people building Infernos, and more vendors buying into that, it may also have a knock on effect of those new vendors then branching out to supply Specialist level parts as demand grows.
-
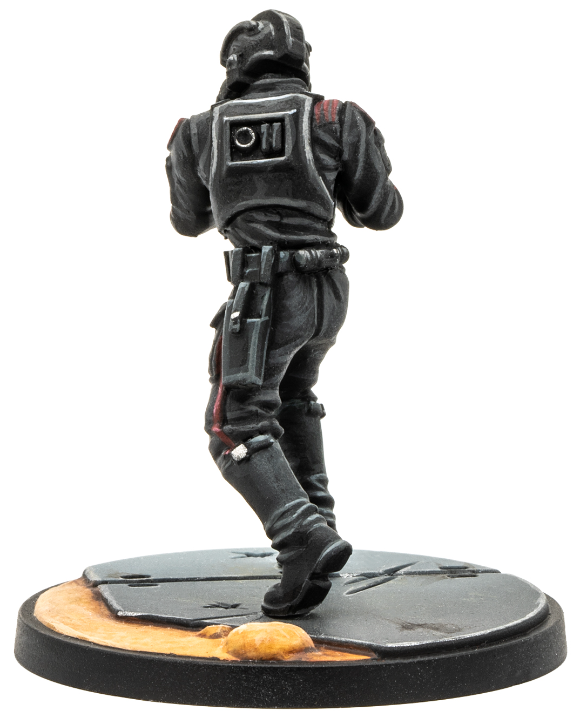
 Good spot on the earcaps, they can't actually be seen at all on the main artwork. There are clearly earcaps molded on the figure, but not in any detail. I'd say that's another line we can cross out completely for this CRL (with the proviso on the first line that earcaps matching Del's CRL can still be cleared, even if they're not required). Any plain black balaclava would do the job I'd say. Where did you see that different balaclava for Iden? It doesn't appear to be in her CRL.
 -
I believe this was the result of a lot of work in the most recent CRL discussion thread, principly by my predecessor Anton. He took the game renders and examined them in extreme detail, including calculating the scale of each. He established that the drop box was smaller than the scout one. Del's TD is actually a different design to the Shadow Scout one, and again all of the close ups can be seen going back through that discussion thread. Wishing you luck with going for that lvl2!
-
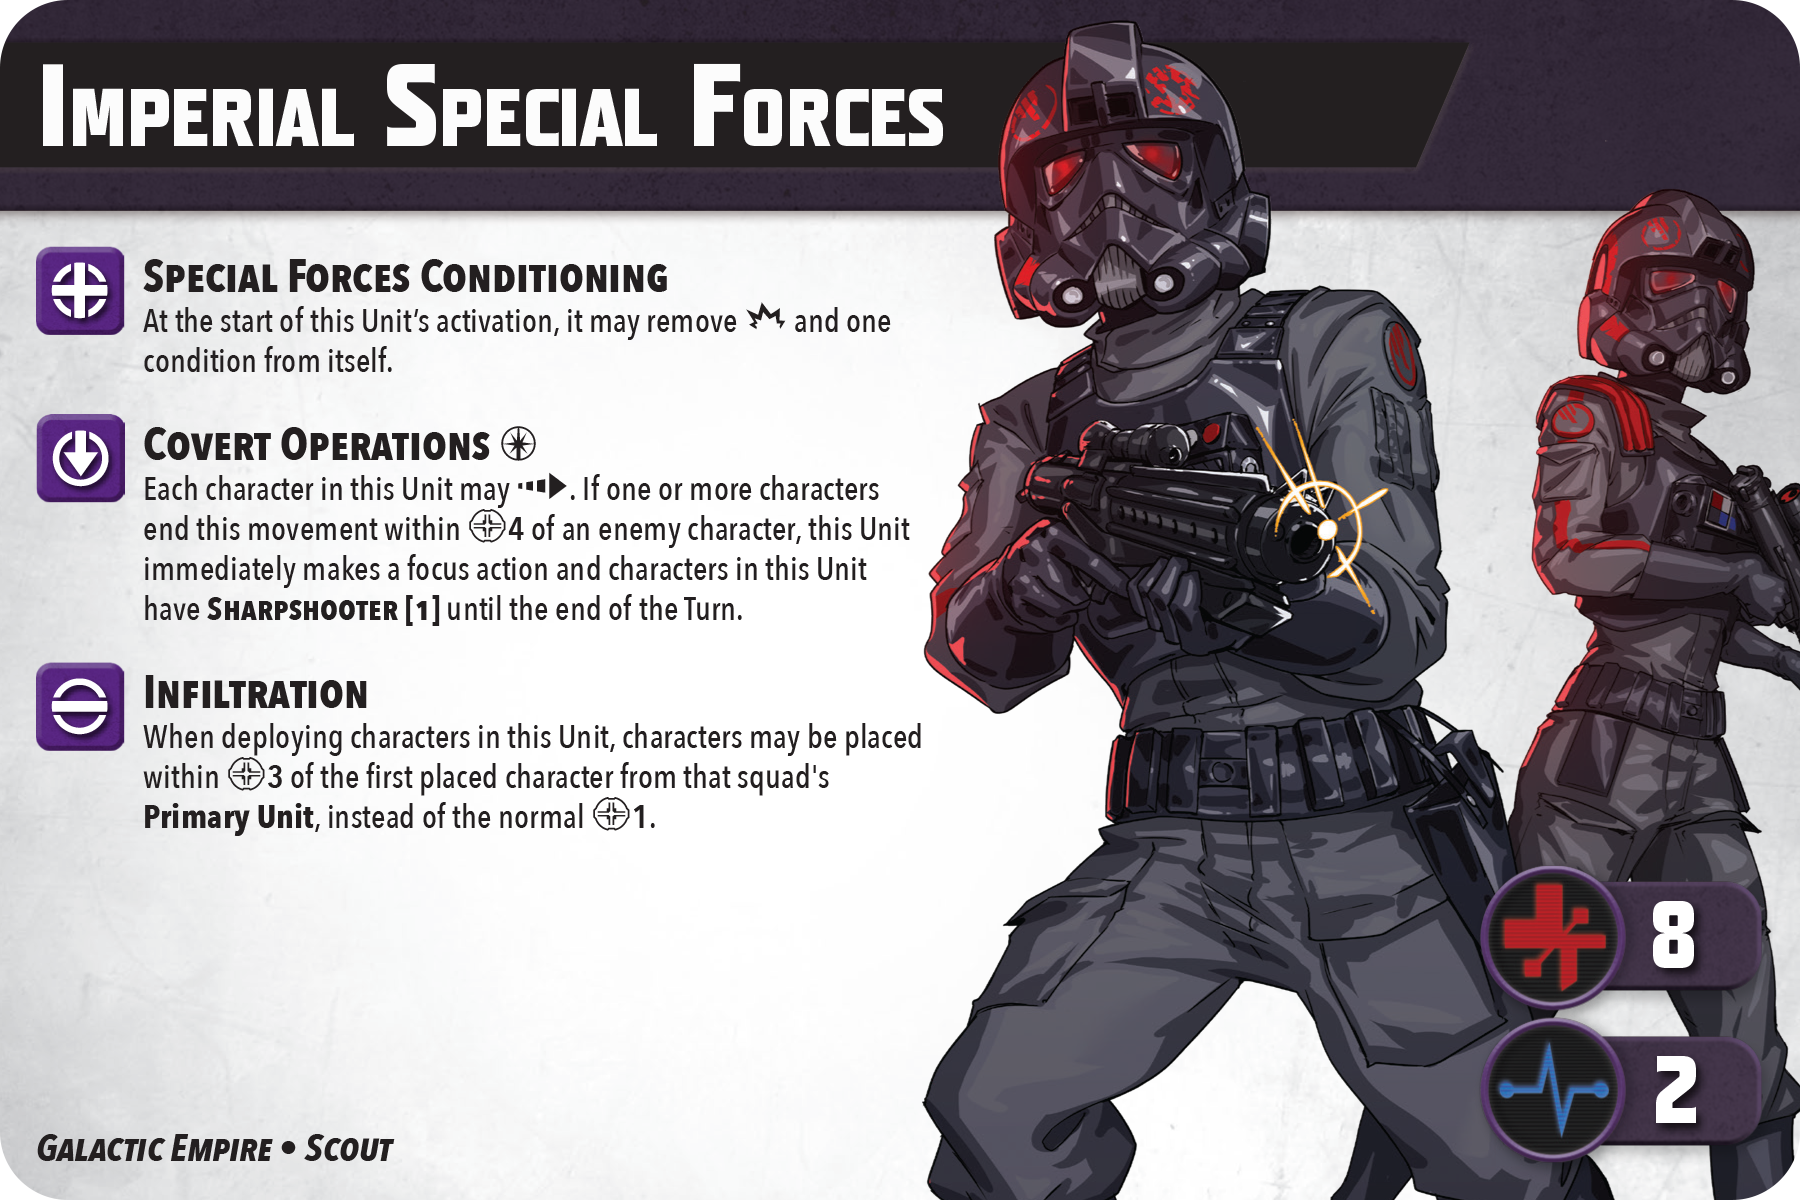
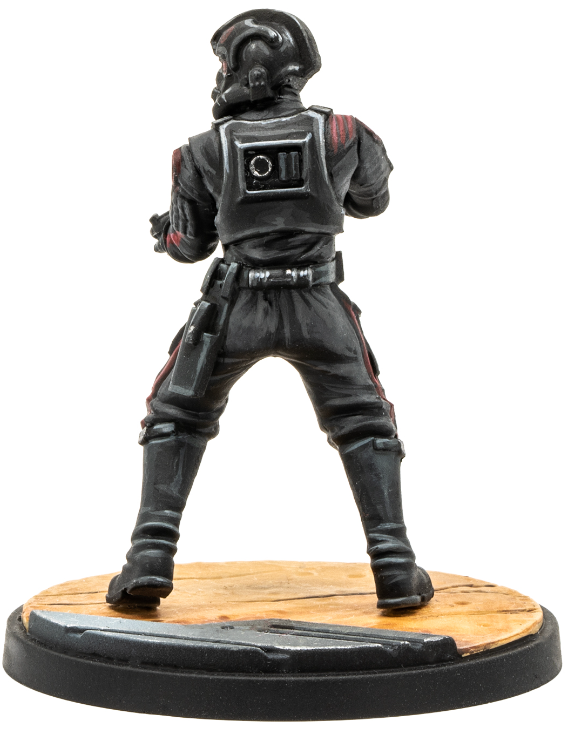
So to start with the helmet, proposed omissions or changes are marked in red. As far as possible I wish to keep this consistent with our current Inferno CRLs, but with the removal of some of the more extraneous detail that cannot be seen in the new artwork for this particular trooper. Helmet The Inferno Squad helmet is modeled after the 3D model specific to Battlefront II game. Battlefront II style Inferno Helmet is allowed for this CRL. The Rogue One TIE Pilot style helmet is allowed for Basic Approval when requirements outlined below are incorporated. Original Trilogy TIE Pilot style helmets are not permitted. There are no screws visible on the helmet. Lenses are bubble or flat, are red in color, and must be sufficiently dark enough to obscure the costumer's eyes. Translucent or mirrored red lenses are acceptable. The front trident area is shorter than a traditional pilot helmet. There is a rectangular indentation on top of the mohawk above the trident. There is one retaining clip greeblie in the left side trident indentation. A Nissan retaining clip is most accurate. The top of the mohawk outside of the raised triangle is painted a dark gun metal color down to the inside edge of the helmet opening. There is a pill box just above the back bottom edge of the mohawk. The pill box is the same black color as the helmet and does not need to be functional. Spaces between the teeth are cut out and backed with a dark gray or silver mesh material. The vocoder is it's own separate greeblie with distinct tubes, not bumps molded into the helmet. The teeth and vocoder are painted flat black. Oxygen mask connectors are molded into the helmet just in front of the ear caps above the cheek tubes on both sides of the helmet. There are Imperial disc greeblies without notches on each ear cap. There are two painted or decal logos on the forehead of the helmet. The Inferno Squad logo on the right side and an Imperial cog on the left side. Logo and Cog are equivalent in size, and shall be between approximately 2.15" to 2.75" (54-69mm) for approval. There is a red painted or red decal area on the ram’s horn on the right side of the helmet. There is a red painted or red decal area on the right cheek tube. There are molded greeblies painted silver inside the hose ports that cover the openings. Helmet may have light weathering/ staining. Silver is not permitted. A balaclava must be worn when helmet is worn. OPTIONAL Level two certification (if applicable): Helmet is strictly made from the game's 3D model and correctly sized/scaled to the wearer. Hose connectors are made from machined aluminum. Imperial Cog and Inferno Squad logo will be 2.15" to 2.25" (54-57mm), scaled to wearer's helmet size. Lenses are backed with round-holed mesh/screen. The pill box is functional. Lenses are bubble type.
-
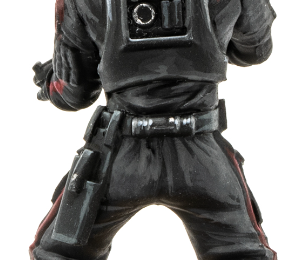
This costume was rejected by Legion Membership Officers for 501st inclusion and will not have a CRL. To begin with I will take the existing text from our Inferno Squad - Del Meeko CRL, combined with the belt and thermal detonator text from the Inferno Squad - Commander Iden Versio CRL. Then we can work through items by item to see what changes may be required. Struck out text. Changed text. New text. --------- Description: Inferno Squad — Imperial Special Forces Trooper Prefix: TX Detachment: Spec Ops Detachment Context: Star Wars: Shatterpoint, Today the Rebellion Dies Squad Pack, Atomic Mass Games Imperial special forces units are masters of infiltration, extraction, and combat in any environment. Ruthless warriors and trained pilots, they stand ready to protect – or bury – the Empire's secrets and eliminate any threat to its reign. Required Costume Components The following costume components are present and appear as described below. Helmet The Inferno Squad helmet is modeled after the 3D model specific to Battlefront II game. Helmets meeting the standards from the Inferno Squad - Del Meeko CRL are permitted. The Rogue One TIE Pilot style helmet is allowed for Basic Approval when requirements outlined below are incorporated. Original Trilogy TIE Pilot style helmets are not permitted. There are no screws visible on the helmet. Lenses are bubble or flat, are red in color, and must be sufficiently dark enough to obscure the costumer's eyes. Translucent or mirrored red lenses are acceptable. The front trident area is shorter than a traditional pilot helmet. There is a rectangular indentation on top of the mohawk above the trident. There is one retaining clip greeblie in the left side trident indentation. A Nissan retaining clip is most accurate. The top of the mohawk outside of the raised triangle is painted a dark gun metal color down to the inside edge of the helmet opening. There is a pill box just above the back bottom edge of the mohawk. The pill box is the same black color as the helmet and does not need to be functional. Spaces between the teeth are cut out and backed with a dark gray or silver mesh material. The vocoder is it's own separate greeblie with distinct tubes, not bumps molded into the helmet. The teeth and vocoder are painted flat black. Oxygen mask connectors are molded into the helmet just in front of the ear caps above the cheek tubes on both sides of the helmet. There are Imperial disc greeblies without notches on each ear cap. There are two red painted or decal logos on the forehead of the helmet. The Inferno Squad logo on the right side and an Imperial cog on the left side. Logo and Cog are equivalent in size, and shall be scaled appropriately to the helmet. There is a red painted or red decal area on the ram’s horn on the right side of the helmet. There is a red painted or red decal area on the right cheek tube. There are molded greeblies painted silver inside the hose ports that cover the openings. Helmet may have light weathering/ staining. Silver is not permitted. A balaclava must be worn when helmet is worn. OPTIONAL Level two certification (if applicable): Helmet is strictly made from the game's 3D model and correctly sized/scaled to the wearer. Hose connectors are made from machined aluminum. Imperial Cog and Inferno Squad logo will be 2.15" to 2.25" (54-57mm), scaled to wearer's helmet size. Lenses are backed with round-holed mesh/screen. The pill box is functional. Lenses are bubble type. Balaclava A balaclava is a black head sock/hood that is worn under the helmet and is used primarily to hide any view of the wearer's skin and/or facial hair. A balaclava must be worn when the helmet is worn. Flight suit Flight suits meeting the standards from the Inferno Squad - Del Meeko CRL are permitted. One-piece black fabric flight suit is made out of canvas or similar heavy material. The full length of the front zipper is covered by a black panel. Approximately 1.5" (38mm) tall mandarin collar with a chevron shaped, left-over-right Velcro closure. An approximately 2.5" (63.5mm) red embroidered or PVC Inferno Squad emblem, on a black background, is present on both shoulders. The shoulders of the suit are slightly padded. If a compad is to be worn with this costume, a compad pocket that properly fits the compad is placed below the left elbow above the left glove so that the pocket is not hidden, and faces outward on the arm. On the left bicep below the cog emblem, there is a code cylinder pocket with no flap, and vertical stitching dividing it into pen sleeves. No code cylinders are present. There is a piece of nylon strapping sewn below the pen sleeve openings and is the same length as the top of the pocket. The bottom front corner of the pocket is cut off at a bevel on the side pointing in view direction, with the broader upside forming the border of the pen sleeves. The right sleeve has a cargo pocket below the cog emblem, with a chevron flap. Two large chest pockets and two large front pockets with chevron flaps are present below the belt. There are no leg pockets below the knees. There are two red stripes that run up the right side of the flight suit. The first begins at the bottom of the right leg and continues up to the right armpit. The second begins at the right wrist and stops at the bottom of the arm pocket. The stripe then continues above the arm pocket, behind the patch emblem to the shoulder seam. The red arm stripe stops at the top of the shoulder seam, but continues up and over the shoulder as a black stripe. There are two black stripes that run up the left side of the flight suit. The first begins at the bottom of the left leg and continues up to the left armpit. The second begins at the left wrist and stops at the bottom of the arm pocket. The stripe then continues above the arm pocket, behind the patch emblem to the shoulder seam. The black arm stripe stops at the top of the shoulder seam, but continues up and over the shoulder to the collar. For basic approval this can be accomplished with topstitching. The black portion of this stripe stops at the collar. A piece of leather or leather-like material is sewn below the pen sleeve openings and is the same length as the top of the pocket. OPTIONAL Level two certification (if applicable): Patches are vinyl on textile with no edge border. If twill is used for the patch material the fabric texture will be vertically oriented. The black stripes on top of the shoulders shall be a material matching texture and weave of the red stripe. A heavy canvas-like material is most accurate for the flight suit construction as it is a thick materials with a "solid" structure. A "loose", soft or lightweight material is not accurate. Compad Rectangular communications pad with patterned painted details matching reference photo. Compad is worn with the four large, rectangular buttons pointing towards the wearer’s elbow. Compad is rectangular in shape and fits within the flight suit's compad pocket window. Details of the compad differ from the standard TIE Pilot compad. Black buttons are smaller than the red and white buttons; the white button located adjacent to the button with multiple dimples may be a single piece, instead of split in two segments. Compad base color is silver, metallic grey, or weathered silver. Compad size is 2.5" x 2" (63.5mm x 50mm). Compad is fully visible above the glove, facing outward on the arm. An Inferno style compad as per Battlefront 2 CRLs is accepted for clearance. For basic approval (Level 1) A standard TIE pilot style compad painted and worn to match game references may also be accepted for use. OPTIONAL Level two certification (if applicable): Compad shall be Inferno Squad style with correct button sizes, layout and colors. Two black buttons at the top of the pad are smaller than the white and red buttons. The white button adjacent to the button with holes/dimples is not split. Compad is moderately weathered / stained. Gauntlet Gloves Black, leather or leather-like material, enclosed fingered, non-textured, (normal leather grain/texture/lines are acceptable) fitted gauntlet style. No buckles, straps, or decorative stitching. Gloves meeting the standards of the Inferno Squad - Del Meeko CRL are acceptable. There is a split on the bottom gauntlet portion that runs from the glove opening to the wrist that is bridged with leather or leather-like material. OPTIONAL Level two certification (if applicable): Gloves are made of leather. Armor Armor consists of front and back pieces connected by shoulder bridges anchored by wedge connectors. Armor is glossy black. Chest and back plate meet flush at the sides under the arms. This is done with a third plate that bridges the gap between the front and back armor parts. Molded black, ribbed, rubber shoulder bridges are acceptable. Back plate contains detailed "O II" design. Armor meeting the Inferno Squad - Del Meeko CRL standard is acceptable. The top of the back plate box may feature a trapezoid shaped depression 4" x 5" (101mm x 127mm) at the top of the box. There is a 5/16" (8mm) circular depression below the right shoulder strap connector on the back plate. Armor may be lightly stained or weathered. Silver is not permitted. OPTIONAL Level two certification (if applicable): Made from the game's 3D model and scaled to the wearer. Armor scaling and strapping must fit the wearer accurately. "O II" design shall have 16 points on the "O" design and "II" bars shall have 5 indented slot depressions at the bottom of each bar matching references. Trapezoid shaped depression at the top of the box shall match game refences for size, shape and location. Any visible staining or weathering must be light. Silver is not permitted. Ammo Belt The front of the belt is made from glossy black or shiny material. is painted gloss black to match the costume's hard armor. Belt face is comprised of 6-8 rectangular boxes, with three square buttons, one centred in the middle and one on each end. Belt face attaches to a belt made of leather or leather-like material. Belt closes behind the Belt Face/Ammo Belt. An ammo belt meeting the standard of the Inferno Squad - Commander Iden Versio CRL is acceptable, so long as Iden's drop boxes are omitted. There are two drop boxes that dangle from the sides of the belt face via black elastic or nylon straps and are aligned under the last ammo boxes on either side of the ammo belt. Belt face and drop boxes may be light to moderately weathered. Thermal Detonator A black thermal detonator is worn centred on the back of the belt. Detonator is based on a Black ANH TK Thermal Detonator. The detonator from the Inferno Squad - Commander Iden Versio CRL is acceptable. Thermal detonator is attached to the back of the belt via metal “scoop" hooks, painted black and attaches over the top of the belt. Thermal detonator may be light to moderately weathered. Holster Holster is made of black leather or leather-like material. A Stormtrooper or Inferno Squad - Del Meeko style holster is acceptable for basic approval. Holster is worn on left side of belt. Holster is attached via 2 black leather or leather-like straps which are attached inside the top edge of the ammo belt, hanging down over the ammo belt pass behind the belt, using two fasteners in the middle of the belt. Fasteners may be rivets, snaps, or Chicago screws. Note: The straps are slightly longer for this holster than seen on Stormtroopers. There is a retention strap which ends in a point approximately 1/2" (13mm) beyond a black snap closure. OPTIONAL Level two certification (if applicable): The holster is made of leather. A leather square is seen under the rivet at the top corners of the holster where the straps are mounted. Holster is worn empty. Boots Calf high black leather or leather-like material. Boots are dull in appearance. Similar design to tall German jack boots or tall motorcycle riding boots are acceptable for basic approval. Boot has a round, plain toe. Harness style or box toe boots are not to be approved. Ankle straps are to be removed. Typical jackboots are not acceptable as they are too short. The boot shaft must rise as close to the bottom of the knees as possible. The boot shall be as tall as required to achieve this appearance. See reference images. Boots have an adjustment strap on the out facing side of the boot. Adjustment strap has a square, silver adjustment buckle. Heels are made of rubber or similar material and may have tread or no tread. Boots may contain zipper closure but must be concealed with boot material as to not be visible. OPTIONAL Level two certification (if applicable): Boots stops just below wearers knees. Shaft height should be 15" (38cm) or as required to stop just below the wearers knees. Boots have a flap with adjustment strap with square silver buckle that starts at the middle back of the boot and wraps around to the outfacing sides. See reference images for shape of the adjustment flap and strap. Boots are not shiny, they have a matte appearance. OPTIONAL ACCESSORIES Chest Box The chest box is required to have the same configurations as seen in the photo. The chest box is held to the armor with an invisible system which is not visible when the box is removed. Strong magnets are advised. The chest box is painted glossy black and matches the sheen of the armor. The chest box has five detail pieces: 1 Red, 1 White, 1 black, 2 Blue. There is a 1/8" (3mm) thick white pinstripe border around the square detail pieces. There are two round indicator lights above the rocker switches, one white, one red respectively. There are three rocker switches below the round indicator lights. The rockers are always gray, white, gray. The gray rockers have red dots or indicator lamps in the bottom outfacing portion. There is a 1/8" (3mm) thick white pinstripe that runs horizontally across the bottom portion of the box. There is a male silver snap or radio jack and a silver round disc with cone knob greeblie on the lower portion of the box below the horizontal pinstripe. There are two "gear" type greeblies affixed to either end of the lower tube portion of the box, and are painted silver or metallic grey. There are two machined aluminum or molded silver greeblies in the hose ports of the box. See reference images and the CRL Gallery view. The hose port greeblies feature 8 round depressions around a raised disc. The color matches the gear type greeblies. Chestbox may be light to moderately weathered or stained. Silver is not permitted. The red and white indicator lights and rocker lamps may be functional. OPTIONAL Level two certification (if applicable): Box is electrically lit to include the red and white squares, both rocker lamp lights and the red and white indicator lights on top of the box. *Box is based on the games 3D model and is scaled to the wearer and consistent with armor size. E-11 Blaster Based on a real or replica Sterling sub-machine gun, scratch-built, or a modified commercial toy Stormtrooper blaster. OPTIONAL Level two certification (if applicable): Folding stock (does not need to function). Folding stock (does not need to function). No ammo counter is present. D-ring mounted on the rear. Correct style scope. No power cylinders on the magazine housing. Scratch-built, resin cast, Hyperfirm rubber cast blasters have a total of seven U- shaped channels on blaster (all holes on barrel are covered). If using the popular commercially available Stormtrooper blasters, you shall grind off the T-tracks and replace them with U shaped channels and cover the open rows of holes (total of 7 U-shaped channels in all). Correct greeblies on the left rear area are present (door catch and two "hammers").
-
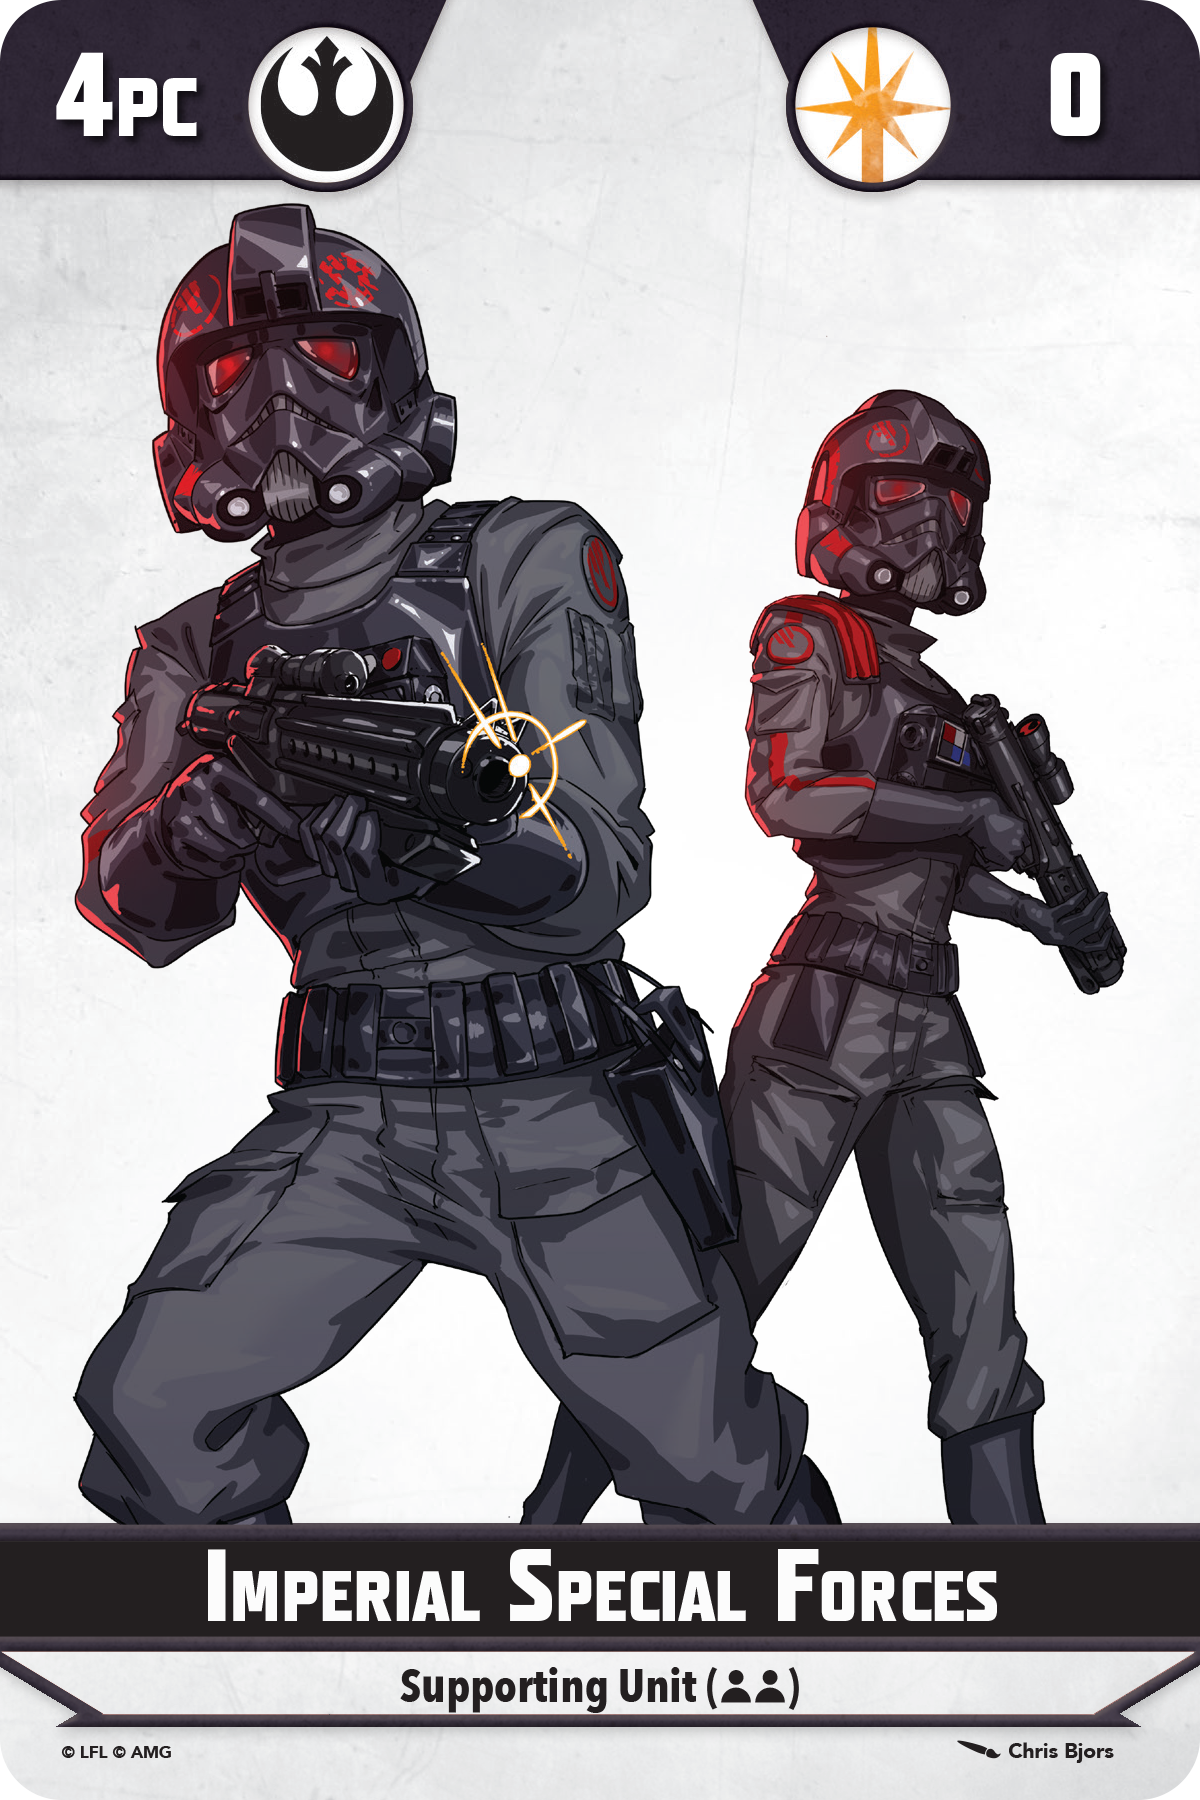
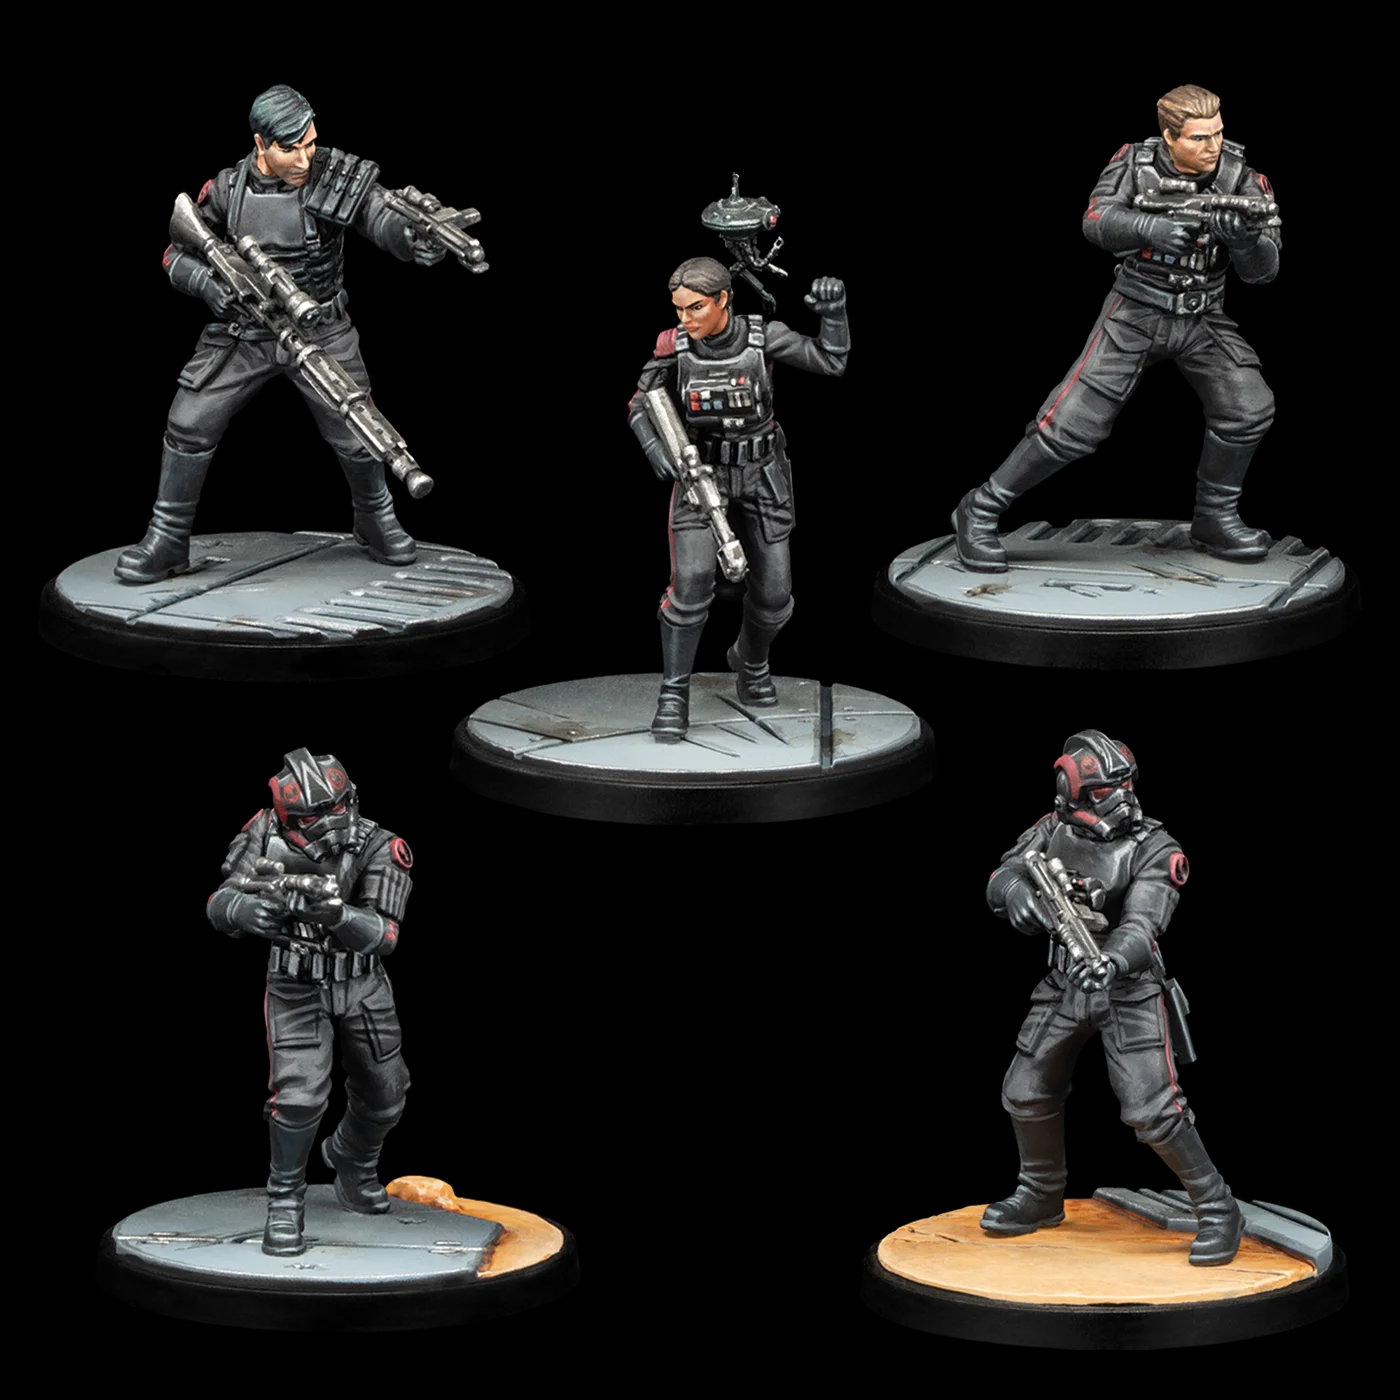
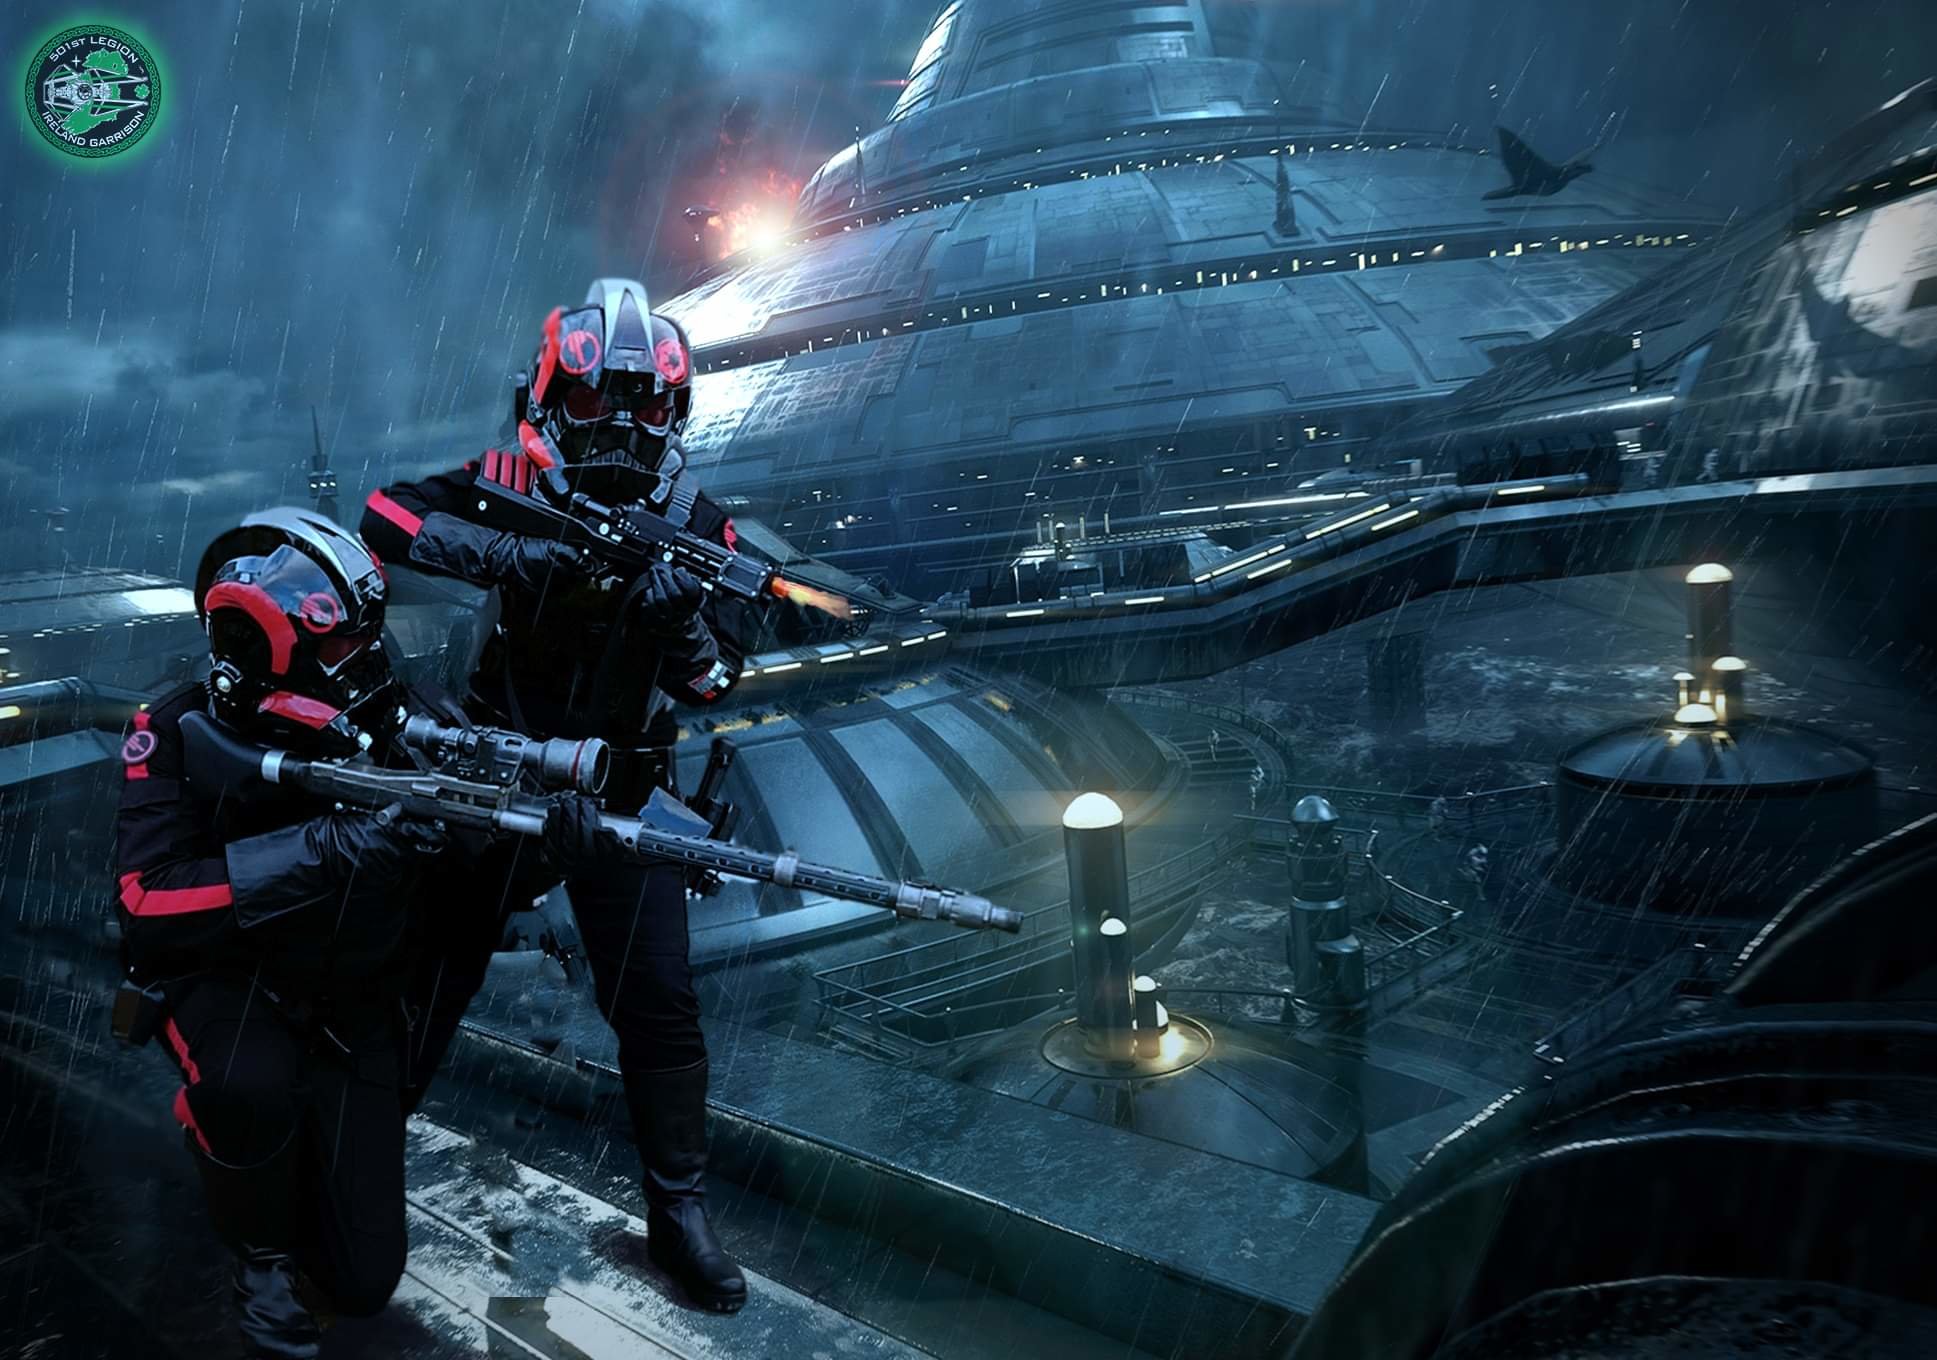
There are a number of official artworks which illustrate the "Imperial Special Forces" troopers, as distinct from the named versions of Iden Versio, Del Meeko and Gideon Hask from the same source. Two Imperial Special Forces troopers, one with a shoulder pauldron. Two Imperial Special Forces troopers with Gideon Hask. Two Imperial Special Forces troopers with Del Meeko, Iden Versio and Gideon Hask. The publisher also provides 2 interactive 360 degree views of the trooper models that can be viewed at the link below. These clearly show that the thermal detonator remains consistent with that described in the Iden Versio CRL. They also provide another look at the new style of pauldron featured in the primary artwork. This lies flat to the flightsuit and does not extend out beyond the shoulder seam, unlike the traditional "squad leader" pauldron worn by many Imperial characters. https://www.atomicmassgames.com/character/today-the-rebellion-dies-squad-pack/ The only typical "Inferno Squad" component not clearly visible is the com pad, however the Del Meeko artwork clearly indicates that this remains consistent with the Inferno style com pad already described in our existing Inferno CRLs.

-
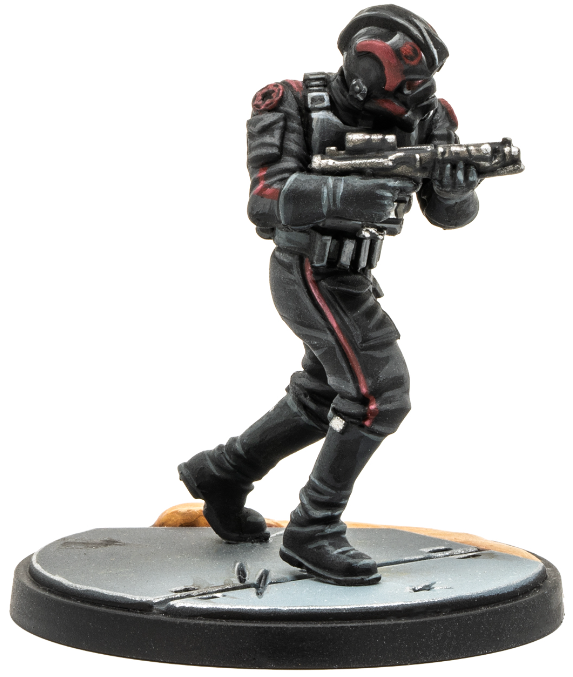
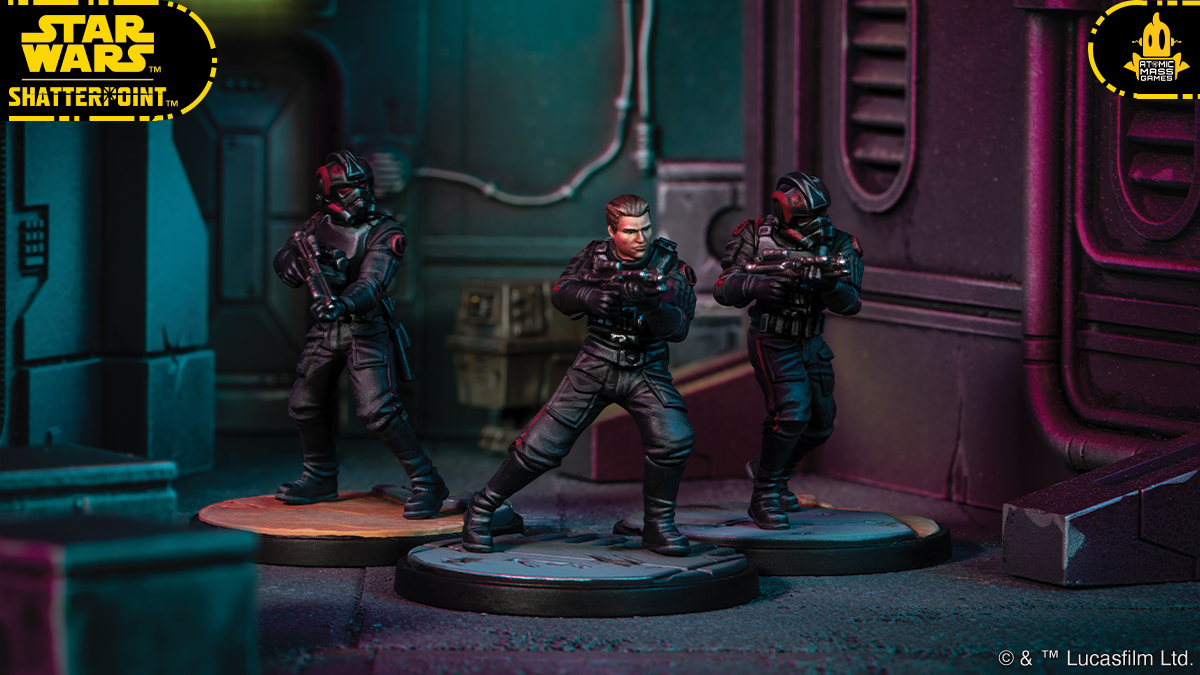
Another licensed product (Star Wars Shatterpoint, published by Atomic Mass Games) has now confirmed the presence of a generic Inferno style trooper in the Star Wars universe. This trooper is also titled "Imperial Special Forces", consistent with their appearance in Star Wars Legion, published by Fantasy Flight Games. The above artwork is much clearer and less stylised than that which appears in Star Wars Legion artwork, so I would propose using this as the primary visual reference for a NTTL CRL application. The artwork shows two troopers, with the one on the right wearing a modified "squad leader" style shoulder pauldron. If approved, we could either create a "version 2" including the pauldron, or we could simply include the pauldron as an "optional" aspect of this costume. Additional detail is provided by 360 degree visual references for the models, published online by the licensed publisher: https://www.atomicmassgames.com/character/today-the-rebellion-dies-squad-pack/ There are also a number of other published photos showed the physical models painted by the publisher's team. Between these photos and the 360 degree visual references, any gaps in the primary visual reference would seem to be more than covered. The combined visual references above provide a full and detailed look at each costume part that makes up this costume. The following costume parts are entirely consistent with the following parts already described in detail in our Inferno Squad - Del Meeko CRL: Helmet. Flight Suit. Shoulder Patches. Torso Armour. Optional Chest Box. Compad (inferred from the Del Meeko artwork). Gloves. Holster. Boots. Optional E-11. The regular ISF trooper being proposed does NOT have the following parts of the Del Meeko CRL: Tactical Vest. Shoulder Ammo Pouch. Scout Over Belt. Scout Pouches. The remaining elements visible in our new references are fully consistent with those already described in the Inferno Squad - Commander Iden Versio CRL: Thermal Detonator. Ammo Belt - omitting Iden's drop boxes. I would therefore suggest using our existing Del Meeko CRL as the basis for this proposed NTTL CRL, with additional details drawn from the Iden Versio CRL. While much clearer than the artwork in Star Wars Legion, the artwork we would be drawing upon is still somewhat stylised. However the Legion has already created many high quality CRLs based on similar artwork in published comics. These include: 0-0-0 (TX) General Weir (TX) Lt Sunber (TX) Task Force 99 members (TX) 181st Fighter Group (TI) 181st Dress Uniform (TI) Baron Fel (TI) I would suggest streamlining the existing Del Meeko and Iden Versio text to omit detailing that is not readily visible in the stylised Shatterpoint artwork, particular as relates to highly specific Level 2 detail that was taken from the high resolution 3D models visible in Battlefront 2. This would ideally create the opportunity for a new "entry level" costume that is more accessible than the named Inferno characters, which would be particularly beneficial in drawing in new first time applicants. This new costume could be an excellent stepping stone towards the named Inferno characters for many new troopers.
-
Yup, I'm pretty sure that's a Rogue 1 TIE helmet rather than an OT one. So while it might not reach specialist level, it's perfectly acceptable for basic clearance (assuming that the actual product lives up to the renders being displayed of course!).
-
I'd definitely agree that its a TIE helmet rather than a game accurate Inferno, though I'll need to look closer to figure out whether it's Rogue One (clearable) or OT (technically not clearable). Will see if I can do a side by side tomorrow. 3DSchmiede in Germany definitely make lids accurate to the game, but I don't know if they've ever sold files for their casts.
-
I haven't seen a great looking one yet, but if you see any viable candidates don't hesitate to throw up some pictures or links. No problem taking a look and giving a verdict.
-
Full text on Page 1 has now been amended with a few tweaks to the flight suit and hand plates following previous discussion with Teresa and Kevin. The only part still to be done from scratch is Saxon's rifle. Do we have any existing CRLs that use the same model?
-
Hi Michael, That sort of question is usually best answered by your local Garrison or Squad. In my own Garrison, I believe the ruling would usually be that if we are attending an official Disney/LFL troop then we are restricted to the props in the character's CRL. However in all other troops (the vast majority), there is no issue at all bringing other suitable props. It is however up to your own local staff to decide.
- 1 reply
-
- 3
-

-

-
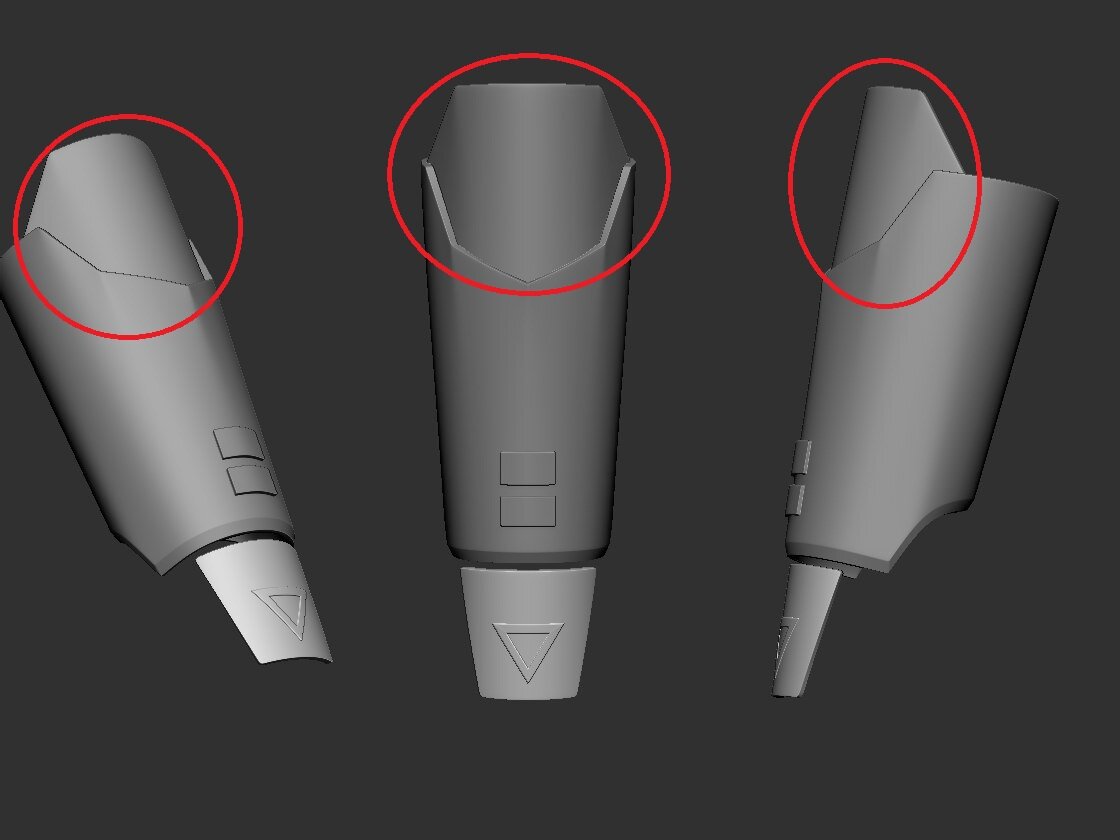
Brilliant work Kevin! Just one final tweak needed to my eyes - sorry, I probably should have explained better during my last review. You got rid of the raised ridge near the top of each gauntlet, but now you have that top section sitting much lower than the rest of the gauntlet: None of the reference images that I've found show this. All surfaces on the gauntlets are at the same elevation, with the sole exception of the bevelled edge down at the wrists. The overall shape you have is perfect, it just doesn't need to be inset like that at the top. Once you bring that section up to the same level, the model should be perfect.
-
I would speak to your GML to see if they are willing to clear a R1 chestbox first. However it's worth noting that the chestbox is an optional extra for Del Meeko. So there is nothing to stop you proceeding without it and getting clearance. If Jinta or anyone else gets them back in future, there is nothing to stop you resubmitting your clearance photos to have that added in 🙂 I wouldn't recommend spending money on something that might not clear, especially if it isn't a core element of the costume.
-
Hi again Jérémy, I'm actually working at the moment on bringing our list of vendors up to date. Jinta Props is the only one I've found so far listing a finished chest box, though you could try asking Jim Tripon whether he offers them. You can find him with a quick Facebook search. Let us know how you get on with your search.
-
Yes, as Ryan says only your GML can really make that call. It's worth noting that there is no evidence of an electronic lighting in the Inferno compad, and the CRL certainly doesn't include anything like that. So your GML could choose to refuse clearance if they wished. However I would agree with Ryan that in most cases, a GML would probably not deny basic clearance just for this.
-
Purge Trooper (Phase II) - Kenobi - Discussion
tipperaryred replied to nanotek's topic in Purge Trooper Phase II (Kenobi)
Huge thanks to everyone that assisted with this project. We had to rely on convention photos, behind the scenes insights, scale models and more to make up for the limited on screen references. Fantastic to see it complete. -
No worries Teresa, it's always a help to have input from members with technical knowledge when it comes to the construction of these - all the more so when we're trying to translate something from an animation to something that can be worn by a real human being. We'll figure out something that works I'm sure.
-
Hi Jason, thanks for the post. You are entirely correct that this needs a bit of updating. I'll make this a priority and start reaching out to a few vendors to check on their current status.
-
Jetpack looks perfect, great work! For the shins, it looks more like there is a separate knee pad, rather than it being a part of the shin armour: It's also worth noting the shape of the knee armour, and that the cut out at the top of the shin armour is more of a semi circular shape than the angled version you have in the first draft there. Keep up the great work, you're nearly there 👍
-
Purge Trooper Phase 1: Commander - CRL Discussion
tipperaryred replied to nanotek's topic in Purge Trooper Phase I: Commander
Starting at the beginning. The changes in yellow seem simple enough. As far as I can tell there are no changes from the Electrostaff Trooper helmet other than the edges of the lower tubes being painted red instead of grey. One thing that did stand out though, is that I really struggled to make sense of some of the text from the original Electrostaff CRL. When we revised this I was mostly looking for new detail that could be added thanks to the new high resolution screen caps we had access to. I can't have been looking too critically at the existing text however, because I can't follow a lot of it now. It might just be my lack of familiarity with some of the terminology though, so I'd appreciate any feedback on the notes I've added in purple below. Screens added in below are from the Electrostaff rather than the Commander, simply because they are the highest quality ones we have at this point. Thanks! Helmet Realistic style Purge Trooper helmet. Note that this helmet differs from the Airborne Trooper helmet sculpt. Armor is painted satin black. Helmet has a rounded dome with no mohawk. Helmet has a narrow red eye lens. The etched lines on the face of a standard Airborne Trooper helmet are not present. Along each side of the eye lens are semi circular intake vents with a protruding tube extending towards back of helmet. Vent does not feature open slits. Vent features twelve raised, vertical bars that are evenly spaced along the length of the vent. I cannot see anything matching this description on the upper vents that this sub-bullet point is nested under. Is this referring instead to the grey panel located on either side of the lowest tube? This is the only place I can see raised vertical bars, and even here I count 13 on each side, not 12. Area below the nose bridge splits open to the base and has a gray, vertical inset vocoder column detail. The front face of the delta piece features two raised rectangles. Where are the raised rectangles? There also seems to be no description of the lowest part of the vocoder? The front face of the delta piece features 10 ribs. Base of helmet has two widened ventilation tube bands with the widest tube band on bottom. Ends of the smaller tube band, above the helmet base, have a black mesh opening in front. Is this supposed to say the "wider" tube band, not the smaller? The smaller tube has grey vents inset as described below. Two black round aerators are located in the split area in front of lower tube band. These also look grey/silver, not black? The front edges of the lowest tube band are painted red. A small red square is painted on the underside of the vocoder opening in the lowest tube band. The entire top interior edge is painted red on each side, is that what this refers to? I cannot see a red square painted anywhere. Base tube band has elliptical shaped inset ventilation detail with vertical ribbing at the front cheek areas. The vents are painted dark gray. The front end of the vent insert is squared off Helmet has an indented band that extends around the back of the helmet. There seem to be two indented bands? One at the rear top, one at the rear bottom. Squared off rib detail at the base of the helmet dome is a different tone of satin black. Armor has little to no weathering. Any weathering present consists of gray tones. Visor lens is red. OPTIONAL Level two certification (if applicable): The visor has a red lighting effect that matches the reference photos. -
I understand what you mean, but having looked again at the references, I can't find a single frame where there's even the slightest gap between the hand plates and the forearm armour: Even the conceptual art shows the hand plates sitting much lower and apparently sliding underneath the forearms. Some of the screens show a definite flex in the hand plates. You are entirely correct that this could just be an artefact of the animation, but nonetheless it is what is appearing on the screen. So we have to walk the difficult line between replicating that, while still making it possible for a real human to wear the costume. If we try and recreate this look purely with hard plastic, I don't see any way that it will be possible for you to move your wrists. My instinct would be go with something like that wording used in the ANH TK CRL: "As an alternative to plastic, these may be made out of latex or latex-like material" If someone can successfully achieve the required look with plastic, there is no problem at all. But my instinct is that we need to allow a more flexible option in order to balance the right look with the ability to actually move while wearing it.
-
No problem, I'll review the reference images again. My instinct would be to leave both hand plate options open for builders, but I'll confirm once I've had a chance to review
-
I think we're nearly done on all the major parts, but I'll ask at least one or two of our experienced staff members to do a final review before we finish. It's particularly important to make sure the language and wording is consistent with our other CRLs. Once that is done, we'll then need photos of the final parts, and everything put together.
-
Brilliant work! Spot on, no issues. Also great. Only two issues here that I can see. First, you don't need to have that raised ridge running around the top (where the white band is on the right forearm). There is definitely no change in elevation there: So I think you can scrap that raised ridge entirely and leave it all at the same elevation. Second, you can see in some images that the hand plates run underneath the forearm armour: For this reason, I think having them 3D printed in hard armour would limit movement, and would also cause one or both to break very quickly. I think you would be safest leaving the forearm as a separate piece, and then making a set of hand plates out of something flexible like foam rubber. The white triangle is simply painted on, so there is no need to sculpt a raised ridge where the white triangle is. Brilliant job here again. It is almost perfect! I think the only thing needing work are the details on the abdomen section. Some better views came up in the last batch of screenshots: You can now see that there are four divisions in that detail, not three - there is a tiny section at the very top. The bottom section is also a lot bigger than the one above it. So if you just tweak the spacings there a little, I think it will be spot on. Brilliant work mate, that's a huge step forwards.