tipperaryred
-
Posts
596 -
Joined
-
Last visited
-
Days Won
24
Content Type
Profiles
Forums
Events
Everything posted by tipperaryred
-
That's absolutely a lot closer, great work. The shoulder piece that David picked out above is a particularly nice reference point, and I'd agree with David's point that the smooth gradients between colours are still going to be tricky to get spot on without an airbrush. However I think your torso armour is the closest you've gotten to a solid match so far, so maybe tweak that a little further and come back to us? If you can then replicate that on the other armour parts you'll be most of the way there. Great to see the progress 🔥
-

Del Meeko CRL Change proposals FEBRUARY 2025
tipperaryred replied to Blackwatch's topic in Inferno Squad Del Meeko
I like this a lot better now, I think we may be good to lock it in. -
Del Meeko CRL Change proposals FEBRUARY 2025
tipperaryred replied to Blackwatch's topic in Inferno Squad Del Meeko
Thanks for the input Gary! To address each in order: 1) The line about the OT style pilot helmets is two separate sentences. The first says exactly what you suggest, "Original Trilogy TIE Pilot style helmets are not permitted". We don't want to leave any grey areas there - if it is an OT helmet, it shouldn't clear even basic clearance. The second sentence about not having any screws visible is supplementary to that. To put it another way, we aren't saying OT helmets aren't allowed BECAUSE there should be no visible screws. We're saying OT helmets aren't allowed AND there should be no visible screws. 2) I think this could be a useful piece of clarification. In truth it is very difficult to get a clear visual reference on this part of the costume, but where we do see it, it does appear to look very similar to the rest of the armour. I would be happy to suggest wording along those lines, "This is done with a third plate that bridges the gap between the front and back armor parts, and matches the rest of the torso armor in appearance". That way folks aren't tied down to using the exact same material, but can use something more practical so long as they ensure that it blends in. Would that read better? 3) In fairness what we know as "canvas" comes in a huge variety of types. My own flight suit is made from canvas and is extremely comfortable to wear, in almost all weather conditions (in Ireland at least!). The key part here is that we want to leave vendors and troopers alike some degree of flexibility in what they can wear. At the end of the day we are looking at a simulated texture used in a game, which was never in canon worn by a real human being. The only things we can go on are the appearance and the fit. As far as the appearance goes, there is a very noticeable weave that closely resembles canvas, hence the guidance we give. The fit does not have a lot of bunching or hanging that would be associated with lighter materials, so again is consistent with something like canvas. However the key part of the text is, "or similar heavy material". If you find a type of denim that fits right, doesn't hang or bunch, and looks similar in appearance to what we see in the game, there is nothing in the CRL text stopping a GML from clearing that. Thanks again, and please do jump back in if you want to follow up on any of that further or spot some other areas worth looking at. -
While we wait for Kevin, it is worthwhile jumping back into the grunt CRL. As Saxon's text is now complete, I have copied and pasted it above, and we can go through it item by item in the usual fashion. Starting as usual with the helmet, here is Gar Saxon's text as a starting point: Helmet Imperial Mandalorian Super Commando style helmet, matching visual references from Star Wars Rebel animated series. Helmet should be painted and weathered to match references. Weathering/chipping of the white paint should match the light grey paint used elsewhere on the helmet. Helmet dome and face plate to be painted red as per references. Rear plate, raised rear panel detailing, the upper cheek plates, left ear plate and teeth must be painted light grey as per references. Helmet dome and face plate, lower cheek plates, raised rear panel, must be painted white (or a lighter shade of grey), as per references. Additional detailing on rear plate must be painted white. The ear caps and antennae may be painted light grey or a weathered white. All recessed panel lines are black or dark grey. There is an inverted white outlined red triangle with a white outline in the center of the forehead. This should be painted. A weathered decal may be acceptable if achieving the look of having been painted. Both visor pieces are black, and obscure the wearer's face. The lower visor tapers in slightly to its narrowest point at the bottom. The left ear cap is oval, with a raised circular detail at the top, and a slightly tapered antenna with a circular profile. The right ear cap is angled at the top, with a narrower half oval at the base. There is an angled recessed panel line in the bottom right corner of the cap. The cap has a raised circular detail at the top, and two antennae. The rear antenna matches that on the left side, while the front antenna is significantly taller. Twin recessed panel lines (1 & 2) run around the upper visor, angle up over the ear pieces, and join together in horizontal lines across the back of the helmet. A third panel line (3) runs parallel and just above the upper of these two lines (2), joined to this same upper panel line at both ends, and running horizontally across the central portion of the rear of the helmet. The distance between 2 and 3 is approximately half the distance between lines 1 and 2 at the rear of the helmet. Additional panel lines vertically bisect each ear plate, and run around their edges. The rear bottom lip of the helmet has a raised, curved rim, running between the rear edges of each ear plate. The back plate has a raised rectangular panel with details to match references. These are long vertical oblongs on both sides, a circle in the lower center, and a double striped rectangle within another rectangle in the upper center. Details are outlined by recessed panel lines. The back plate is light grey, but has white detailing painted on either side of the raised rectangular panel. There are six teeth, three on each side of the lower visor, with the recesses painted black or dark grey. I will take some additional high resolution screens grabs to supplement our reference images, but all of the existing images seem to point to this helmet being identical to that worn by Gar Saxon. The only difference being that the dome and face plate of the helmet is painted white on the grunt, in place of the red paint seen on Saxon's helmet. I have not yet been able to spot any other difference.
-
Juice Box's (APPROVED!) Del Meeko Build
tipperaryred replied to TonyJuiceBox's topic in Inferno Squad Del Meeko
There are currently two approvable approaches. 1) You can attach the lower half of the pouch to the overbelt, either by threaded it through a loop in the back of the pouch, or by using velcro, or a combination of both (as you note above). 2) Or you can attach the upper half of the pouch to the waist strap that run around the back of the tactical vest. Again, you can use a loop, velcro, or a combination of both. Personally I prefer this method as it lets the pouch hang down naturally - it is less likely to twist around. However it is perfectly possible to make either approach work. -
Yes, as David noted there isn't all that much variation. Our current plan is that as soon as we have finalised the Saxon CRL, we will copy and paste it over to the Imperial Super Commando grunt thread and go though it line by line to see where it diverges. 95% of the work will already have been done before then, so it should be a much faster process to get the second CRL live.
-
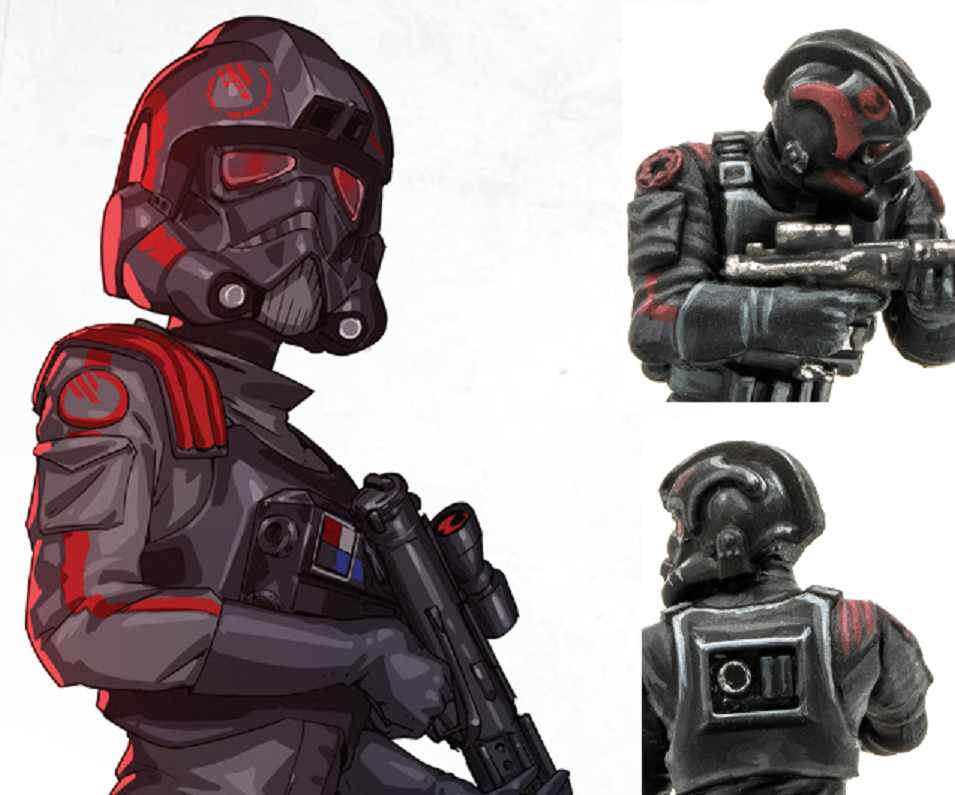
First draft of the optional shoulder pauldron below. The appearance is quite similar to Iden's (red on black, leather-like appearance), but is much shorter with only 3 red bars instead of 5. It stops at the shoulder seam of the flight suit instead of extending out over the shoulder as per the "usual" Star Wars shoulder pauldron. No straps are visible running under the arm, and as this pauldron stops at the shoulder seam this method of attachment would be impractical anyway. I would suggest allowing flexibility of attachment with any "discrete" method, eg. velcro, magnets, or even sewn directly onto the shoulder of the flight suit. We see the pauldron sitting on top of the armour's shoulder straps in the main artwork, but in the supporting references the inside edge of the pauldron can be seen to be tucked in under the shoulder straps at times. I would suggest allowing both ways of wearing the pauldron, at the wearer's preference. Shoulder Pauldron Worn on the right shoulder, matching references. Made from leather or leather-like material. The base of the pauldron is black. On top of the black base are three red stripes placed evenly apart. The pauldron may be worn under or over the shoulder straps of the armour. The outer edge of the pauldron should be approximately in line with the shoulder seam of the flight suit. The pauldron may be attached to the shoulder of the flight suit with any discrete method, including velcro, magnets or sewing.

-
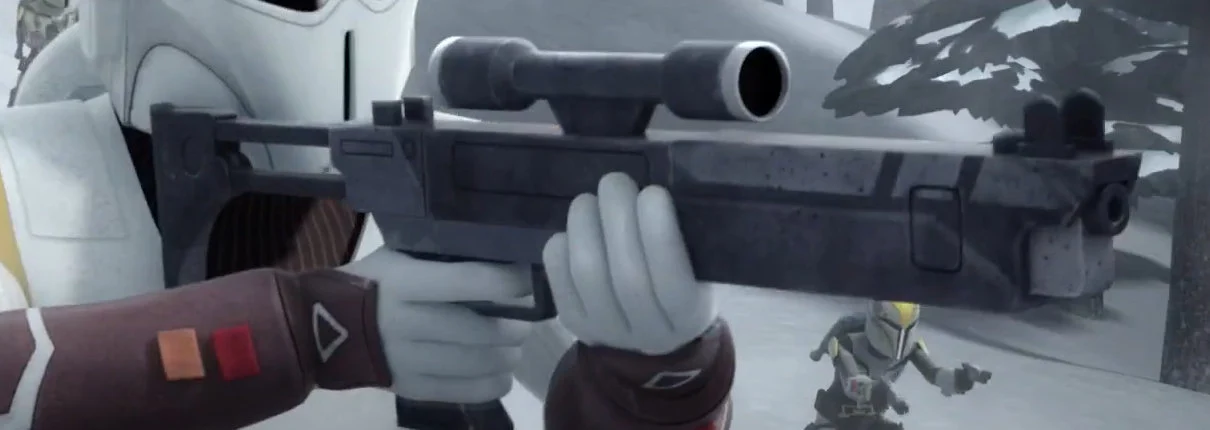
Sound, I think all that's needed on this first pass now is to detail the optional components. As far as I can tell, it should be: Shoulder Pauldron Chest Box Hoses (Maybe? They aren't featured in the artwork) E-11 Blaster
-
Del Meeko CRL Change proposals FEBRUARY 2025
tipperaryred replied to Blackwatch's topic in Inferno Squad Del Meeko
And sorry yes, I wasn't clear on what I meant about the E-11. I know there are shots of Del with one, and it has always been an optional blaster for him. But the CRL has also always specified that he can never carry it in the holster - that it has to be empty. The image I linked to above though clearly shows the E-11 in the holster, so we should probably change that when we get to the holster. -
Del Meeko CRL Change proposals FEBRUARY 2025
tipperaryred replied to Blackwatch's topic in Inferno Squad Del Meeko
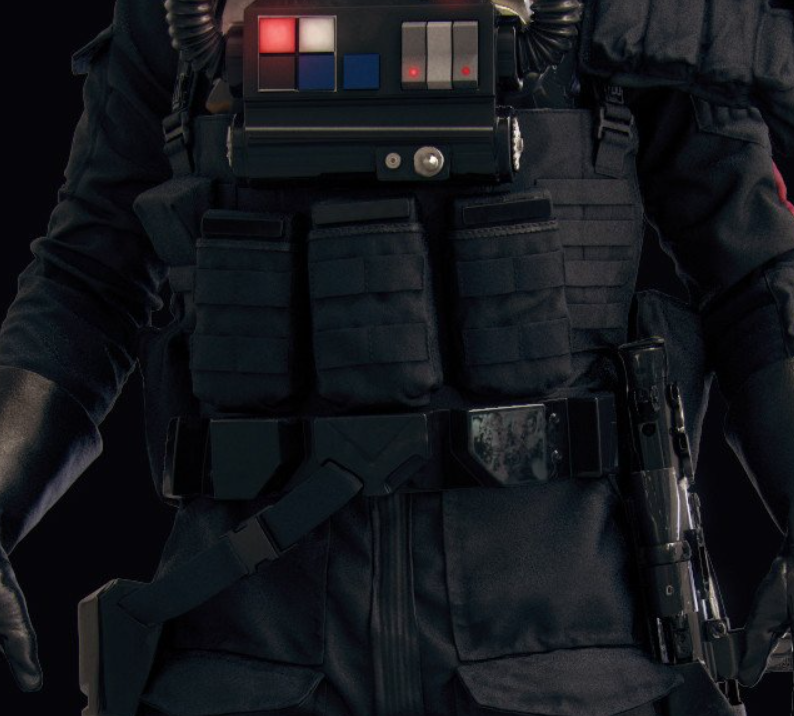
Sound, I like it. You're right that it's really the signature part of Del's costume, so it's only right we take the time to get it right. One more small tweak that I didn't think of before - we should also specify that the block on the right should also be covered by the vest material (like the mag pouch inserts). So I've added that in below: ---- Tactical Vest The tactical vest and its pouches are made of black fabric similar to the flight suit material. Heavy black canvas is recommended. There are three M4 / M16 style magazine pouches fitted to the front of the vest, each filled by a rectangular package covered in the same fabric as the tactical vest. The packages fill the pouches completely, and extend above the pouch. Each package has a black gloss strip mounted to the front at the top, which should appear to be constructed from a similar material to the costume's hard armour parts. There is a black block on the right side of the vest matching references, covered by the same black fabric as the tactical vest, held in place by one of the webbing straps described below There are a total of fourteen wide horizontal black webbing straps sewn onto the front of the tactical vest, with four stacked horizontally on either side of the pouches, and two at the front of each pouch. Straps are approximately 1" (25mm) wide and sewn to match reference images. The main shoulder straps are made from leather or leather-like material, which cross at the back and attach to the top edge of the vest on both sides. The front shoulder straps are attached to triglide buckles, which in turn attach to the top front edge of the vest with a shorter strap. The shoulder straps cross near the top of the back armor box. Each shoulder strap runs through a tri-glide at the rear before feeding into approximately 1" (25mm) wide side release buckles which attach to the top edge of the vest. There is a leather or leather-like waist strap (approximately 1" or 25mm wide) present at the back of the tactical vest, and it is attached to the vest with one quick release buckle on the right or left side of the vest at the wearer's option. This quick release buckle is hidden under the scout pouch, and is not seen when worn. A single adjusting tri-glide is centered on the back waist strap. There is a specific buckle greeblie mounted above the front tri-glide buckles on each side, matching reference images. There is a horizontal strip mounted to each front shoulder strap, several inches above the buckle greeblie. The strips should be made from the same material as the shoulder straps. The Flyye tactical vest is not accurate and will not be approved for use. OPTIONAL Level two certification (if applicable): The vest is proportional to the wearer. See reference images and the Costume Gallery for placement of specific components. All shoulder and waist straps are made of black leather or leather-like material. Vest front tri-glides are made with reference to the games 3D model, and are attached to the vest with straps that are approximately 1.37" x 1.37" (35mm x 35mm) wide. Buckle style greeblies made with reference to the 3D models are attached to the shoulder straps above the tri-glides. The front shoulder straps which go over the shoulder and continue to the back are made of 3 layers which are glued, sewed or bonded together. Stitching is permitted as long as the stitches are small and do not detract from the overall appearance. The first (bottom) layer is approximately 1.37" (35mm) The middle layer shall be approximately 1" (25mm) wide. The final layer is approximately 9/16" (15mm) wide. The layered part of the leather shoulder straps runs up over the shoulders and stops below the rear of the collar. It then continues on as an approximately 1" (25mm) wide black strap, passing through tri-glides and into side release buckles, which are held to the vest with straps that are approximately 1" (25mm) wide. The three magazine pouches fall below the bottom edge of the vest. The top of the pouch is in line with the bottom edge of the upper webbing strap. The bottom edge of the pouch may come close to but not touch the top edge of the overbelt. -
One other important consideration worth some discussion maybe. As of yet we don't have any Level 2 requirements, although there are potentially one or two things that could be placed there quite easily. However, I think it's important that Specialist level remains a challenge for our members. So while I would be entirely in favour of making basic clearance for this proposed costume as accessible as possible, particularly for new members, I would prefer not to create a Level 2 version just for the sake of it. It would risk diluting the Specialist achievement somewhat by creating a relatively easy route to it compared to some other costumes. So unless there are compelling arguments otherwise, I would suggest omitting Level 2 details from this CRL altogether.
-
Thanks for the feedback both of you, I'm in full agreement. "Calf height" is flexible enough that both TIE and Inferno boots could qualify, and is entirely consistent as a description of what we see in the visual references. I've struck out the additional line about the toe style from Del's CRL to allow more flexibility. I've incorporated the wording from the ANH TIE Pilot, that the boots "may" have an adjustment strap with a buckle, which need not be functional. I've also tweaked it to allow silver *or* gunmetal, which again allows a maximum of flexibility while remaining true to the references. Permitting a zipper but insisting that it should be hidden with the boot's outer material is also consistent with both Inferno and TIE CRLs. Boots Calf high black leather or leather-like material. Boots are dull in appearance. Similar design to tall German jack boots or tall motorcycle riding boots are acceptable for basic approval. Boot has a round, plain toe. Harness style or box toe boots are not to be approved. Ankle straps are to be removed. Typical jackboots are not acceptable as they are too short. The boot shaft must rise as close to the bottom of the knees as possible. The boot shall be as tall as required to achieve this appearance. See reference images. Boots may have a single adjustment strap at the top outside of the boot, with a square buckle. Buckle should be silver or gunmetal, and need not be functional. Adjustment strap has a square, silver adjustment buckle. Heels are made of rubber or similar material and may have tread or no tread. Boots may contain zipper closure but must be concealed with boot material as to not be visible. Boots meeting the standard for the Inferno Squad - Del Meeko CRL are acceptable. OPTIONAL Level two certification (if applicable): Boots stops just below wearers knees. Shaft height should be 15" (38cm) or as required to stop just below the wearers knees. Boots have a flap with adjustment strap with square silver buckle that starts at the middle back of the boot and wraps around to the outfacing sides. See reference images for shape of the adjustment flap and strap. Boots are not shiny, they have a matte appearance.
-
The last of the compulsory costume elements, the boots. Reasonably straightforward here I think. The height and style is entirely consistent with existing Inferno boots, while the artwork showing the publisher's painted sculpts clearly shows the metal buckle on the adjustment strap. None of the artwork shows the triangular flap that sits behind the adjustment strap in Del's boots, however I would propose allowing any boot that meets Del's CRL standard to also be clearable here, in line with other elements in this proposed CRL. Boots Calf high black leather or leather-like material. Boots are dull in appearance. Similar design to tall German jack boots or tall motorcycle riding boots are acceptable for basic approval. Boot has a round, plain toe. Harness style or box toe boots are not to be approved. Ankle straps are to be removed. Typical jackboots are not acceptable as they are too short. The boot shaft must rise as close to the bottom of the knees as possible. The boot shall be as tall as required to achieve this appearance. See reference images. Boots have an adjustment strap on the out facing side of the boot. Adjustment strap has a square, silver adjustment buckle. Heels are made of rubber or similar material and may have tread or no tread. Boots may contain zipper closure but must be concealed with boot material as to not be visible. Boots meeting the standard for the Inferno Squad - Del Meeko CRL are acceptable. OPTIONAL Level two certification (if applicable): Boots stops just below wearers knees. Shaft height should be 15" (38cm) or as required to stop just below the wearers knees. Boots have a flap with adjustment strap with square silver buckle that starts at the middle back of the boot and wraps around to the outfacing sides. See reference images for shape of the adjustment flap and strap. Boots are not shiny, they have a matte appearance.
-
Thanks, and I agree with all the points you're making there. I would definitely want to keep Level 2 requirements to a minimum on this one, as they seem mostly unnecessary. It's probably best to look at this one the same way the Legion has built CRLs from comic references in the past. A decent example is Soontir Fel over at JRS, which I nearly built some years ago so am reasonably familiar with. The CRL has very few Level 2 requirements, drawing exclusively from the same stylised artwork that we're looking at here. Practically the only time Level 2 is brought in is to remain consistent with similar costumes; eg leather for boots and gloves, patch material to match that used in the films, etc. We could incorporate some of that logic, or we could leave this purely as a standalone entry level costume and let the named Inferno characters act as that step up in accuracy for those who want to chase it.
-
Del Meeko CRL Change proposals FEBRUARY 2025
tipperaryred replied to Blackwatch's topic in Inferno Squad Del Meeko
It's great to have more input, so thanks a million for chipping in Nichole. I think you'll have no issues here for two main reasons: 1) ALL measurements in the CRL are to be taken as approximate - we're trying to do a better job of stressing that this time around. So the relative measurements compared to how the costume fits on the wearer is far more important than any absolute measurements. So if a 6'3" Del needs to drop their mag pouches by about an inch to look accurate to the reference pics, it is only natural that someone who is 5'2" wouldn't have to drop their pouches quite so far. 2) You said that you'd be worried that the pouches would end up rest on top of your scout belt, but in fact the reference images show Del's in-game pouches almost doing exactly this already. The central pouch has virtually no daylight between its lower edge and the top of the belt, while the pouches on either side have a clearance of a few mms at most. So long as they're not overlapping down in front of the belt face, I think you're good 🙂 Also, just a note for us all to come back to later - I've only just noticed that the reference image above actually shows an E-11 in Del's holster... I don't recall seeing that in any of the other reference images? Definitely need to revisit that "Holster must be worn empty" when we get to that section later.
-
No worries mate. @Dropkickand I are both attending an epic multi-day troop next weekend down at some of the Ep VII and VIII filming locations, so I was planning to have a word in his ear then about this 😉 Yup, I think that approach is the right one. Since I started on this, the publishers have also released interactive 360 degree images of the painted sculpts, so we're in an even better position to make the case than before. Plus I noticed that Del Meeko's artwork from the same publication also finally gives us a look at the compad, which is a simplified version using elements of both the Inferno and regular TIE pilot compads. I added the new images and links to the reference image thread last week.
-
I will also throw up the thermal detonator and holster components (with my initial proposed changes) so that these can be discussed together with the ammo belt. For the troopers the holster straps sit outside the belt, attaching inside the top edge of the belt. This is a departure from the way they are worn by the named members of Inferno Squad. Thermal Detonator A black thermal detonator is worn centred on the back of the belt. Detonator is based on a Black ANH TK Thermal Detonator. The detonator from the Inferno Squad - Commander Iden Versio CRL is acceptable. Thermal detonator is attached to the back of the belt via metal “scoop" hooks, painted black and attaches over the top of the belt. Thermal detonator may be light to moderately weathered. Holster Holster is made of black leather or leather-like material. A Stormtrooper or Inferno Squad - Del Meeko style holster is acceptable for basic approval. Holster is worn on left side of belt. Holster is attached via 2 black leather or leather-like straps which are attached inside the top edge of the ammo belt, hanging down over the ammo belt pass behind the belt, using two fasteners in the middle of the belt. Fasteners may be rivets, snaps, or Chicago screws. Note: The straps are slightly longer for this holster than seen on Stormtroopers. There is a retention strap which ends in a point approximately 1/2" (13mm) beyond a black snap closure. OPTIONAL Level two certification (if applicable): The holster is made of leather. A leather square is seen under the rivet at the top corners of the holster where the straps are mounted. Holster is worn empty.
-
The ammo belt has a slight inconsistency between the artwork and the sculpts, with 6 rectangular boxes on the sculpts and 8 in the artwork. I would propose making both acceptable for clearance, primarily for accessibility reasons. All similar belts in our library would have a maximum of 6 boxes (eg. TK belt, Iden's belt). It is unlikely that many vendors would be willing to create a longer belt just to accommodate this one CRL. Ammo Belt The front of the belt is made from glossy black or shiny material. is painted gloss black to match the costume's hard armor. Belt face is comprised of 6-8 rectangular boxes, with three square buttons, one centred in the middle and one on each end. Belt face attaches to a belt made of leather or leather-like material. Belt closes behind the Belt Face/Ammo Belt. An ammo belt meeting the standard of the Inferno Squad - Commander Iden Versio CRL is acceptable, so long as Iden's drop boxes are omitted. There are two drop boxes that dangle from the sides of the belt face via black elastic or nylon straps and are aligned under the last ammo boxes on either side of the ammo belt. Belt face and drop boxes may be light to moderately weathered.
-
Del Meeko CRL Change proposals FEBRUARY 2025
tipperaryred replied to Blackwatch's topic in Inferno Squad Del Meeko
I agree. If it's always hidden under one of the scout pouches anyway, then what side it is on is irrelevant. Also, a further tweak of the block next to the mag pouches: There is a black wedge-shaped block, covered by the same fabric as the tactical vest, on the right side of the vest matching references, held in place by one of the webbing straps described below. -
Del Meeko CRL Change proposals FEBRUARY 2025
tipperaryred replied to Blackwatch's topic in Inferno Squad Del Meeko
It's one of the most difficult parts to call. It could easily be either, though the fact that there is no bulging of the pad/block below the webbing suggests to me that maybe it has that wedge shape to start with? The top part definitely has a triangular wedge shape to it, and I suppose whether it was like that to begin with, or it is just deformed because of the webbing, the visual end result is much the same? If someone takes a rectangular block and squishes it in so that it looks more wedge shaped, it will still meet the CRL requirements. What do you think? I'll put the proposed text below with both of our proposed changes, minus all of the mark ups, so we can see how it reads and what changes are still needed. The coloured markups are vital for tracking changes, but they do make it hard to take a step back and see how readable the changed text is. Tactical Vest The tactical vest and its pouches are made of black fabric similar to the flight suit material. Heavy black canvas is recommended. There are three M4 / M16 style magazine pouches fitted to the front of the vest, each filled by a rectangular package covered in the same fabric as the tactical vest. The packages fill the pouches completely, and extend above the pouch. Each package has a black gloss strip mounted to the front at the top, which should appear to be constructed from a similar material to the costume's hard armour parts. There is a black wedge-shaped block on the right side of the vest matching references, held in place by one of the webbing straps described below. There are a total of fourteen horizontal black webbing straps sewn onto the front of the tactical vest, with four stacked on either side of the pouches, and two at the front of each pouch. Straps are approximately 1" (25mm) wide and sewn to match reference images. The main shoulder straps are made from leather or leather-like material, which cross at the back and attach to the top edge of the vest on both sides. The front shoulder straps are attached to triglide buckles, which in turn attach to the top front edge of the vest with a shorter strap. The shoulder straps cross near the top of the back armor box. Each shoulder strap runs through a tri-glide at the rear before feeding into approximately 1" (25mm) wide side release buckles which attach to the top edge of the vest. There is a leather or leather-like waist strap (approximately 1" or 25mm wide) present at the back of the tactical vest, and it is attached to the vest with one quick release buckle on the right or left side of the vest at the wearer's option. This quick release buckle is hidden under the scout pouch, and is not seen when worn. A single adjusting tri-glide is centered on the back waist strap. There is a specific buckle greeblie mounted above the front tri-glide buckles on each side, matching reference images. There is a horizontal strip mounted to each front shoulder strap, several inches above the buckle greeblie. The strips should be made from the same material as the shoulder straps. The Flyye tactical vest is not accurate and will not be approved for use. OPTIONAL Level two certification (if applicable): The vest is proportional to the wearer. See reference images and the Costume Gallery for placement of specific components. All shoulder and waist straps are made of black leather or leather like material. Vest front tri-glides are made with reference to the games 3D model, and are attached to the vest with straps that are approximately 1.37" x 1.37" (35mm x 35mm) wide. Buckle style greeblies made with reference to the 3D models are attached to the shoulder straps above the tri-glides. The front shoulder straps which go over the shoulder and continue to the back are made of 3 layers which are glued, sewed or bonded together. Stitching is permitted as long as the stitches are small and do not detract from the overall appearance. The first (bottom) layer is approximately 1.37" (35mm). The middle layer shall be approximately 1" (25mm) wide. The final layer is approximately 9/16" (15mm) wide. The layered part of the leather shoulder straps runs up over the shoulders and stops below the rear of the collar. It then continues on as an approximately 1" (25mm) wide black strap, passing through tri-glides and into side release buckles, which are held to the vest with straps that are approximately 1" (25mm) wide. The three magazine pouches fall approximately 1" (25mm) below the bottom edge of the vest. The top of the pouch is in line with the bottom edge of the upper nylon webbing strap. The back waist strap has a single quick release buckle mounted to the right side of the vest using a strap that is approximately 1" (25mm) wide. -
Del Meeko CRL Change proposals FEBRUARY 2025
tipperaryred replied to Blackwatch's topic in Inferno Squad Del Meeko
David's proposed changes that I am in full agreement with revert to the default white/grey text colour. I have removed the text from David's proposed deletions for clarity. My own tweaks are now in yellow, and my deletions struck through in red, with my comments/explanations in brackets in (red). Most of my proposed deletions are not actually text being removed - it's usually text that has been moved elsewhere for clarity/consistency, or is already repeated elsewhere. Tactical Vest The tactical vest and its pouches are made of black fabric similar to the flight suit material. Heavy black canvas is recommended. All straps are black webbing. Nylon or cotton webbing is acceptable. (NOTE the shoulder and waists straps are leather like material, so a generic comment on all "straps" could be confusing) There are three M4 / M16 style magazine pouches fitted to the front of the vest, with each filled by a rectangular package covered in the same fabric as the tactical vest. The packages fill the pouches completely, and extend above the pouch. Each packages has a plastic black gloss strip mounted to the front at the top, which should appear to be constructed from a similar material to the costume's hard armour parts facing forward. Strip size is 5/32" x 1/2" x 2.63" (4mm x 12mm x 68mm). There is a black canvas-covered wedge-shaped block on the right side of the vest matching references, held in place by one of the webbing straps described below with a 1" (25mm) wide strip of elastic or webbing mounted to the vest, going across the front of the block. There are a total of fourteen 1" (25mm) wide horizontal black webbing straps sewn onto the front of the tactical vest, with four stacked horizontally on either side of the pouches, and two at the front of each pouch. Straps are approximately 1" (25mm) wide and sewn to match reference images. The magazine pouches may drop up to one inch below the bottom of the vest matching reference images. (Now covered in Level 2 below) The main shoulder straps consist of are made from leather or leather-like material, which cross at the back and attach to the top edge of the vest on both sides in the back. The front shoulder straps are attached to triglide buckles, which in turn attach to the top front edge of the vest with a shorter strap. The front portion of the shoulder straps measure 1.38" (35mm). The front shoulder straps may be made of 3 stacked leather or leather-like strips, or may be grooved to simulate this. Vest-front tri-glides are attached to the vest with 1.37" x 1.37" (35mm x 35mm) loops. (All struck text is now repeated either above or in the Level 2 detailing) The shoulder straps cross near the top of the back armor box. Each shoulder strap runs through a tri-glide at the rear that the end of each strap feeds into, near the back armor box shape. These leather or leather-like straps before feeding into approximately 1" (25mm) wide side release buckles which attach to the top edge of the vest. See costume guide gallery for placement. There is a leather or leather-like waist strap (approximately 1" or 25mm wide) present at the back of the tactical vest, and it is attached to the vest with one quick release buckle on the right or left side of the vest at the wearer's option. This quick release buckle is hidden under the scout pouch, and is not seen when worn. A single adjusting tri-glide is centered on the back waist strap. There is an approximately 1.5" x 1" (38mm x 25mm) specific buckle greeblie mounted above the front tri-glide buckles on each side, matching reference images. There is a 1" (25mm) horizontal strip mounted to each front shoulder strap, several inches above the buckle greeblie. The strips should be made from the same material as the shoulder straps. leather or leather-like and is aligned right to left. See Reference Images and the Costume Gallery for correct placement. The quick release buckles on the back of the vest are attached by 1" (25mm) loops. black leather or leather-like strips. (Now covered above) The Flyye tactical vest is not accurate and will not be approved for use. OPTIONAL Level two certification (if applicable): The vest is proportional to the wearer. See reference images and the Costume Gallery for placement of specific components. (Text added here so it does not need to be repeated in each bullet point below) All shoulder and waist straps are made of black leather or leather like material. (Strap material is clearly specified here, so does not need to be repeated in each bullet point below) Vest front tri-glides are made with reference to the games 3D model, and are attached to the vest with leather straps that are approximately 1.37" x 1.37" (35mm x 35mm) wide. loops. Game-specific 3D model Buckle style greeblies made with reference to the 3D models are attached to the leather shoulder straps above the tri-glides. The front shoulder straps which go over the shoulder and continue to the back are made of 3 layers of ribbed leather strips which are glued, sewed or bonded together. Stitching is permitted as long as the stitches are small and do not detract from the overall appearance. The first (bottom) layer is approximately 1.37" (35mm) with the middle layer added to that. The middle layer shall be approximately 1" (25mm) wide. The final layer is centered on top of the first two layers, and is approximately 9/16" (15mm) wide. The three bonded strips run the length of the forward portion of the shoulder strap assembly. (Already explained in the next bullet point) The grooved layered part of the leather shoulder straps runs up over the shoulders and stops below the rear of the collar past the wearers shoulders, . It then continues on as an approximately 1" (25mm) wide black leather strap, passing through tri-glides and into side release buckles, which are held to the vest with black leather straps that are approximately 1" (25mm) wide. See Reference Images and the Costume Gallery for placement and construction. The three magazine pouches fall approximately 1" (25mm) below the bottom edge of the vest. The top of the pouch is in line with the bottom edge of the upper nylon webbing strap. The back waist strap has a single quick release buckle mounted to the right side of the vest using a strap that is approximately 1" (25mm) wide. black leather loop. This buckle is hidden under the scout style pouch and is not seen when worn. -
Del Meeko CRL Change proposals FEBRUARY 2025
tipperaryred replied to Blackwatch's topic in Inferno Squad Del Meeko
To be fair, there was so much to fix from the original CRL that it's understandable things got missed in the last re-write, even if they came up in the last discussion. But you're 100% right that this needs some more serious work to simplify it down while fixing mistakes. I'll contribute my own re-write on top of your own after I have a chance to revisit all the reference images later today, but straight away I agree with a lot of what you've fixed above. In particular the references to "ribbed" straps and leather "loops", which were very confusing. We want this to be simple to read, consistent, and allowing the trooper the maximum flexibility and accessibility to build while remaining accurate. Is it worth having an additional discussion over the sheer level of detail we are including in the CRL itself? Whenever I show the CRL to someone interested in an Inferno build, there is usually a worried intake of breath from them as the scrolling continues, and continues, and continues... Compared to the majority of other CRLs, Del's is packed with a lot of dense detail which is great for scratch builders and vendors, but is going to be off putting for a lot of troopers. It may be worth going back to basics and deciding what information belongs in which of the following places: CRL basic clearance section. CRL Level 2 clearance section. The forum discussion thread (ie. here). I think the best example of this might be the exact measurements we have throughout the CRL. These probably originated with Anton's vital research into the sizes of components in the 3D model, which was essential into getting the relative sizes correct. However does ever trooper need to ensure that the cover strips on their vest mag inserts are "5/32" x 1/2" x 2.63""? Some details like this can probably be left in the forum, while others can definitely be re-written to be easier to read. The main concern is always that costume parts look correct relative to each other when worn by a specific trooper, not that there is a single set of "correct" absolute measurements that can be worn by troopers of all sizes and shapes. -
Del Meeko CRL Change proposals FEBRUARY 2025
tipperaryred replied to Blackwatch's topic in Inferno Squad Del Meeko
Absolutely, it's a fair point on the fit as well as the potential IP issues. There's no point exclusively using one inflexible 3D model that only fits a limited number of troopers. As always, how a costume looks on a trooper is more important that absolute dimensions of each individual piece. Onto our favourite part of the costume, the vest! Current text below presented for feedback: Tactical Vest The tactical vest is black Cordura nylon. All straps are black. There are a total of fourteen 1" (25mm) wide straps sewn to the tactical vest, with four laying horizontally on either side of the pouches, and two at the front of each pouch. Straps are sewn to match reference images. There are three M4 / M16 magazine pouches, with each filled by a rectangular package covered in the same fabric as the tactical vest. The packages fill the pouches completely, and extend above the pouch. Each packages has a plastic strip mounted at top facing forward. Strip size is 5/32" x 1/2" x 2.63" (4mm x 12mm x 68mm). There is a black canvas-covered block on the right side of the vest matching references, with a 1" (25mm) wide strip of elastic or webbing mounted to the vest, going across the front of the block. The main shoulder straps consist of ribbed leather or leather-like material. The front portion of the ribbed shoulder straps measure 1.38" (35mm). The front shoulder strap buckles are tri-glide buckles. Vest-front tri-glides are attached to the vest with 1.37" x 1.37" (35mm x 35mm) loops. The quick release buckles on the back of the vest are attached by 1" (25mm) loops. There is an approximately 1.5" x 1" (38mm x 25mm) specific buckle greeblie mounted above the tri-glide buckles on each side matching reference images. The shoulder straps cross near the top of the back armor box. Each shoulder strap has a tri-glide that the end of each strap feeds into, near the back armor box shape. See reference photos and the Costume Gallery for placement. There is a 1" (25mm) leather or leather-like waist strap present at the back of the tactical vest, and it is attached to the vest with one quick release buckle on the right or left side of the vest at the wearers option. This quick release buckle is hidden under the scout pouch, and is *not seen when worn. A single adjusting tri-glide is centered on the back waist strap. The Flyye tactical vest is not accurate and should be avoided. OPTIONAL Level two certification (if applicable): The vest is fitted to the wearer. All vest shoulder and waist straps are made of black leather. Vest front tri-glides are specific to the games 3S model, and are attached to the vest with 1.37" x 1.37" (35mm x 35mm) leather loops. Game-specific 3D model buckle style greeblies are attached to the leather shoulder straps above the tri-glides. See reference images and the Costume Gallery for placement. Front shoulder straps which go over the shoulder and continue to the back are made of 3 layers of ribbed/ grooved leather strips which are glued/sewed/bonded together. The first (bottom) layer is 1.37" (35mm) with the middle layer added to that. The middle layer shall be 1" (25mm) wide. The final layer is centered on top of the first two layers, and is 9/16" (15mm) wide. The three bonded strips run the length of the forward portion of the shoulder strap assembly. The grooved part of the leather shoulder straps stop just past the wearers shoulders, and continues on as a single 1" (25mm) black leather strap, passing through tri-glides and into specific quick release buckles, which are held to the vest with 1" (25mm) black leather loops. (see Reference Images and the Costume Gallery for placement and construction. The quick-release buckles on the back of the vest, which hold the shoulder straps, are attached by 1" (25 mm) black leather loops. The back waist strap has a single quick release buckle mounted to the right side of the vest using 1" (25mm) black leather loop. This buckle is hidden under the scout style pouch and is not seen when worn. -
Armor Armor consists of front and back pieces connected by shoulder bridges anchored by wedge connectors. Armor is glossy black. Chest and back plate meet flush at the sides under the arms. This is done with a third plate that bridges the gap between the front and back armor parts. Molded black, ribbed, rubber shoulder bridges are acceptable. Back plate contains detailed "O II" design. Armor meeting the Inferno Squad - Del Meeko CRL standard is acceptable. The top of the back plate box may feature a trapezoid shaped depression 4" x 5" (101mm x 127mm) at the top of the box. There is a 5/16" (8mm) circular depression below the right shoulder strap connector on the back plate. Armor may be lightly stained or weathered. Silver is not permitted. OPTIONAL Level two certification (if applicable): Made from the game's 3D model and scaled to the wearer. Armor scaling and strapping must fit the wearer accurately. "O II" design shall have 16 points on the "O" design and "II" bars shall have 5 indented slot depressions at the bottom of each bar matching references. Trapezoid shaped depression at the top of the box shall match game refences for size, shape and location. Any visible staining or weathering must be light. Silver is not permitted.