RAIDER
-
Posts
3,316 -
Joined
-
Last visited
-
Days Won
400
Content Type
Profiles
Forums
Events
Everything posted by RAIDER
-
From what I can see, everything looks good for basic approval. Truthfully with some minor tweaks you could probably get this to Level 2 fairly easily.
-
Congrats @Hoda!!! Looking forward to seeing your Specialist application!
-
is it possible the pieces are not paired up correctly? i think if ur going to use wider cover strips and/or shims u should do that in the back. i had a squad mate do that with his thighs...id have to see if i can find an example for shins/calves
-

Star Wars Battlefront (2004): Phase 0 Dark Trooper CRL Discussion
RAIDER replied to Darth Emphatic's topic in Dark Troopers
Looking at that above (and the texture reference shows similar) it looks like it's more like the ESB TK shell hand plate (clone hand plates are more angular if I remember correctly)…HOWEVER…there is no texture there really. It's smooth all the way. The question would be, is that intentional or is that just cutting back (or limitations of) the design textures? We could demand a totally smooth hand plate at Level 1 OR allow the readily available ESB plate for Level 1 while requiring a smooth shell plate for Level 2. Thoughts? -
Star Wars Battlefront (2004): Phase 0 Dark Trooper CRL Discussion
RAIDER replied to Darth Emphatic's topic in Dark Troopers
I think this is the best angle of the hand plate we have. -
Congrats @SpaceWelder and welcome to Spec Ops! Love the pic and have shared it with our PR team
-
congrats @Kessel!!! if u think u might be close to Level 2 you should try for specialist approval.
-
Kevin might not be readily available...but he purchased from Chef's Creations I believe. HOWEVER...we are reworking the CRL for an update and Kevin has actually done a more accurate 3D model. Hopefully he will make that available once we can get his pictures taken and the CRL updated.
-
Additionally moved detonator to optional per references.
-
224th imperial swamp trooper gunner : "Korso"
RAIDER replied to mike ford's topic in Mudtrooper Heavy Gunner (Korso)
Great @JAFO Whats the source for these shots? Only one belt eh? -
Star Wars Battlefront (2004): Phase 0 Dark Trooper CRL Discussion
RAIDER replied to Darth Emphatic's topic in Dark Troopers
Felt like there was some angling in it as well. Not just vertical. Maybe @Blue Hatter has a closeup up of it to show -
Star Wars Battlefront (2004): Phase 0 Dark Trooper CRL Discussion
RAIDER replied to Darth Emphatic's topic in Dark Troopers
@IcyTrooper Im backtracking i know...but i noticed it on the BF fan skin. The vocoder on Phase 0 is different than a standard TK correct? Does the text address that? -
I was referring more to the measures as a guide for makers/builders and for any potential L2 applications down the line which would require that...not for GMLs. ?
-
Star Wars Battlefront (2004): Phase 0 Dark Trooper CRL Discussion
RAIDER replied to Darth Emphatic's topic in Dark Troopers
if there's a chance neck can be seen...let's just require the neck seal lol. We had a similar loophole in the Del Meeko CRL where balaclava was optional but then necks were showing on applicants. No bueno. -
Star Wars Battlefront (2004): Phase 0 Dark Trooper CRL Discussion
RAIDER replied to Darth Emphatic's topic in Dark Troopers
Off hand...not necessarily...the general rule is accuracy trumps look. Again, there are times especially with video games where things magically float in place and something has to be done to make it work. But in general, you want it be true to form. My concern here specifically would be the helmet becoming more Stormtrooper-esque (smaller) than it should. The model borders on that going for a more proportional aesthetic. As a general example...this happens often...when new costumes are being created as a new movie comes out, makers often jump the gun and create armor molds that are ultimately found not to match and then when the CRL is written, they get upset when their mold doesnt meet the requirements. I'm just giving you a heads up. My recommendation would be to follow the CRL creation thread religiously to make sure you know exactly what needs to be adjusted. -
Making corrections in wiki as noted. Additionally, I went and looked at some of our more recent updates and noticed that when below 1", we do in fact use fractions @gmrhodes13 lol. Would anyone have any objections however to my rounding of the fractions to 16ths as most US rulers/measuring tapes do not show 32nds or smallrer or would that throw off the measures too much?
-
Star Wars Battlefront (2004): Phase 0 Dark Trooper CRL Discussion
RAIDER replied to Darth Emphatic's topic in Dark Troopers
Read my word of caution above tho in my edit. -
Star Wars Battlefront (2004): Phase 0 Dark Trooper CRL Discussion
RAIDER replied to Darth Emphatic's topic in Dark Troopers
@Mr.Nova I would add though that you are correct in that this rendition is close. If your intent was to build a 3D model off of it, I assume you could alter that model to match the correct details of the original and so it might make a suitable base. You would just need to be certain that the final product meets those CRL requirements (i.e. remove the knee armor) and cross-check every little detail so that anything that was added that does not match the original reference is removed...and vice versa...any little detail missing is added where it should be. Edit: Adding this just to clarify...with any 3D model (or hand sculpted mold), there is a fine line between accuracy and interpretation. Just a word of caution to be very careful about over-interpreting to what may "look better" in the process so that it doesn't cross over into something that cannot be approved. -
Star Wars Battlefront (2004): Phase 0 Dark Trooper CRL Discussion
RAIDER replied to Darth Emphatic's topic in Dark Troopers
Fan art cannot be used as a reference. What kishdr did is build his 3D model based on the details seen from the actual gameplay...and yes the graphics were a much lower quality and so liberties are taken most certainly (that's done with alot of older video game characters)...but kishdr's model as an example could never be the reference from which we write the text and requirements. Only the original (official) art provides those details and we match them as best as possible to real-world costume applications. To further the explanation...there are countless fan-made Stormtrooper renditions out there. Many very true to the original source. But if we were to write a CRL today, none of them would qualify as a "reference" because they aren't the original...just copies of that. TL/DR: All references must come from official sources from which CRL text is based. Fan art does not qualify as a reference no matter how close to the original source it may be. -
Star Wars Battlefront (2004): Phase 0 Dark Trooper CRL Discussion
RAIDER replied to Darth Emphatic's topic in Dark Troopers
Correct. Unfortunately this is not an actual official game skin (I have both BF1 and 2 by EA as well). It’s essentially fan art that someone imported into the game on their own. We have had a similar request for a “Ghost Trooper” (white Death Trooper), but since it is not an official skin it cannot be made into a CRL. Probably not what you wanted to hear @Mr.Nova sorry. Right now, the only version that can be pursued is the one under construction from the ol skool BF. There was quite a nice model made by @kishdr that might be approve able. Im not sure what his plans for that model were. Or the Oota Goota (did I get it right?) kit if still in production. -
Star Wars Battlefront (2004): Phase 0 Dark Trooper CRL Discussion
RAIDER replied to Darth Emphatic's topic in Dark Troopers
just to verify then...the skin of the neck wont be visible if not worn correct? -
adjusting in final published wiki
-
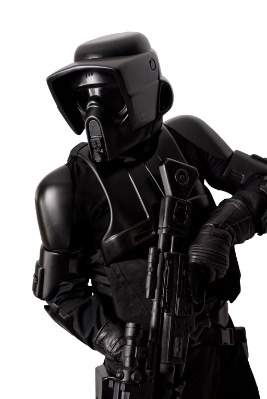
This will be the CRL reference if it helps...

-
Star Wars Battlefront (2004): Phase 0 Dark Trooper CRL Discussion
RAIDER replied to Darth Emphatic's topic in Dark Troopers
Its not seen right? Should it just be optional or will neck show without something? Based in timeline...TK would be more in line yes? -
Yea start a wip. We need a first somewhere and its ultimately for the benefit of entire community. Better for eyes to be on it to make sure its on track with correct details