RAIDER
-
Posts
3,343 -
Joined
-
Last visited
-
Days Won
407
Content Type
Profiles
Forums
Events
Everything posted by RAIDER
-

Star Wars Battlefront (2004): Phase 0 Dark Trooper CRL Discussion
RAIDER replied to Darth Emphatic's topic in Dark Troopers
Read my word of caution above tho in my edit. -
Star Wars Battlefront (2004): Phase 0 Dark Trooper CRL Discussion
RAIDER replied to Darth Emphatic's topic in Dark Troopers
@Mr.Nova I would add though that you are correct in that this rendition is close. If your intent was to build a 3D model off of it, I assume you could alter that model to match the correct details of the original and so it might make a suitable base. You would just need to be certain that the final product meets those CRL requirements (i.e. remove the knee armor) and cross-check every little detail so that anything that was added that does not match the original reference is removed...and vice versa...any little detail missing is added where it should be. Edit: Adding this just to clarify...with any 3D model (or hand sculpted mold), there is a fine line between accuracy and interpretation. Just a word of caution to be very careful about over-interpreting to what may "look better" in the process so that it doesn't cross over into something that cannot be approved. -
Star Wars Battlefront (2004): Phase 0 Dark Trooper CRL Discussion
RAIDER replied to Darth Emphatic's topic in Dark Troopers
Fan art cannot be used as a reference. What kishdr did is build his 3D model based on the details seen from the actual gameplay...and yes the graphics were a much lower quality and so liberties are taken most certainly (that's done with alot of older video game characters)...but kishdr's model as an example could never be the reference from which we write the text and requirements. Only the original (official) art provides those details and we match them as best as possible to real-world costume applications. To further the explanation...there are countless fan-made Stormtrooper renditions out there. Many very true to the original source. But if we were to write a CRL today, none of them would qualify as a "reference" because they aren't the original...just copies of that. TL/DR: All references must come from official sources from which CRL text is based. Fan art does not qualify as a reference no matter how close to the original source it may be. -
Star Wars Battlefront (2004): Phase 0 Dark Trooper CRL Discussion
RAIDER replied to Darth Emphatic's topic in Dark Troopers
Correct. Unfortunately this is not an actual official game skin (I have both BF1 and 2 by EA as well). It’s essentially fan art that someone imported into the game on their own. We have had a similar request for a “Ghost Trooper” (white Death Trooper), but since it is not an official skin it cannot be made into a CRL. Probably not what you wanted to hear @Mr.Nova sorry. Right now, the only version that can be pursued is the one under construction from the ol skool BF. There was quite a nice model made by @kishdr that might be approve able. Im not sure what his plans for that model were. Or the Oota Goota (did I get it right?) kit if still in production. -
Star Wars Battlefront (2004): Phase 0 Dark Trooper CRL Discussion
RAIDER replied to Darth Emphatic's topic in Dark Troopers
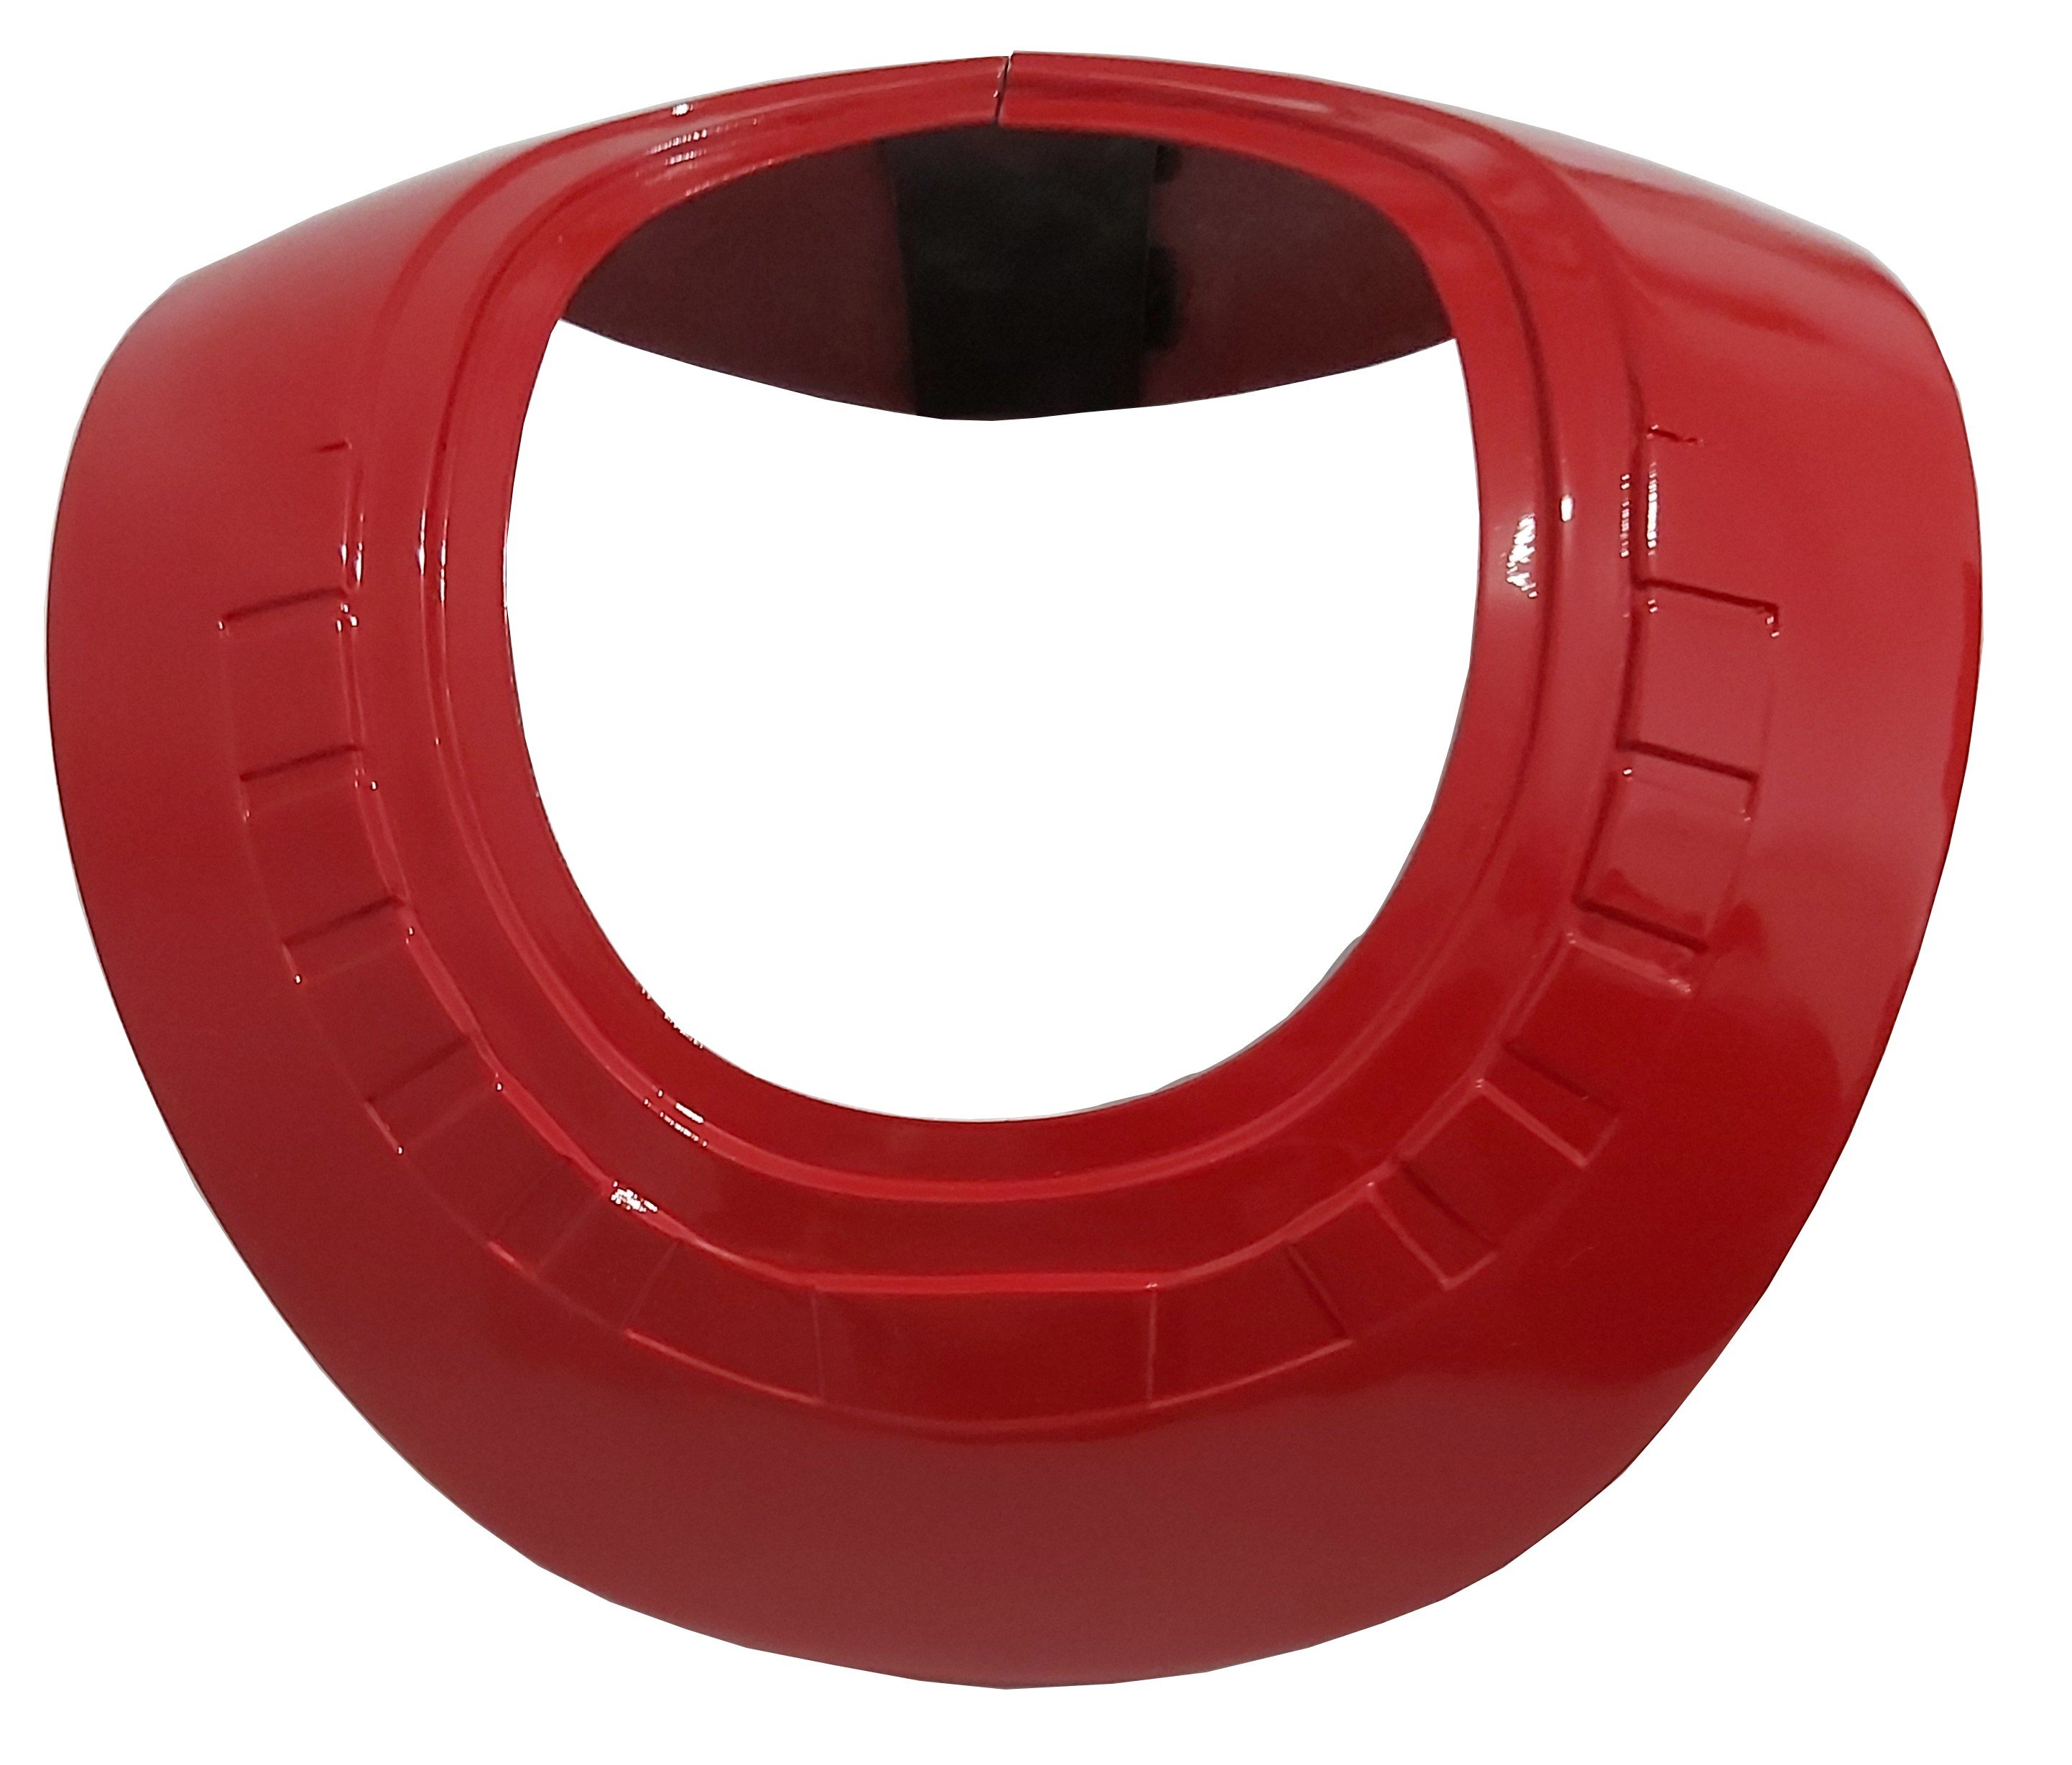
just to verify then...the skin of the neck wont be visible if not worn correct? -
adjusting in final published wiki
-
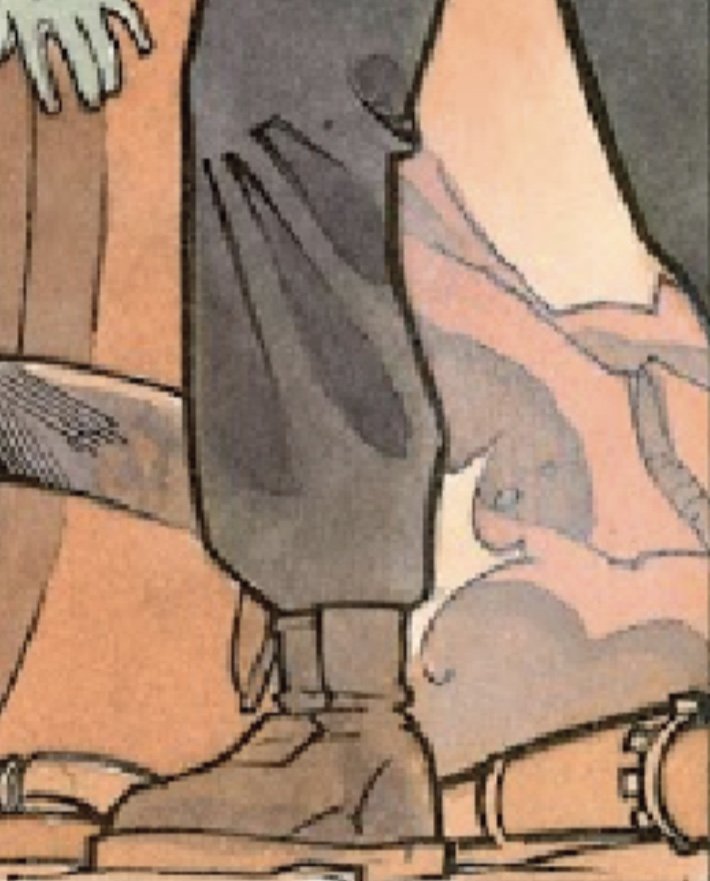
This will be the CRL reference if it helps...

-
Star Wars Battlefront (2004): Phase 0 Dark Trooper CRL Discussion
RAIDER replied to Darth Emphatic's topic in Dark Troopers
Its not seen right? Should it just be optional or will neck show without something? Based in timeline...TK would be more in line yes? -
Yea start a wip. We need a first somewhere and its ultimately for the benefit of entire community. Better for eyes to be on it to make sure its on track with correct details
-
Star Wars Battlefront (2004): Phase 0 Dark Trooper CRL Discussion
RAIDER replied to Darth Emphatic's topic in Dark Troopers
just the color bit? yea that works -
Lol. Currently no one has and until someone steps up and works with us towards completing a build and text, no CRL will exist. The most I believe we have seen is a helmet build by @Supreme_Leader_66. @IcyTrooper has written a first draft but it will need refining.
-
Excellent @JoeShoe Thanks I believe @nanotek is going to move the final 2 bits (gaskets and forearms) over here and do some final tidying as we move text over to the CRL with pictures. Should be live soon troopers! Thanks for your research, input, and patience!
-
Adjusted shins. A little note here...where it said "as outlined in the diagram" I replaced that with "refer to gallery diagram" which we can then direct link to the gallery image. Extra work in the coding, but it can be done and would probably be helpful. Additionally, I created the CRL wiki tonight and started exporting text from here to there. Now on to final review of the boots/spats. We will bypass the blasters, there's nothing to adjust there. Following these parts, we just need to do final review of gaskets and forearms. Spats Finished in a high gloss deep red that matches the colors of the entire costume The spats wrap around the lower ankle The spats are enclosed on the outside of the ankle with a clip greeblie that overlaps from the back side over the outside There is a flat section at the back of the spat that is equal in width to the rear flat section of the shin Are fitted over the top of the shin (should this say bottom?) Are fitted over the top of the boot armor OPTIONAL Level two certification (if applicable): Clip greeblie is the correct spat greeblie (refer to gallery diagram). There is a visible seam on the inside of the ankle Boots & boot armor Boots: FO style boot finished in a gloss or semi-gloss red that closely resembles the armor Sole is black rubber with no visible heel No visible buckles or laces Boot Armor finished in a high gloss deep red that matches the colors of the entire costume Fixed to the top of the boot and sits under the spats divided into 3 sections that the top front section has a number recessed lines running vertically as shown the outer section has diagonal lines running parallel to the edge of the armor as shown the inner panel is smooth/flat and has no recessed lines the front panel is of equal width to and lines up with the front section of the shin OPTIONAL Level two certification (if applicable): The boot color and gloss shall match the armor Top front section of the armor has approx 10 recessed lines Outer section of the armor has at least 14 visible recessed lines Rectangular section on the toe and the heel of the boot that is knurled Stitching at the top of the sole runs the entire diameter of the boot There is a seam down both sides of the front that swoops out to the side of the foot There is a vertical zipper on the inside that spans the height of the boot.
-
Adjustments made...shins next... Shins Finished in a high gloss deep red that matches the colors of the entire costume Each shin can be divided into 8 panels alternating between recessed lines and flat, comprising of the following: The front panel of each shin is squared at the top, flat and is the same width as the top panel of the boot armor and is squared at the top The front panel has a recessed channel that starts at the top of the panel closest to the inside, extends outward 1/4 way down then back towards the ankle meeting at the top of the spat forming a scalene triangle The front inside panel overlaps the inside panel The inside panel is slightly curved along the top A clip greeblie is present on outside panel near the top of the shin The front 3 panels have straight, angular edges at the top, with the recessed lines following the top edges of the two outer panels to base of the shin The back 3 panels, the middle one has a straight line at the top, with the two outer panels curving slightly to the inside and outside panels The outer panels have vertical seams that separate the recessed lines from the flat section Each shin is roughly the mirror opposite of each other with the following differences on the outer panels Right shin has a rectangular section that is about 2/3 up from the bottom The right shin has two elongated trapezoidal boxes that are chamfered with one flat section between them evenly spaced in 3rds Left Shin has a rectangular box appearing to have a lid, directly below the clip greeblie The base of the shins is covered by a spat OPTIONAL Level two certification (if applicable): Clip greeblie is the correct shin greeblie outlined in the document Rectangular box on left shin has the following details Has the appearance of two pieces, base and lid. The lid is a bout 0.15" (4mm) deep with a 0.04" (1mm) recess between lid and base A small oblong shaped recess on the top left base part of the box Front Inside Panel has 48 recessed lines Front Outer Panel has 69 recessed lines Back Inside Panel has 36-38 recessed lines Back outer panel has 50-52 recessed lines
-
red tank topper stripe is not permitted on shadow scout...thats a standard biker scout thing
-
OK...adjustments made. "Chocolate bars" kept for now. Doing the next pieces together since they are short... Cod Finished in a high gloss deep red that matches the colors of the entire costume Has the appearance of being connected to the abdomen belt assembly Sits directly under the belt Has the appearance of two separate pieces joined together upper section is a trapezoid shape roughly 3-4" (75-100mm) in length and terminates about 1.5" (38mm) into the lower section lower section is curved and extends down to cover the wearer's groin OPTIONAL Level two certification (if applicable): There is no connecting material between the cod and the posterior Thermal Detonator & Mounting Plate The thermal detonator is divided into two distinct parts, the thermal detonator itself and the armor it is attached to; the mounting plate Thermal Detonator The outer cylinder is finished in a high gloss deep red that matches the colors of the entire costume The internal cylinder is matte or satin black and ribbed The right hand end cap has a chamfered recess that extend inwards to a small circular recess on the inside of the cap The left hand end cap extends from the detonator assembly and there is a small channel that runs the circumference There are no visible seams Is postioned just above the belt Is mounted on the lower section of the mounting plate Thermal detonator mounting plate Finished in a high gloss deep red that matches the colors of the entire costume Sits under the cuirass The belt overlaps the lower section of the plate The mounting plate is a long trapezoidal shape, divided into 4 sections by recessed lines The top and lower trapezoidal shapes are slightly raised outward and have a smooth surface the bottom trapezoid is separated by a channel that runs around the perimeter The recessed lines run parallel to the edges of the top trapezoid section The recessed lines start from the outer edge and terminate in the perimiter channel of the bottom trapezoid OPTIONAL Level two certification (if applicable): The left and right panels of the thermal detonator mounting plate have 36 recessed lines each The satin black, ribbed, internal cylinder on the Thermal Detonator has 36 ribs (suggesting removing satin as it is mentioned in L1). Posterior Finished in a high gloss deep red that matches the colors of the entire costume Sits directly under the belt and has the appearance of being attached to the belt assembly Is trapezoidal in shape yet curved to a posterior shape Has a recessed trapezoidal section directly below the belt, within this section are further recessed lines running horizontally OPTIONAL Level two certification (if applicable): Recessed trapezoid section has approximately 14 recessed lines
-
Ok...back from a couple days out of town visiting family...edits made to belt. Posting thighs... Thighs Finished in a high gloss deep red that matches the colors of the entire costume No holster is present on either thigh Each thigh is comprised of 7 sections, front, inner-front, inner-rear, rear, outer-rear, outer, outer-front Front and rear sections are both raised slightly in appearance and smooth flat surfaces. A diagonal channel runs from the top outer edge of the section panel, to about 1/2 way down towards the inner thigh Each Front inner thigh section has a number of evenly spaced, diagonally recessed lines, starting from top of the section sloping downward from the wearers cod to the front of the thigh terminating 3/4 down the thigh. Left thigh recessed lines terminate approximately at the top of the sniper plate Right thigh recessed lines terminate approximately half-way between the "chocolate bars" (thought we renamed this?) Angle of the recesses is roughly 33 degrees from the font section edge Each Rear outer panel has a number of evenly spaced, diagonal recessed lines that slope downwards from outer to inner thigh Each outer section forms a visible vertical seam towards the wearers front, is smooth and has a clip greeblie near the top Each thigh has the appearance of an overlap on the inner thigh where the inner-front section overlaps the inner-rear section Front bottom edges of the thigh are angular in nature and dip towards the wearers knee from the sides Right thigh There are two vertical rectangular boxes above the knee that have chamfered edges that look like "chocolate bars" Each box sits in a slightly larger recessed cavity towards the top leaving a small recessed section exposed at the bottom Recessed channel that traverses the front 3 panels roughly 1" (25-30mm) from the bottom Left Thigh Large hexagonal 'sniper plate' just above the knee which has two raised rectangular 'boxes' in the centre of the upper left and upper right faces of the sniper plate two dark grey or matt black, rectangular shaped recesses above the sniper plate, are angled slightly outwards from the knee OPTIONAL Level two certification (if applicable): Inner thigh section has approximately 45 evenly spaced recessed lines Outer-rear section has approximately 34 evenly spaced recessed lines Greeblie clip is the correct thigh greeblie clip (see diagram) and appears to be slotted into a recess (i.e it doesn't sit on top of the armour) The inner-front section overlaps the inner-rear section forming an overlapping closure
-
pending review Sithtrooper Forearms - Draft CRL Development Discussion
RAIDER replied to nanotek's topic in CRL Discussion Archive
lets get eyes on this last piece @gmrhodes13 @rickyboyblue @JoeShoe -
k...all clear to move for me.
-
Adjustments made. I also realized that we typically do decimals for US measures, so I've gone back and adjusted those (please go back and check me from helmet down). Trying to get this completed and published by month's end, so on to the next...lots of measurements here so please double check my conversions. Belt and Boxes All parts finished in a high gloss deep red that matches the color of the entire costume The Belt sits flush to the bottom of the belt-ledge on the abdomen Is approximately 2" (50mm) wide and 0.3" (8-10mm) thick. Has no visible openings or fasteners Has the appearance of being flexible 6 belt boxes are attached securely to the belt Attached to the front are 2 evenly sized rectangular, horizontal boxes with the appearance of lids, matching the width of the belt. The outer edges of the box are filleted. Front-Right drop box is rectangular, mounted just above the top of the belt and drops down vertically, it is a single box in appearance that has no lid or visible seams. The edges of the box are sharp. The box is mounted to the belt with a piece of material that is approximately 0.3" (8-10mm) thick like a riser. (Gives the appearance of hovering slightly outward from the belt) Front-Left drop box is rectangular, mounted just above the belt and drops vertically down and has the appearance of a lid with a chamfered horizontal edge about 3/4 down from the top. The edges of the box are sharp. The box is mounted to the belt with a piece of material that is approximately 0.3" (8-10mm) thick like a riser. (Gives the appearance of hovering slightly outward from the belt) 2 drop boxes with diagonal recess, towards the side rear, near kidneys on each side, mounted slightly above the belt, has a pronounced appearance of a lid and is deeper in volume than the other boxes. The box is mounted to the belt with a piece of material that is approximately 3/8" (8-10mm) thick like a riser. (Gives the appearance of hovering slightly outward from the belt) There is a diagonal channel on the lid that starts near the top front of the box and extends downwards to the rear. The channel extends around to the sides of the lid. The outermost face of the lid has slightly filleted edges, the rest are sharp. OPTIONAL Level two certification (if applicable): Belt is made of flexible PU or rubber type material Belt ends must connect behind the front boxes Sits under the belt ledge of the abdomen (same requirement in Level 1?) Belt is approximately 50mm wide and between 8 to 10mm thick (same requirement in L1...or should this be removed from L1 and kept here at lL2) The dimensions of the two front boxes are as follows: Approximately 4" (100mm) wide by 2" (50mm) high Outer facing part is about 0.3" (8mm) thick, inner part is curved to match the abdomen The boxes form a slight inverted 'V' shape when viewed by wearer The dimension of the front right box Box is flat with sharp edges and is about 0.6" (14-15mm) thick Is about 3.15" (80mm) wide Is about 3.75" (95mm) high The dimensions of the front-left Box Inner box part attached to belt is 0.4" (10mm) thick Outer lid part is 0.3" (8mm) thicket the top and 0.15" (4mm) thick at bottom below chamfered edge Total width of the box is about 3.15" (80mm) wide Total height of the box is about 4" (100mm) The lid has a 45 degree chamfered edge that turns inwards about 2.5" (64mm) down from the top or about 22mm from the bottom The dimensions of the side/kidney boxes The total box width is about 3" (75mm) wide The total box height is about 3.75" (95mm) The box lid has a diagonal channel that is about a 0.15" (4mm) wide, starts 1" (25mm) from top-front to 1" (25mm) up from bottom-back and extends around the sides of the lid 0.25" (6mm) wide channel which is about 0.3" (8mm) in from front, running around the perimeter of the box forming the lid Total depth of the box is about 1" (25mm)
-
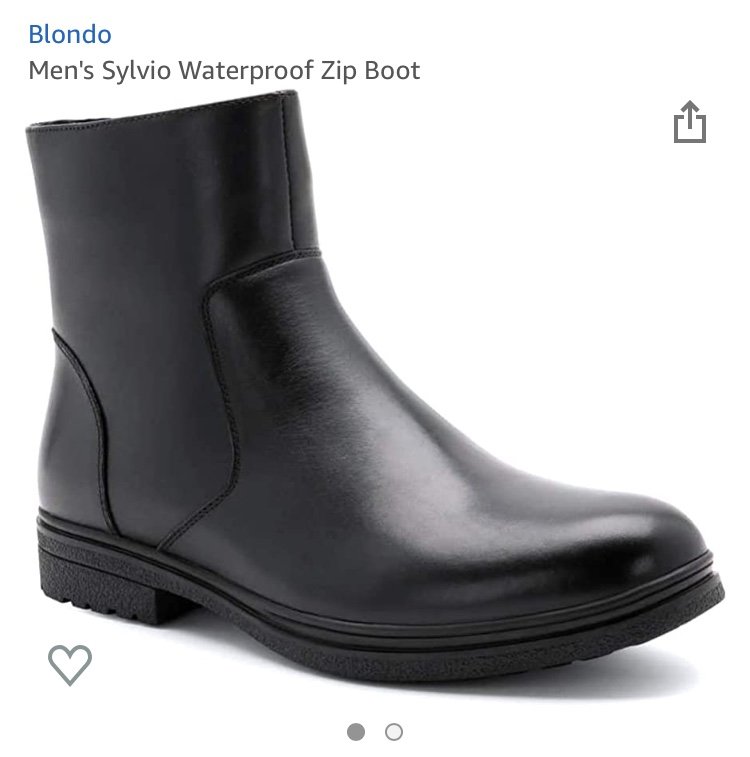
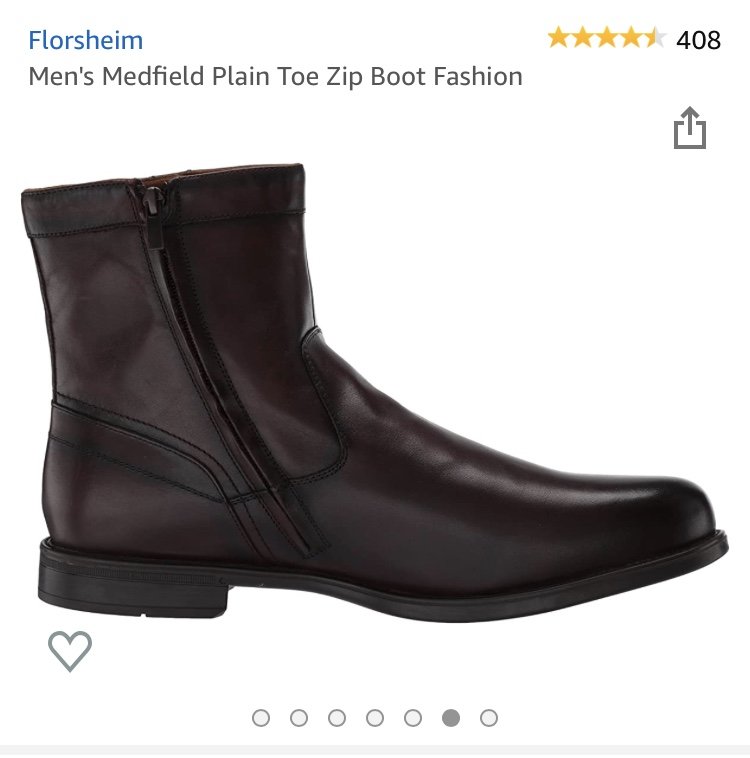
I had a feeling what I saw on my own search was different. This sole is fine...but the canvas becomes an issue. We discussed this regarding the TK Chelsea elastic. And Im sorry that wont be negotiable. It will need to be leather or leather like all the way around. It is too noticeable. I was going to add this to my previous post to the sole question...currently commuters arent listed in the CRL. When a GML does a review they will see “commuter” in the text (when added) and then look at the CRL pics. So not all commuters will pass simply by name. Not all commuters will clear based on a variety of factors. A GML will examine text and model pics and decide...or if still unsure reach out to the detachment advisors. And I would disagree that the sole is negotiable as well though this one you posted seems fine. Apply this line of thought to a TK, DT, etc...it wont work. Again, noticeability is the key and large sole cuts are too noticeable. But again...the sole cuts on the boot above are minor and should be fine...what I saw was much larger.
-
You will need to post a pic here of the exact model you are eyeing.
-
Here are 2 more options that may work as long as the height is within range that appear to have a tighter ankle (simple google search for commuter boots). They have a higher cost but that is a reality for our club at times. Im sure there are more out there. And if none work to your liking you may have to look at custom/commission. This particular costume is fairly entry level with nearly all parts being very friendly to a budget unlike most costumes where everything consists of costly armor parts, must be tailored/custom fit, etc.
-
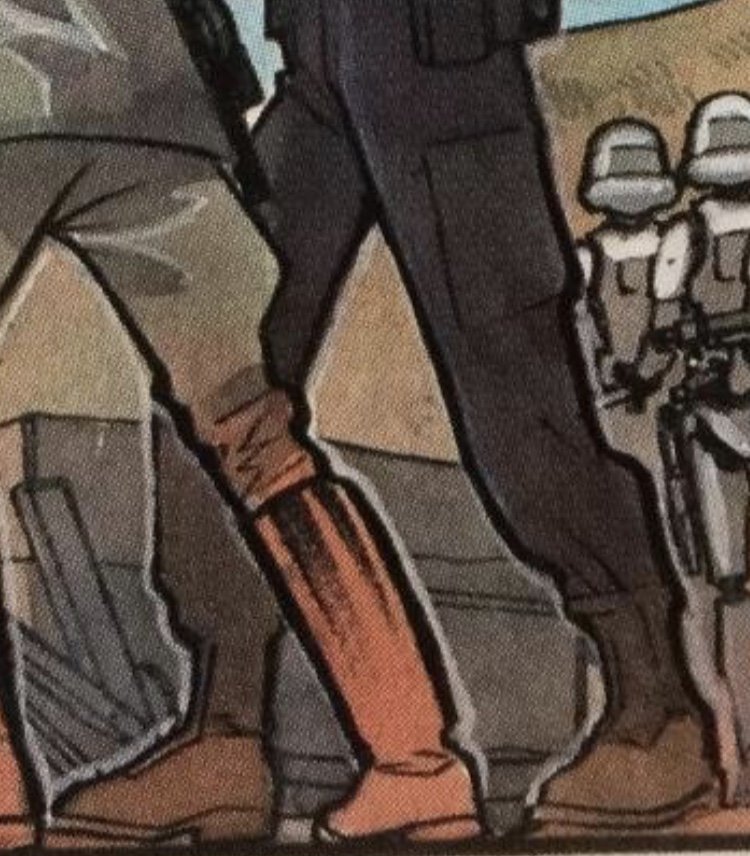
Not a PITA lol...and I love gyros. So yea feel free to keep discussion going. Its not a problem at all. A couple notes to keep in mind so you understand my baseline: 1) CRLs are ever evolving. Discussion and critique is allowed...even encouraged. 2) My role (among many others) as DL is to make sure (particularly with newer CRLs...older ones are a much wider discussion for a PM maybe if you are interested lol) the standards coincide with the references...and the DCA team typically facilitates that. 3) References are priority over anything. Thats a precedent here and in any detachment Legion-wide...especially now as the process has evolved. Availability is secondary. So yea you arent a PITA by any stretch. You will, as all new proposals will, have the uphill battle of making the case for acceptance of a proposal. Certain commuters have been the best off-the-shelf representation. They seem to fit more than 2 of the 6 criteria you listed (assuming those criteria are accurate). As @IcyTrooper mentioned, sometimes its a matter of what is less noticeable. So to reiterate visible laces are def out of the question...height is an obvious factor (cant hide height thus eliminating the previously accepted Jackboots). The ankle wrap and stitching is an area where I think more leniency could be allowed. Hence, the commuter as the current push...because not all have a super loose ankle as the one you purchased. However... I think you could make a case for reference evidence for a discreet lace cover. Regarding the boots then, we only have 2 really good shots for the Engineer boots. One is at a distance which shows no texture...so this shot is really the best. Here I do see drawn lines at the tongue area of both boots. Ankle reinforcement is less certain. If we looked to the other army troopers we can borrow from a couple other shots... The first shot shows the rear...nothing there really except maybe a heel stitch...no ankle reinforcement really seen. Second shot again clearly shows no laces but drawn lines could indicate (or allow for) lace covers. Notice though very discreet and minimal. Cant be bulky or flappy (tight to the boot). Ankle reinforcement appears lacking. So after looking at those, Id be open to seeing a lace cover. The 2 Rothco boots you mentioned though I would say would be unusable based on the toe cap and the sole...both obvious and noticeable divergences from the references here. So back to finding an alternative base boot. To wrap up, anyone already approved regardless of any change is always grandfathered. We dont need to worry about that. Availability should be considered BUT sometimes it does just come down to custom making something. Im a Scout first...our boots cannot be bought off-shelf...a base boot has to be purchased and then custom work done to get an approvable (or more accurate in the case of our army costumes) look. So Im ok personally with you exploring a cover that can meet some parameters (minimal, tight to boot)...but different boots that meet the larger criteria (height, sole, decorative stitching etc).
-
Gotcha. Do you have a helmet model for the realistic Force Arena version ready by chance? P.S. Don't be embarrassed...glad to see progress. It would be awesome to be able to help you wrap up the CRL for this before this term ends.